Imagine a chilly evening that calls for something warm and cozy. You enter the kitchen, and the smell of simmering broth greets you. It reminds you of family gatherings filled with laughter and delicious meals.
It’s the perfect moment for a tasty tortellini soup with meat. This soup is more than a meal; it’s a warm hug that brings back happy memories. With tender tortellini, savory meat, and fresh veggies, it makes your home feel welcoming and your heart full.
Table of Contents
Introduction to Tortellini Soup
Tortellini soup is a delightful dish that combines rich flavors and comforting textures. It comes from Italy and features small, ring-shaped pasta filled with meat or cheese. The pasta swims in a savory broth, making each spoonful warm and inviting.
This soup is a favorite for meals with family and friends. It wraps you in warmth, making it a cozy choice for any time.
What is Tortellini Soup?
This dish is made with tortellini, tiny pasta pockets filled with ingredients like ground meat or cheese. The filling adds a depth of flavor. When simmered in a flavorful broth, it becomes a hearty and rich meal.
This combination of pasta and broth makes it a great meal option all year round.
Why Choose Tortellini Soup?
Homemade tortellini soup is a great meal choice for many reasons. You can customize it with your favorite ingredients. Adding fresh vegetables, spices, and herbs can enhance the taste.
It’s perfect for cold evenings or when you need a nourishing meal. Using fresh ingredients makes it healthy and delicious.
Ingredients for the Best Tortellini Soup with Meat
Making the perfect meaty tortellini soup means picking the right ingredients. It’s all about rich flavors and satisfying tastes. You’ll need some key items and a few extra add-ins to make it even better.
Essential Ingredients
Tortellini: Pick meat-filled or cheese tortellini for extra taste. Traditional ones make your soup more authentic.
Broth: Use chicken or vegetable broth as the base. It adds richness and depth to your soup.
Vegetables: Add diced carrots, celery, and onions. They bring nutrients and a great flavor.
Spices: Spice up your soup with garlic, bay leaves, salt, and pepper. These spices make it deeply flavorful.
Optional Add-Ins for Extra Flavor
Fresh herbs: Basil, thyme, or parsley add a bright touch to your soup.
Garlic: Minced garlic boosts the flavor and aroma of your soup.
Spinach: Adding fresh or frozen spinach brings color and extra nutrients.
Diced tomatoes: Diced tomatoes add a sweet touch and balance the broth’s richness.
Step-by-Step Guide to Homemade Tortellini Soup
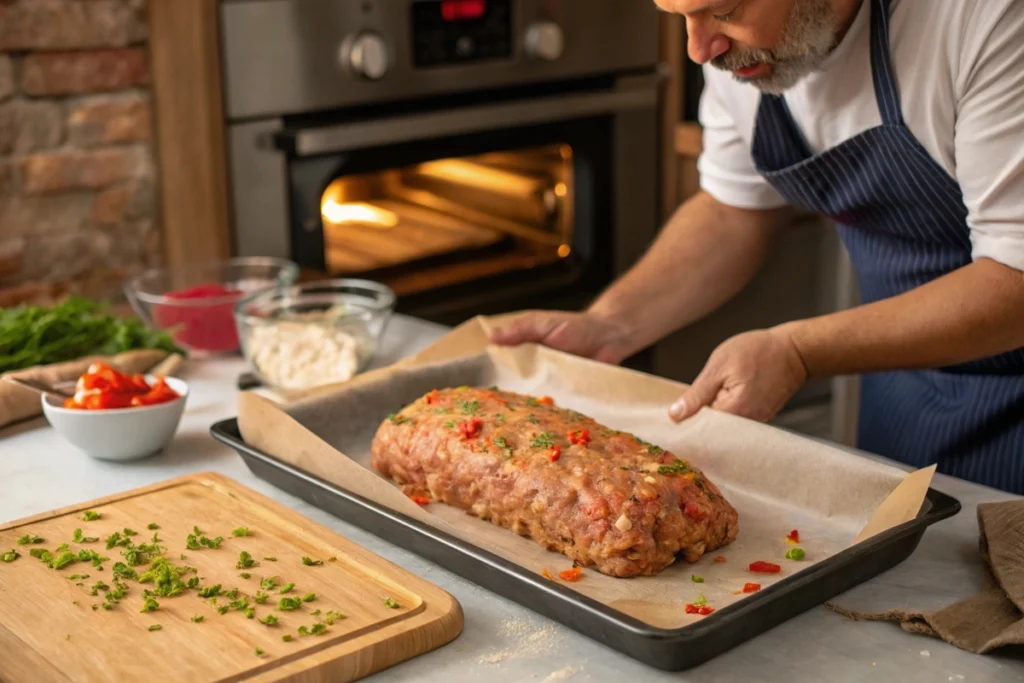
Making homemade tortellini soup is fun and easy. This guide will help you make a delicious soup. Start by preparing the meat, then cook the vegetables. Blend everything for a comforting bowl of soup.
Preparing the Meat
Choose your favorite meat ground beef, sausage, or chicken. Cook it in a large pot over medium heat until it’s brown. Season with salt, pepper, and spices to add flavor.
Make sure the meat is well-cooked and crumbled. This helps the flavor spread evenly in your soup.
Cooking the Vegetables
After cooking the meat, sauté the vegetables. Use onions, garlic, carrots, and celery. Heat olive oil in the pot and add the onions and garlic first.
Sauté until they’re soft and smell good. Then, add the carrots and celery. Let them cook until they start to soften. This step boosts the flavor of your soup.
Bringing it All Together
Combine the cooked meat and vegetables. Add your broth—chicken or vegetable broth works great. Then, add the tortellini.
Let it simmer for 5 to 7 minutes until the tortellini is tender. Finish with fresh herbs for extra flavor. Your homemade tortellini soup is now ready to warm your heart and home.
for more inspiration Spice Up Your Dinner with This Easy Dish: Salsa Chicken Tacos
Tips for Making Hearty Tortellini Soup
Making a comforting tortellini soup is more than just a recipe. It’s about adjusting the soup’s thickness and storing it right. These tips will help your tortellini soup with meat turn out great every time.
Adjusting the Thickness
Do you like your soup brothier or thicker? If it’s too thick, add more broth or water. For a thicker soup, let it simmer uncovered to reduce liquid. The right texture makes your soup even better.
Storing and Reheating Your Soup
Storing your tortellini soup is easy. Cool it down first, then put it in an airtight container. This keeps it fresh for days. When reheating, use low heat to avoid mushy pasta. These steps will make your soup just as good the next time.
Conclusion
Now that you’ve explored the delightful world of tortellini soup with meat, it’s time to embrace its simplicity and heartiness. This easy tortellini soup with meat offers not just a satisfying meal but also an inviting experience perfect for sharing with loved ones. Whether you stick to the basics or venture into creative variations, this dish is customizable to suit your preferences.
Feel free to substitute ingredients or experiment with new flavors. Adding your favorite vegetables or spices can elevate your tortellini soup with meat into a unique creation each time you prepare it. The warm, comforting bowl of soup you serve can foster togetherness among family and friends, making every meal a little more special.
So gather your ingredients, and get cooking. Your journey into the world of tortellini soup with meat awaits, promising delightful aromas and delicious tastes that will leave everyone wanting more.
FAQ
What makes tortellini soup with meat so special?
Tortellini soup with meat is a cozy dish. It has tender pasta filled with meat in a tasty broth. It’s a warm meal perfect for cold days. The mix of flavors and textures makes it a favorite among families.
Can I use store-bought tortellini for my homemade soup?
Yes, you can! Using store-bought tortellini saves time. It still makes your tortellini soup delicious and hearty.
How can I customize my tortellini soup recipe?
You can make your tortellini soup your own. Add veggies like spinach, kale, or diced tomatoes. Try different spices and herbs. You can also change the meat type to make it your own.
What type of broth should I use for the best tortellini soup with meat?
Choose chicken or vegetable broth for flavor. Homemade broth is best, but store-bought works well too. It makes your soup easy to make.
How do I store leftover tortellini soup?
Keep leftover soup in an airtight container in the fridge for 3-4 days. If it gets too thick, add a bit of broth or water to thin it out.
Can I freeze tortellini soup for later use?
Yes, you can freeze it! But freeze it without the tortellini. After thawing, add fresh tortellini for a tasty soup.
Is tortellini soup a healthy meal option?
Yes, it can be! Use lots of veggies and lean meat. Homemade broth and fresh ingredients make it nutritious and comforting.
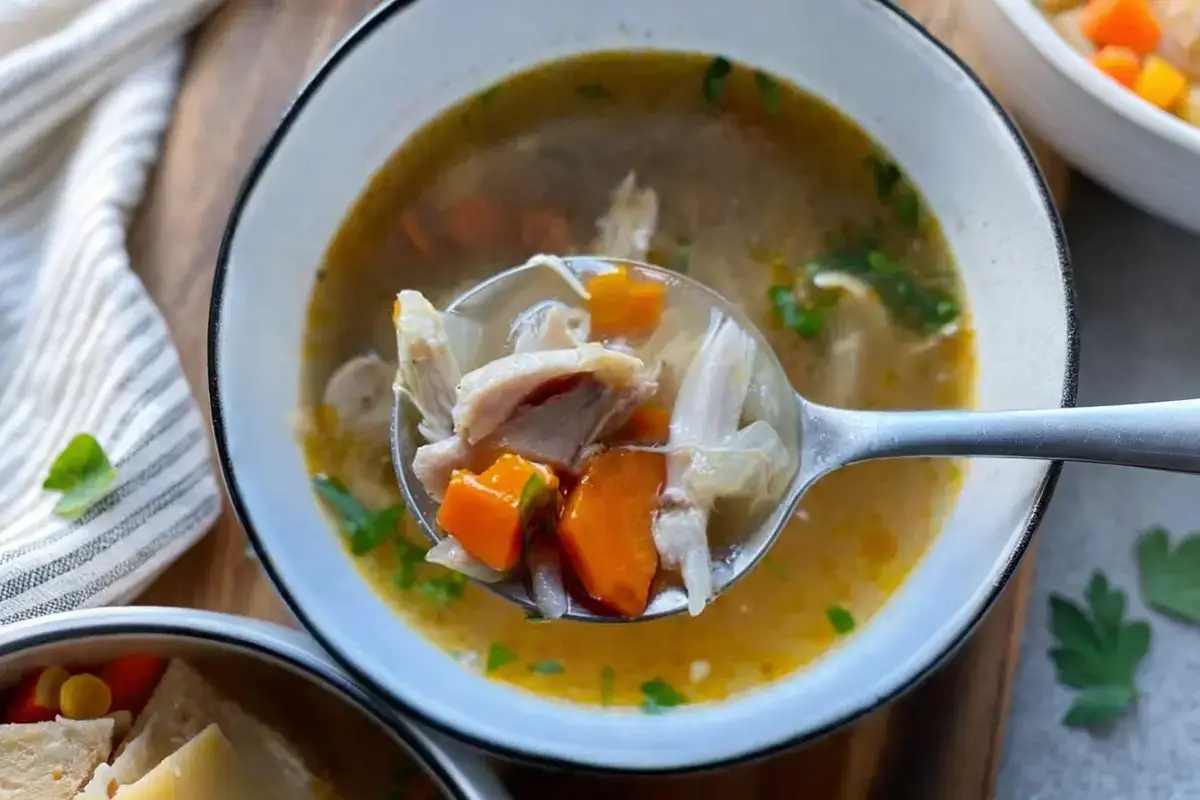
This hearty and flavorful tortellini soup with meat is the ultimate comfort food. With tender meat-filled tortellini, a rich broth, and a medley of vegetables, it’s perfect for warming up on a chilly evening. Easy to prepare and bursting with flavor, this soup is a family favorite!
Ingredients
Scale
1 lb ground beef, Italian sausage, or shredded chicken
1 tablespoon olive oil
1 small onion, diced
2 cloves garlic, minced
2 carrots, diced
2 celery stalks, diced
6 cups chicken or vegetable broth
1 (14.5 oz) can diced tomatoes (optional)
1 teaspoon salt
½ teaspoon black pepper
1 teaspoon Italian seasoning (or a mix of basil, thyme, and oregano)
1 bay leaf
1 package (9 oz) refrigerated or frozen meat or cheese tortellini
2 cups fresh spinach (optional)
¼ cup fresh parsley or basil, chopped (for garnish)
Grated Parmesan cheese (for serving)
Instructions
Cook the Meat: In a large pot, heat olive oil over medium heat. Add the ground beef, sausage, or shredded chicken. Cook until browned, breaking it up with a spoon. Drain excess fat if needed.
Sauté the Vegetables: Add diced onion and minced garlic to the pot. Sauté for 2-3 minutes until fragrant. Stir in carrots and celery, cooking for another 3-4 minutes until they start to soften.
Add Broth and Seasonings: Pour in the broth and diced tomatoes (if using). Stir in salt, pepper, Italian seasoning, and the bay leaf. Bring to a gentle simmer.
Simmer the Soup: Let the soup simmer for 10-15 minutes, allowing the flavors to develop and the vegetables to become tender.
Cook the Tortellini: Add the tortellini to the pot and cook according to package instructions (usually 5-7 minutes) until they are tender.
Add Greens (Optional): Stir in fresh spinach and let it wilt for about 1-2 minutes.
Finish and Serve: Remove the bay leaf. Taste and adjust seasoning if needed. Serve hot, garnished with fresh parsley or basil and a sprinkle of Parmesan cheese.
have you ever thought about how you could make a weeknight dinner taste like a restaurant meal, but in just 30 minutes? Well, let me tell you, black pepper chicken is the way to go! It’ll give you all these amazing flavors and make you feel totally satisfied, and the best part is, it doesn’t take forever to cook.
this black pepper chicken recipe is absolutely perfect! It’s got all these bold spices, tender meat, and a super delicious sauce. And the best part? It’s ready in no time, faster than ordering takeout. So, whether you’re super busy or just love to cook, this recipe is great for everyone!
Introduction
Black pepper chicken is a vibrant mix of sichuan cuisine. It combines rich traditions with bold, peppery flavors. This dish comes from the detailed world of chinese cooking, showing the deep flavors of authentic Asian cuisine.
Origins in Chinese Cuisine
The roots of black pepper chicken are in southwestern China, mainly Sichuan province. Chefs there are known for dishes that mix intense spiciness with complex flavors. Sichuan cuisine is known for turning simple ingredients into amazing dishes.
Originated in southwestern China
Reflects traditional cooking techniques
Emphasizes bold, layered flavors
Why This Recipe Works
Black-pepper chicken works because it balances tender meat with a strong sauce. The secret is in how peppery flavors mix with chicken. This creates a dish that’s both fulfilling and thrilling to eat.
Health Benefits of Black Pepper
Black pepper is not just tasty; it’s also good for you. It’s full of antioxidants and may help fight inflammation. Its special compounds can also help with digestion and boost nutrition.
Rich in antioxidants
Supports digestive health
Potential anti-inflammatory effects
Essential Ingredients and Kitchen Tools
Making tasty chicken recipes begins with picking the right ingredients and tools. Black pepper chicken needs a mix of aromatic spices and fresh parts. This turns a simple meal into a work of art.
To make this dish, you’ll need some key ingredients. They will make your chicken recipes taste like they’re from a restaurant.
Key Ingredients
Boneless chicken breasts or thighs
Freshly ground black pepper
Soy sauce
Garlic
Ginger
Vegetable oil
Aromatic Spices for Enhanced Flavor
White pepper for depth
Red chili flakes
Sesame oil
Green onions
Essential Kitchen Tools
Tool
Purpose
Large skillet
Primary cooking surface
Sharp chef’s knife
Precise chicken cutting
Cutting board
Safe ingredient preparation
Measuring spoons
Accurate spice measurements
When making black pepper chicken, focus on quality ingredients and the right tools. These spices and ingredients will help you create a meal full of flavor.
Mastering the Perfect Black Pepper Sauce
Making a great black pepper sauce is key to tasty spicy chicken dishes. It turns a simple chicken recipe into a meal that wows your taste buds. It makes your dinner table exciting.
The secret to a fantastic black pepper sauce is knowing its basic parts. It’s about mixing flavors in the right way.
Sauce Base Components
Fresh cracked black pepper
Soy sauce
Chicken stock
Cornstarch
Garlic and ginger
Balancing Flavors
Getting the flavors just right is crucial. Spicy chicken dishes need a balance of heat, salt, and umami. It’s all about the mix.
“The secret is not just in the ingredients, but in how they interact with each other.” – Professional Chef
Consistency Tips
The sauce’s thickness is important. Use cornstarch to thicken, but add it slowly to avoid lumps.
Consistency Goal
Cornstarch Amount
Cooking Technique
Light Sauce
1 tsp
Quick whisking
Medium Sauce
2 tsp
Steady stirring
Thick Sauce
3-4 tsp
Slow reduction
Try these methods to make a sauce that’s truly part of the asian fusion cuisine. It will take your black pepper chicken to the next level.
Step-by-Step Cooking Instructions
Making tasty stir-fry meals is easy. This Black-pepper chicken recipe is quick and simple. It will make your weeknight cooking better. Here’s how to cook it in easy steps.
Prepare the Chicken
Cut boneless chicken breasts into 1-inch cubes
Pat chicken pieces dry with paper towels
Season with salt and black pepper
Heat the Cooking Surface
Use a large wok or heavy-bottomed skillet
Set heat to medium-high
Add 2 tablespoons of vegetable oil
Stir-Fry Technique
Add chicken to hot pan
Cook for 3-4 minutes, stirring constantly
Ensure chicken is golden brown and cooked through
The secret to great stir-fry meals is high heat and constant stirring. These quick dinner ideas need your full focus for a few minutes. You’ll get a dish as good as a restaurant’s.
Cooking Stage
Time Required
Key Action
Chicken Preparation
5 minutes
Cutting and seasoning
Cooking
4-5 minutes
Stir-frying chicken
Sauce Addition
2 minutes
Coating chicken
With practice, you’ll get better at stir-frying. Every time you make this black pepper chicken, you’ll feel more confident in your cooking.
Tips for Creating Restaurant-Style Black Pepper Chicken
To turn your kitchen into a pro Chinese cooking space, you need precision and skill. Making chicken dishes as good as those in restaurants is an art. It mixes technique, ingredients, and passion. Here are some tips to make your black pepper chicken restaurant-quality.
This black pepper chicken is bringing the heat and the sweet, topped with fresh scallions and toasted sesame seeds.
Professional chefs know that making great Chinese food is more than just a recipe. It’s about mastering the techniques that enhance flavors and textures.
Selecting the Perfect Chicken
Choose boneless, skinless chicken thighs for maximum tenderness
Slice chicken against the grain for optimal texture
Pat chicken dry before cooking to ensure perfect browning
Mastering Heat Control
The secret to top-notch chicken recipes is precise heat control. Use a wok or heavy-bottom skillet with consistent high heat. This creates a crispy outside and a juicy inside.
Preheat your cooking surface until it’s smoking hot
Use high heat for quick, even cooking
Avoid overcrowding the pan to maintain temperature
Timing and Technique Mastery
Chinese cooking techniques need split-second timing. Stir-frying is an art that requires your full attention. Cook chicken in small batches, moving quickly and keeping ingredients in constant motion.
“Precision is the soul of Chinese cuisine” – Master Chef Wu
By following these professional tips, you’ll turn your black pepper chicken into a dish that wows family and friends.
Serving Suggestions and Pairings
To make your spicy chicken dishes stand out, think about what to serve with them. Black pepper chicken needs sides that match its strong taste. This will make your meal a true feast for the senses.
Rice Options:
Jasmine rice
Garlic fried rice
Coconut cilantro rice
Vegetable Accompaniments:
Stir-fried baby bok choy
Roasted sesame broccoli
Asian slaw with ginger dressing
Wine lovers, you’ll find that light white wines like Riesling or Gewürztraminer are perfect. They balance the spicy chicken’s bold taste. The wine’s sweetness helps soften the pepper’s heat, making for a delightful meal.
Pairing Category
Recommended Options
Flavor Profile
Starches
Steamed white rice
Neutral, absorbs sauce
Vegetables
Grilled asparagus
Fresh, slightly charred
Beverages
Lager beer
Crisp, refreshing
Pro tip: Try adding garnishes like fresh cilantro, green onions, or toasted sesame seeds. They add texture and make your dish look great.
Conclusion
Learning to make black pepper chicken is simpler than you might think. This stir-fry meal brings top-notch flavor to your kitchen with little effort. The tips and techniques in this guide will help you make a dish that wows everyone.
Black pepper chicken is more than a quick meal. It’s a journey of flavors that’s easy to start. It’s perfect for anyone looking for a tasty dinner or a cooking challenge. The secret is finding the right spice mix and mastering the cooking method.
FAQ
What makes black-pepper chicken a unique dish?
Black pepper chicken is a tasty stir-fry with a bold flavor. It’s quick to make and combines tender chicken with a rich sauce. This mix of spicy and savory flavors makes it a hit in Chinese and Asian fusion dishes.
How long does it take to prepare black pepper chicken?
This recipe is fast and easy, ready in about 30 minutes. It’s perfect for those who want a quick, flavorful dinner without spending hours in the kitchen.
Can I substitute chicken with another protein?
Yes, you can! You can use tofu, beef, shrimp, or turkey instead of chicken. Just remember to adjust the cooking time for each protein.
Is black pepper-chicken very spicy?
The spice level is up to you. You can add more or less black pepper or red pepper flakes to make it as spicy as you like.
What are the best side dishes to serve with black pepper chicken?
It goes well with steamed rice, vegetable fried rice, lo mein, or stir-fried veggies. For a lighter option, try it over cauliflower rice or with a fresh Asian salad.
Can I make black-pepper chicken ahead of time?
You can prep ingredients in advance, but it’s best to stir-fry just before serving. This way, you get the best texture and flavor.
What type of black pepper works best for this recipe?
Freshly ground black pepper is best for flavor. Use whole peppercorns and grind them just before cooking for the most intense aroma and taste.
Are there any health benefits to this dish?
Black pepper has health perks like better digestion and anti-inflammatory effects. It also helps your body absorb nutrients better. With lean chicken and veggies, this dish is a nutritious choice.
Get ready for a flavor explosion that’ll make takeout jealous! This crispy, saucy, perfectly peppery chicken is about to rock your world in just 30 minutes. Trust me, your taste buds will thank you
Ingredients
Scale
For the Chicken:
1.5 lbs boneless, skinless chicken thighs, cut into 1-inch cubes
2 tablespoons vegetable oil
2 tablespoons freshly ground black pepper (Don’t skimp here, folks!)
1 teaspoon salt
For the Sauce (this is where the magic happens!):
4 cloves garlic, minced (or more, I won’t judge!)
1 tablespoon fresh ginger, grated
3 tablespoons soy sauce
1 tablespoon cornstarch
1/2 cup chicken stock
1 teaspoon sesame oil
1/2 teaspoon white pepper
For Garnish:
4 green onions, sliced diagonally (fancy, right?)
2 tablespoons toasted sesame seeds
Extra black pepper to taste (because why not?)
Instructions
Pat those chicken pieces dry like they’re precious little gems (trust me, this is key for crispiness!)
Season chicken with 1 tablespoon black pepper and salt
Heat your wok or skillet until it’s smoking hot (Like, REALLY hot!)
Add vegetable oil and swirl to coat
Add chicken in batches (Don’t crowd the pan – these babies need space to dance!)
Stir-fry until golden brown, about 3-4 minutes per batch
Remove chicken and set aside (resist snacking… I know it’s hard)
In the same pan, add garlic and ginger (mmm… that smell though!)
Mix sauce ingredients in a bowl (this is your liquid gold!)
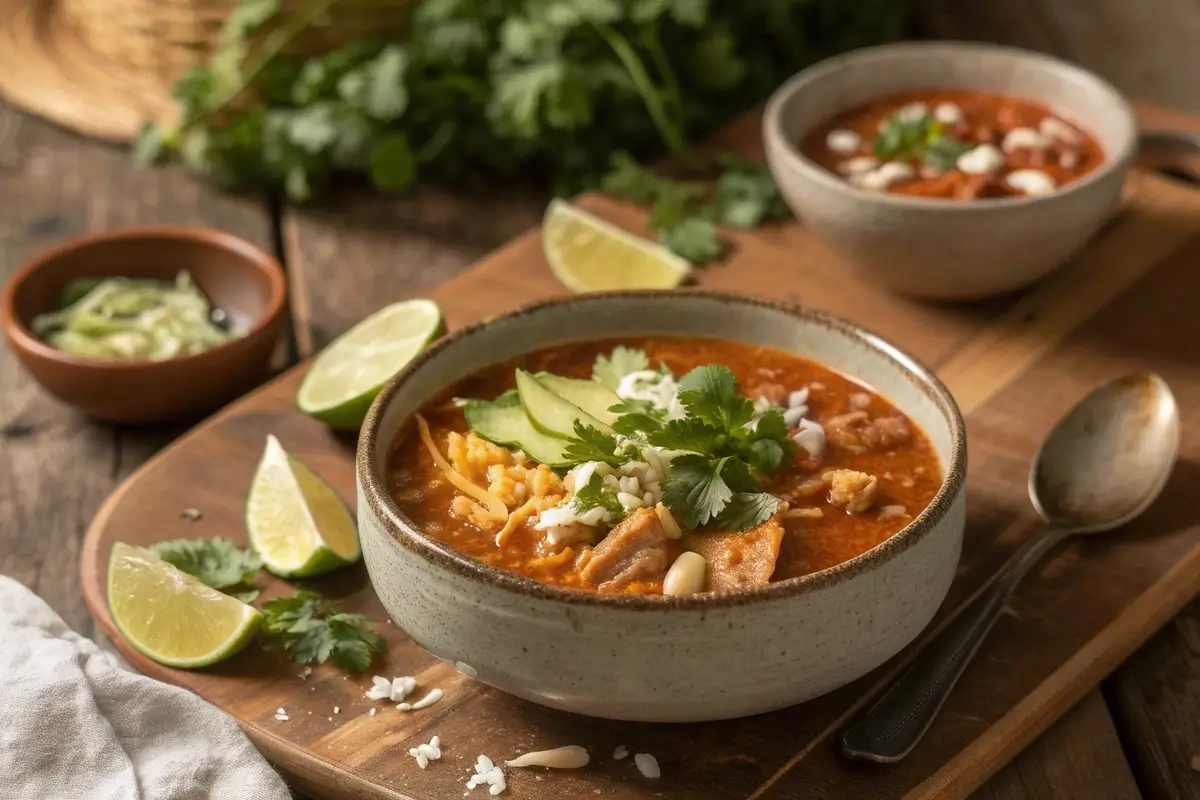
Today, you’ll dive into an irresistible adventure with our spark recipes chicken taco soup, blending lean chicken, crisp veggies, and a pinch of Mexican magic. Not only is it tasty, but it also packs a nutritional punch, ensuring your meal is both satisfying and full of wholesome goodness.
Table of Contents
Essential Ingredients for Spark Recipes Chicken Taco Soup
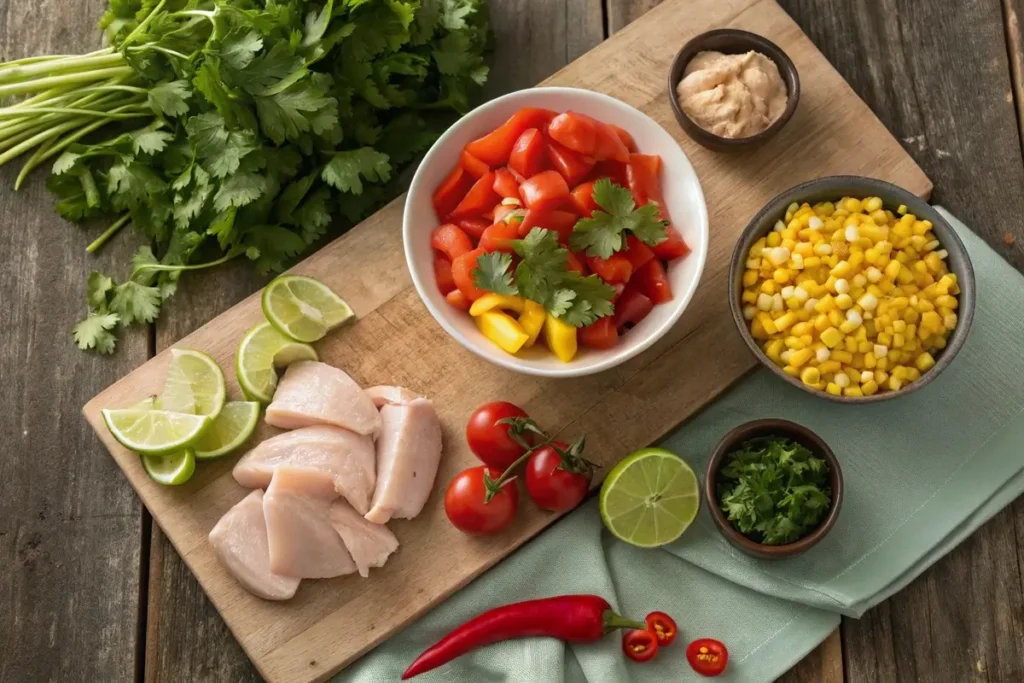
An overhead view of fresh vegetables and lean chicken prepared for the soup
Vibrant Vegetables: Fresh Produce That Brings Life
When you start your spark recipes chicken taco soup, the first step is selecting the freshest vegetables. Firstly, ripe tomatoes, crisp bell peppers, and sweet corn add a burst of color and natural flavor. Moreover, these ingredients not only enhance taste but also boost essential vitamins, ensuring your soup is both nutritious and appealing.
Lean Chicken: Your Protein Powerhouse
Next, lean chicken plays a crucial role in your spark recipes chicken taco soup. Using chicken breast provides high-quality protein and keeps the dish light and satisfying. Furthermore, the tender meat readily absorbs the flavors of the broth, making each bite delicious. In addition, incorporating lean protein helps balance your meal, so you enjoy a wholesome, energy-packed bowl.
Bold Spices and Zesty Seasonings for a Kick
In addition, a mix of bold spices and zesty seasonings transforms your spark recipes chicken taco soup into a flavor-packed delight. For example, a pinch of taco seasoning, cumin, and chili powder creates warmth and depth. Moreover, a squeeze of fresh lime adds brightness to the dish.
Smart Additions: Beans, Avocado, and More
Finally, smart additions like beans and avocado not only boost the texture but also enrich your spark recipes chicken taco soup. For instance, black beans offer extra fiber and protein, while diced avocado adds creaminess and healthy fats. Additionally, including ingredients such as corn and fresh herbs layers subtle flavors that complement the main components. Consequently, these thoughtful additions ensure your soup remains hearty, nutritious, and uniquely satisfying.
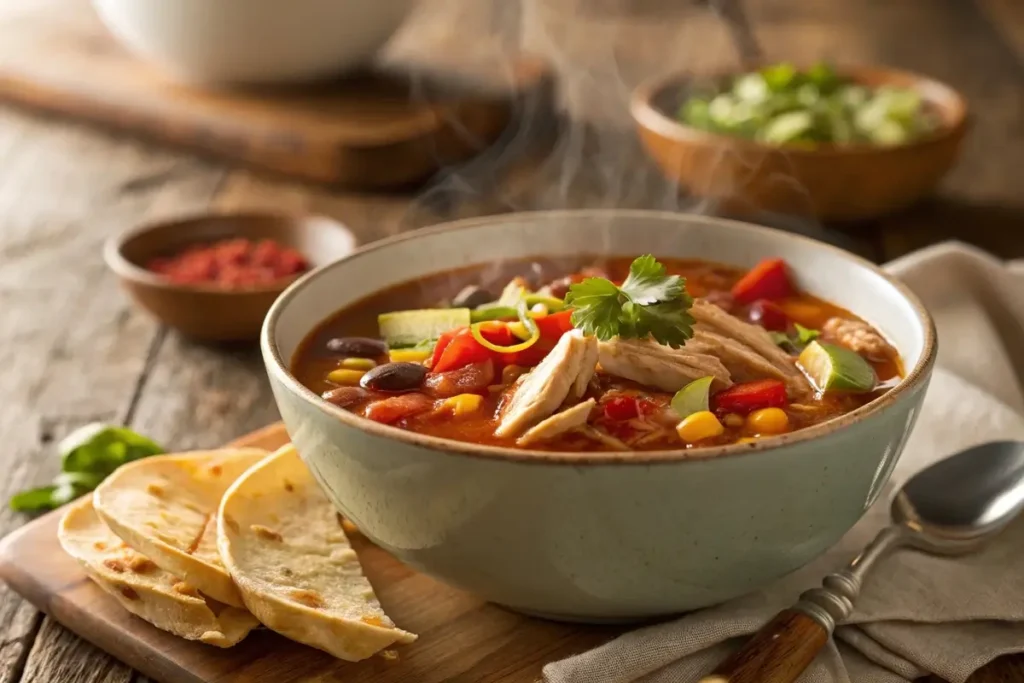
Step-by-Step Creation: Crafting Your Delicious Chicken Taco Soup
Preparation Essentials: Marinating and Chopping
A step-by-step image capturing the preparation of chicken and vegetables for the soup
When you begin your spark recipes chicken taco soup, start by marinating your lean chicken and chopping fresh vegetables. Firstly, toss the chicken with a pinch of taco seasoning and a drizzle of olive oil to lock in flavor. Next, chop tomatoes, onions, and bell peppers into bite-sized pieces. By doing so, you create a base that is both nutritious and full of natural zest.
Simmering Secrets: Building Rich, Layered Flavors
After the prep work, it’s time to build deep flavors by simmering your spark recipes chicken taco soup. Gradually bring your broth to a gentle boil, then reduce the heat to let the ingredients meld slowly. Moreover, as the vegetables and chicken simmer together, their flavors deepen and become wonderfully rich. Consequently, this slow-cooking step transforms the soup into a hearty, delicious meal.
Cooking Techniques: Combining Ingredients with Care
As you continue, carefully add each ingredient to your spark recipes chicken taco soup in stages. First, introduce the marinated chicken into the simmering broth, and then add the chopped vegetables. Furthermore, sprinkle in spices gradually to ensure every layer of flavor stands out. Additionally, adjust cooking times so that delicate veggies remain crisp while the meat tenderizes perfectly.
Finishing Touches: Garnishes and Serving Tips
A beautifully garnished bowl of spark recipes chicken taco soup ready to be served.
Finally, give your spark recipes chicken taco soup a vibrant finish with simple garnishes. A sprinkle of fresh cilantro and a squeeze of lime add a burst of brightness, elevating the overall taste. Also, if you’re looking for more serving ideas, check out our Quick Healthy Chicken Soup recipe for extra inspiration. Ultimately, these finishing touches ensure your soup is not only tasty but also a visual delight.
Creative Twists: Customizing Your Chicken Taco Soup Experience
Turning Up the Heat: Spicy Variations
If you love a bit of fire in your meal, try adding extra spices to your spark recipes chicken taco soup. For instance, you can mix in chopped jalapeños or a dash of red pepper flakes. Additionally, a splash of hot sauce can give your dish a lively kick. Moreover, these spicy twists not only intensify the flavor but also bring a delightful warmth to every spoonful.
Vegetarian Options: Delicious Alternatives for Every Diet
Alternatively, you might want to explore a vegetarian twist on your spark recipes chicken taco soup. In this case, you can replace the chicken with hearty tofu or a mix of black beans and chickpeas. Furthermore, these substitutions maintain a rich, satisfying flavor while making the dish perfect for plant-based eaters. Also, you’ll enjoy a nutritious, protein-packed bowl without compromising taste.
Gluten-Free Adaptations: Making It Accessible for All
Moreover, if you need a gluten-free version, rest assured that your spark recipes chicken taco soup can easily be adapted. Simply swap out any wheat-based ingredients with gluten-free alternatives, and use fresh, whole ingredients instead. In addition, these small changes help ensure that everyone can enjoy this hearty meal without worry. Consequently, your soup remains both safe and delicious for all diets.
Perfect Pairings: Sides and Toppings to Enhance Flavor
Finally, consider pairing your spark recipes chicken taco soup with sides and toppings that add extra flair. For example, a light salad, crunchy tortilla chips, or a dollop of guacamole can enhance each bite. Additionally, fresh herbs like cilantro or a squeeze of lime not only brighten the flavors but also add a touch of elegance to your dish.
Health Benefits and Smart Storage: Maximizing Your Soup’s Value
Nutritional Insights: Vitamins, Protein, and More
When you whip up your spark recipes chicken taco soup, you’re treating yourself to a bowl rich in essential nutrients. For example, lean chicken provides high-quality protein, while fresh vegetables add vital vitamins and minerals. Moreover, these ingredients work together to create a nutritious and satisfying meal that supports your overall health.
Diet-Friendly Features: Low-Calorie and Balanced
Furthermore, spark recipes chicken taco soup is perfect for those aiming to maintain a low-calorie yet balanced diet. In addition, the blend of lean protein and crisp veggies makes this dish both light and filling. Consequently, you enjoy a meal that satisfies your hunger without weighing you down, making it ideal for any healthy eating plan.
Storage Strategies: Keeping Your Soup Fresh Longer
Besides its great taste, your spark recipes chicken taco soup can be stored to extend its deliciousness. For instance, transferring the soup into airtight containers preserves its flavor and texture. Additionally, by refrigerating promptly and following proper storage methods, you can enjoy its full nutritional benefits for up to three days.
Reheating Tips: Preserving Taste and Texture
Finally, reheating your spark recipes chicken taco soup correctly is key to maintaining its delightful flavor. Initially, warm the soup slowly over low heat, stirring occasionally to ensure even warmth. Moreover, by avoiding long microwave sessions, you keep the texture just right, ensuring every spoonful tastes as fresh as when it was first made.
FAQs
What makes spark recipes chicken taco soup a healthy meal option? Spark recipes chicken taco soup is crafted with lean chicken, fresh vegetables, and bold spices. For example, the use of crisp bell peppers and ripe tomatoes provides essential vitamins, while the lean protein supports muscle health. Moreover, the light broth keeps the calorie count low, making it a balanced meal.
Can I customize spark recipes chicken taco soup for different diets? Absolutely! You can tweak the recipe to suit your taste or dietary needs. For instance, if you prefer a vegetarian version, you can swap chicken for tofu or beans. Additionally, you may adjust the spice level by adding more chili or even using gluten-free ingredients if needed.
How do I store and reheat my spark recipes chicken taco soup for best flavor? To keep your soup fresh, store it in an airtight container in the refrigerator for up to three days. When you’re ready to enjoy it again, reheat the soup slowly over low heat on the stovetop. This method helps preserve both its texture and flavor, ensuring every spoonful remains delicious.
What sides or garnishes pair well with spark recipes chicken taco soup? You can enhance your meal by pairing the soup with light sides such as a crisp salad or warm tortilla chips. Additionally, garnishes like a sprinkle of fresh cilantro, a squeeze of lime, or even diced avocado add brightness and extra flavor to your bowl.
Conclusion
In summary, you’ve discovered how to create a flavorful and nutritious bowl of spark recipes chicken taco soup by focusing on fresh ingredients, thoughtful preparation, and customizable twists. By following these actionable tips, you ensure that each bowl is as wholesome as it is delicious. Enjoy making your soup and delight in every comforting spoonful!
If you’re looking to wow your taste buds, try our french onion chicken and rice recipe. This scrumptious, one-pot marvel blends savory onions, juicy chicken, and hearty rice into a satisfying meal simply perfect for any day. Moreover, it’s a quick fix for busy schedules that truly impresses!
Table of Contents
Introduction and Essential Ingredients
Discovering the Allure of a One-Pot Meal
One-pot meals are a real game changer, especially when you need a dish that’s quick and comforting. With our french onion chicken and rice recipe, you get tender chicken, sweet caramelized onions, and soft rice all in one pan. First, you enjoy the ease of cleanup; next, you relish the rich layers of flavor. Moreover, this one-pot marvel adapts well to various tweaks, making it ideal for busy weeknights or relaxed family dinners.
Unveiling the Star Components
When preparing a french onion chicken and rice recipe, every ingredient shines in its own way. First, sear the chicken to lock in its juices, then slowly caramelize the onions to create a deep, sweet base. Additionally, choose the right rice fluffy grains absorb flavors wonderfully. Furthermore, simple additions like garlic and herbs enhance the dish, turning a basic meal into a comforting, one-pan dinner.
The Role of French Onion Chicken and Rice Recipe in Your Dinner Routine
You’ll soon find that a french onion chicken and rice recipe can easily become a staple in your dinner rotation. It’s not only hearty but also a breeze to prepare, saving you time without skimping on taste. Moreover, its comforting nature makes it perfect for cool evenings or whenever you crave a home-cooked meal. In addition, its versatility lets you mix in extra veggies or spices. So, whether you’re planning a quick weeknight dinner or a family feast, this dish is sure to delight your taste buds.
Sourcing and Preparing Quality Ingredients
To craft the best french onion chicken and rice recipe, start with fresh, quality ingredients. First, choose chicken that’s fresh and firm onions that promise great flavor. Next, pick a type of rice that suits your texture preference white or brown, both work nicely. Additionally, use simple herbs like thyme and rosemary for a gentle, savory lift. In short, spending a bit more time on your ingredients ensures every bite is bursting with flavor.
Step-by-Step Cooking Guide
Crafting a Flavorful Foundation with Caramelized Onions
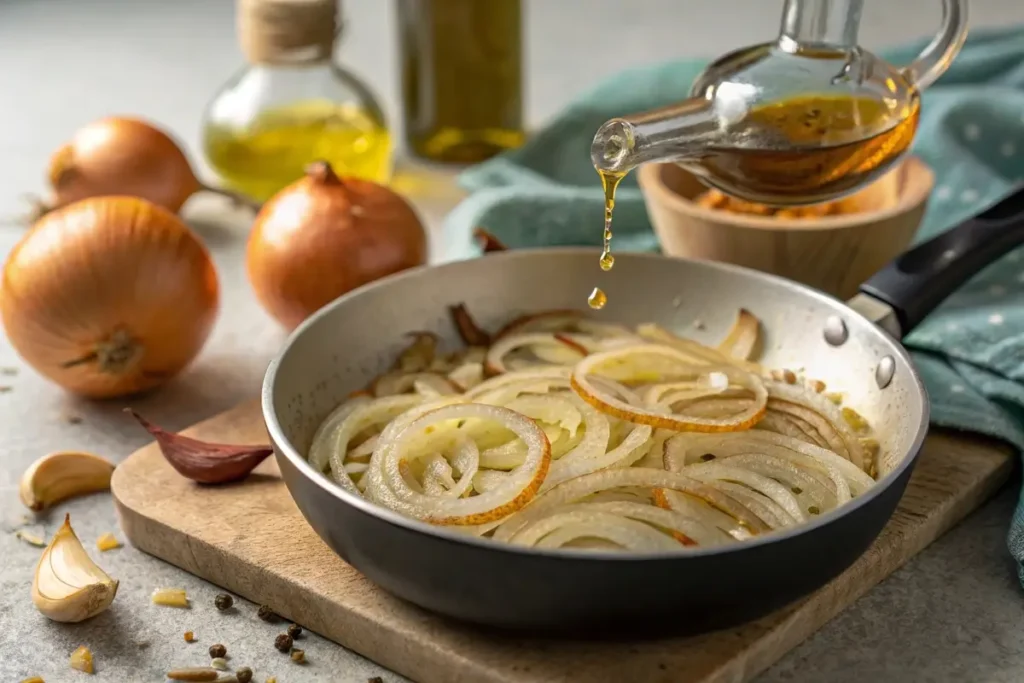
Sliced onions slowly caramelizing to enhance flavor.
In our french onion chicken and rice recipe, caramelized onions set the stage for a rich flavor profile. First, slice your onions thinly and sauté them in a bit of olive oil over medium heat. As they slowly turn golden, you’ll notice their natural sweetness emerge, which, in turn, enhances the overall taste. Moreover, this process lays a perfect base for this one-pot meal recipe.
Browning the Chicken for Maximum Juiciness
Golden-brown chicken being seared to perfection.
Next, browning the chicken is key to locking in its natural juices and creating a savory crust. In our french onion chicken and rice recipe, pat your chicken dry and sear it in a hot pan until each side turns a lovely golden brown.
Integrating Rice and Aromatic Enhancers in a Single Pot
Then, incorporate the rice along with aromatic enhancers like garlic, thyme, and rosemary to enrich your dish. In our french onion chicken and rice recipe, mix the rice gently so that it soaks up the juices from both the chicken and caramelized onions. Additionally, add the right amount of broth to create a cohesive, hearty chicken and rice skillet.
Simmering to Perfection and Final Flavor Adjustments
Finally, allow the dish to simmer so that all the ingredients meld together beautifully. In our french onion chicken and rice recipe, this simmering stage is crucial; it helps all the flavors to blend seamlessly. Moreover, as the dish simmers, taste and adjust the seasoning with salt, pepper, or extra herbs.
Creative Twists and Customization Tips
Adding Seasonal Vegetables for Vibrant Variety
When you prepare the french onion chicken and rice recipe, adding seasonal vegetables can brighten up your dish. First, try tossing in diced bell peppers, zucchini, or even spinach to boost both color and nutrition.
Experimenting with Herbs, Spices, and Gourmet Accents
Next, you can experiment with herbs and spices to give your french onion chicken and rice recipe a unique twist. For example, a pinch of smoked paprika can enhance the flavors subtly. Additionally, a sprinkle of fresh basil or oregano can introduce a new layer of aroma, making this one-pot meal both comforting and exciting.
Elevating Texture with Crunchy and Creamy Elements
Furthermore, elevating the texture of your dish can make it even more appealing. For instance, consider garnishing your french onion chicken and rice recipe with a handful of toasted almonds or a dollop of sour cream. These additions create a pleasing contrast between crunchy and creamy, enriching the overall experience of this hearty chicken and rice dinner.
Adjusting Techniques for Different Cooking Appliances
Lastly, you may want to adjust your cooking techniques depending on your kitchen tools. Whether you’re using an Instant Pot, a slow cooker, or a traditional oven, your french onion chicken and rice recipe adapts well. For example, slow cooking over low heat allows the flavors to deepen, whereas pressure cooking saves time while still delivering a delicious meal.
Serving, Presentation, and Nutritional Insights
An inviting presentation of a one-pot french onion chicken and rice recipe.
Inspiring Plating Ideas for a Home-Cooked Masterpiece
Once your french onion chicken and rice recipe is ready, presentation becomes key. First, use a wide, shallow bowl to display the vibrant colors of your dish. Moreover, garnish with a sprinkle of fresh parsley or thyme to add a pop of green. Additionally, arrange the chicken and rice neatly, so every bite looks as delightful as it tastes. In short, a creative plate not only enhances appeal but also elevates your dining experience.
Pairing the Dish with Complementary Sides
Next, consider pairing your french onion chicken and rice recipe with sides that boost its flavor. For instance, a crisp green salad or a side of roasted vegetables works wonderfully. Furthermore, a slice of crusty bread can be perfect for soaking up the delicious juices. Also, you might try a light soup or a tangy coleslaw to add contrast. In essence, the right sides can transform a simple meal into a complete and satisfying dinner.
Unpacking the Nutritional Benefits of a One-Pot Meal
In addition, one-pot meals like this french onion chicken and rice recipe offer balanced nutrition. First, the lean chicken provides protein, while the rice delivers wholesome carbohydrates. Moreover, the caramelized onions and added herbs pack vitamins and antioxidants. Consequently, you enjoy a dish that is not only hearty and flavorful but also supports a healthy diet. Therefore, you can feel good about serving this comforting meal to your family.
Best Practices for Leftover Storage and Reheating
Finally, proper storage ensures your french onion chicken and rice recipe stays fresh for later. First, let the dish cool, then transfer it into an airtight container. Additionally, when reheating, use a low heat setting to maintain its texture and flavor. Furthermore, consider adding a splash of broth or water to revive the dish if it seems dry. In summary, these steps will help you enjoy every bite, even as leftovers.
Frequently Asked Questions (FAQs)
What are the 4 ingredients in French onion chicken?
In a classic french onion chicken and rice recipe, the four essential ingredients typically include tender chicken, sweetly caramelized onions, a rich broth, and a blend of savory herbs. These elements work together to create a dish full of depth and comforting flavor.
What can I add to chicken and rice for flavor?
To enhance your french onion chicken and rice recipe, you can add garlic, fresh herbs like thyme or rosemary, and even a splash of white wine. Moreover, including vegetables such as bell peppers, mushrooms, or carrots introduces extra texture and brightness to the dish.
What to serve with French onion chicken?
When serving your french onion chicken and rice recipe, consider pairing it with a crisp green salad, crusty bread, or steamed vegetables. Additionally, a light soup or tangy coleslaw can provide a delightful contrast that elevates the overall meal experience.
Why do French people eat French onion soup?
French onion soup is a cherished tradition in France, celebrated for its deep, caramelized flavors and comforting warmth. The soup’s rich taste, enhanced with melted cheese and croutons, reflects a cultural love for robust, home-style dishes—a passion that also inspires the flavors found in a french onion chicken and rice recipe.
Conclusion
Your french onion chicken and rice recipe combines tender chicken, sweet onions, and hearty rice into one delightful, one-pot meal. By following these easy steps and tips, you can create a satisfying dinner that bursts with flavor and warmth. Enjoy every bite, and feel free to experiment to make the dish uniquely yours!
Chicken Drumstick Soup the easiest way to build rich, homemade flavor without babysitting the pot. Here’s the deal: Simmer bone-in drumsticks with garlic, herbs, and veggies for 45 minutes, and let those legs work their collagen magic. Want silky broth? Don’t skip the sear—it’s the golden ticket to depth.
Table of Contents
Why chicken drumstick soup is a Weeknight Game-Changer
Craving comfort food that doesn’t tie you to the stove all day? Chicken drumstick soup delivers hearty flavor in a fraction of the time. But how? Let’s unpack why this dish is a secret weapon for busy cooks.
The Magic of Bone-In Chicken for Rich Broth
You know that silky, collagen-rich broth that takes hours to simmer? Here’s the twist: bone-in drumsticks work faster. As they cook, marrow and connective tissues melt into the liquid, creating depth without an all-day wait. For example, compared to boneless breasts, drumsticks add a meaty richness that’s downright luxurious. Meanwhile, veggies like carrots and celery soften just enough to soak up the savory flavors. Pro tip: Sear the drumsticks first for a caramelized edge your taste buds will thank you!
How Drumsticks Save Time Without Sacrificing Flavor
Think quick meals mean bland results? Chicken drumstick soup begs to differ. Thanks to their higher fat content, drumsticks stay juicy even during shorter cook times. On the other hand, leaner cuts can turn rubbery if rushed. Plus, their curved shape makes them easy to fish out once tender—no fussing with shredding. Not to mention, one-pot cooking means fewer dishes (and more Netflix time). Still skeptical? Try swapping drumsticks into your go-to soup recipe you’ll taste the difference.
Budget-Friendly Comfort Food Your Family Will Crave
Let’s face it: eating well shouldn’t cost a fortune. Luckily, drumsticks are cheaper than most cuts, yet pack more flavor. For instance, a $5 pack can feed four, especially when stretched with affordable staples like potatoes or noodles. And since this soup freezes beautifully, you can batch-cook it for those “I’m too tired to cook” nights. Fun fact: A study by the USDA found that bone-in poultry reduces food waste by using parts often discarded. Win-win!
Health Benefits You Won’t Want to Miss
Chicken drumstick soup isn’t just tasty it’s a nutrient powerhouse. Between the protein from the meat, vitamins from the veggies, and collagen from the bones, it’s a meal that fuels and heals. Research shows collagen supports joint health, while garlic and thyme add immune-boosting perks. Even better, it’s naturally gluten-free and low in sodium if you control the seasoning. So, whether you’re fighting a cold or just need a cozy reset, this soup’s got your back.
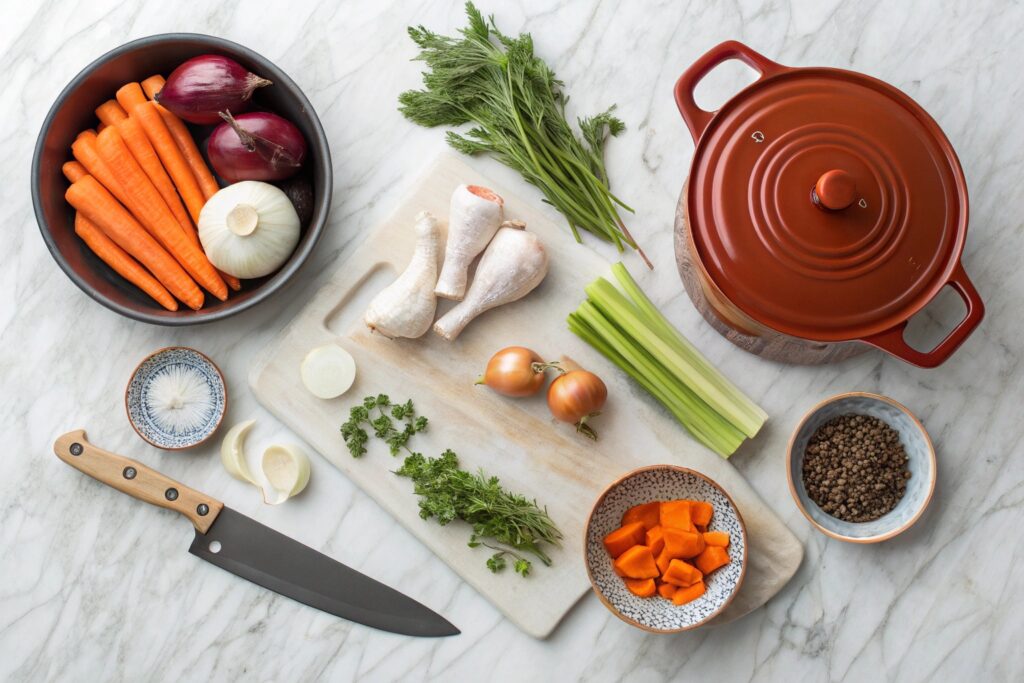
Gathering Your Ingredients and Tools
Everything you need for a quick, hearty meal.
Great chicken drumstick soup starts with the right foundation. But don’t worry this isn’t a scavenger hunt. With a handful of pantry staples and a few trusty tools, you’ll be simmering success in no time. Let’s break down what you’ll need (and why!).
Essential Staples for a Balanced Broth
Every spoonful of chicken drumstick soup hinges on its broth. Start with bone-in drumsticks their marrow and connective tissues melt into the liquid, creating a collagen-rich base that’s both silky and satisfying. Next, grab aromatic veggies: onions, carrots, and celery form the “holy trinity” of flavor. Don’t forget garlic (for depth) and herbs like thyme or bay leaves (for earthy notes). Pro tip: Use low-sodium broth if you’re watching salt, but water works too the drumsticks pack enough punch on their own!
Optional Add-Ins to Customize Your chicken drumstick soup
Here’s where you make it yours. For example, toss in diced potatoes or egg noodles for heartiness, or add kale for a green boost. On the other hand, if you’re craving spice, a dash of cayenne or smoked paprika wakes things up. And if you’re short on fresh herbs, dried work in a pinch just use half the amount.
Must-Have Kitchen Gear for Speedy Cooking
You don’t need fancy gadgets, but a few basics streamline the process. A Dutch oven distributes heat evenly, preventing burnt bits while searing drumsticks. Meanwhile, a sharp chef’s knife makes quick work of chopping veggies no wrestling with celery stalks.
Prepping Like a Pro: Time-Saving Hacks
First, chop veggies in bulk and store them pre-portioned in the fridge. That way, you’re ready to toss them in whenever soup cravings strike. Second, sear drumsticks in batches if your pot is small this ensures crispy skin without overcrowding. And here’s a game-changer: Freeze leftover broth in ice cube trays for future recipes. Not only does this cut waste, but it also lets you add instant flavor to grains or sauces.
Mastering the 45-Minute Magic
Sear, simmer, and serve—effortless comfort food
Think chicken drumstick soup needs hours to shine? Think again. With a few smart tricks, you’ll coax out deep flavors and tender meat in under an hour. Let’s dive into the step-by-step secrets that make this dish a weeknight legend.
Searing Drumsticks for Maximum Flavor Depth
First, pat those bone-in drumsticks dry this ensures a golden sear, not a sad steam. Heat oil in your Dutch oven, then lay the chicken skin-side down. As they sizzle, the Maillard reaction works its umami magic, creating crispy bits that’ll infuse the broth with richness. Pro tip: Don’t crowd the pot! Cook in batches if needed. Once browned, set the drumsticks aside. Fun fact: Those caramelized bits at the bottom? They’re liquid gold for your soup base.
Building Layers of Flavor in Your Broth
Next, toss diced onions into the same pot. As they soften, add minced garlic and a pinch of salt this draws out moisture, speeding up the cooking. Then, stir in chopped carrots and celery, letting them mingle with the fond (those tasty browned bits). For depth, deglaze with a splash of broth or white wine, scraping up every last flavor-packed crumb. Finally, return the drumsticks to the pot, cover with liquid, and let the collagen-rich broth work its charm.
When to Add Veggies for Perfect Texture
Timing is everything. Root veggies like potatoes or parsnips go in early to soften fully. On the other hand, delicate greens (spinach, kale) wilt quickly toss them in during the last 5 minutes. Not sure? Taste as you go! For example, if you prefer al dente carrots, add them halfway through. And if you’re using noodles, cook them separately to avoid mush. Pro move: Stir in frozen peas at the end for a pop of color and freshness.
Finishing Touches: Herbs, Seasoning, and Serving
Here’s where your soup sings. Fish out the drumsticks, shred the meat, and discard bones. Then, stir the meat back into the pot. Add a squeeze of lemon for brightness or a dash of hot sauce for heat. Don’t forget fresh herbs like parsley or dill they add a vibrant finish.
Creative Twists to Keep It Exciting
Chicken drumstick soup is like a blank canvas ready for your personal flair. Whether you’re craving global flavors or dietary tweaks, these twists ensure boredom never bubbles up. Let’s explore how to reinvent this classic while keeping its comfort food soul intact.
Global Inspirations: Mexican vs. Asian Variations
Customize your soup with bold flavors
For instance, swap thyme for cumin and lime, then toss in black beans and corn for a Tex-Mex twist. On the other hand, stir in coconut milk, ginger, and a splash of soy sauce for an Asian-inspired broth that’s equal parts creamy and zingy. Not sure where to start? Garnish with fresh cilantro or crispy fried shallots they’re instant flavor upgrades. Pro tip: Add a spoonful of miso paste for umami depth without overpowering the bone-in drumsticks.
Creamy vs. Clear Broth: Which Suits Your Mood?
Prefer silky soups? Stir in a splash of heavy cream or blend cooked potatoes into the broth for velvety richness. Alternatively, keep it light with a crystal-clear base perfect for showcasing tender veggies and herbs. Craving both? Serve the soup clear, then let guests swirl in cream or chili oil. Either way, the collagen-rich broth stays the star.
Meal Prep Secrets for Freezer-Friendly Batches
First, cool the soup completely before portioning it into airtight containers. For best results, leave a bit of space at the top broth expands as it freezes. Then, label with the date (it keeps for 3 months!). When reheating, thaw overnight in the fridge or warm gently on the stove. Pro move: Freeze shredded drumstick meat separately for adding to salads or wraps later.
Pairing Ideas: Breads, Salads, and More
Crunchy bread is a no-brainer, but why stop there? Try pairing your chicken drumstick soup with a crisp apple-walnut salad for contrast, or cheesy garlic bread for indulgence.
FAQ: Your Chicken Drumstick Soup Questions Answered
Are drumsticks good for broth?
Absolutely! Bone-in drumsticks are broth superstars. As they simmer, collagen from the bones and connective tissues melts into the liquid, creating a rich, silky broth that’s far more flavorful than broth made from boneless cuts. Pro tip: For extra depth, roast the drumsticks first to caramelize the skin and bones.
Is chicken drumstick soup good for health?
Yes! Chicken drumstick soup is packed with protein, vitamins (like B12 and A), and minerals (zinc, iron). The collagen-rich broth supports joint health, while garlic and herbs add immune-boosting perks. However, go easy on added salt if you’re watching sodium.
How long should I boil chicken drumsticks?
Simmer them for 25–30 minutes. This tenderizes the meat without overcooking it. To check, pierce a drumstick with a fork if the meat slides off easily, it’s done. Note: Boiling too long can make veggies mushy, so add them halfway through.
What cut of chicken is best for chicken drumstick soup?
Bone-in drumsticks or thighs are ideal. Their higher fat content keeps the meat juicy, and the bones enrich the broth. While breast meat works, it’s leaner and can dry out. For maximum flavor, stick with drumsticks!
Conclusion: Your New Go-To Comfort Food
Chicken drumstick soup isn’t just a meal—it’s a 45-minute hug in a bowl. With bone-in drumsticks delivering deep flavor, budget-friendly ingredients, and endless customization options, this recipe solves weeknight dinners and chilly-day cravings alike. Whether you’re boosting immunity, meal-prepping, or just craving comfort food, this soup’s got your back.
6 bone-in chicken drumsticks (skin-on for extra flavor)
2 tbsp olive oil
1 large onion, diced
3 garlic cloves, minced
3 carrots, peeled and sliced
3 celery stalks, chopped
6 cups low-sodium chicken broth
2 bay leaves
1 tsp dried thyme (or 3 sprigs fresh)
Salt and black pepper to taste
1/4 cup fresh parsley, chopped
Optional: 1 lemon (zested for garnish)
Instructions
Sear the Drumsticks: Heat olive oil in a Dutch oven over medium-high heat. Pat drumsticks dry, season with salt and pepper, then sear for 3-4 minutes per side until golden. Remove and set aside.
Sauté Veggies: In the same pot, add onion, garlic, carrots, and celery. Cook for 5 minutes, scraping up browned bits from the bottom.
Simmer: Return drumsticks to the pot. Pour in broth, add bay leaves and thyme. Bring to a boil, then reduce heat to low. Cover and simmer for 25 minutes.
Shred Meat: Remove drumsticks, shred meat off the bones (discard bones), and return meat to the pot.
Finish: Stir in parsley. Taste and adjust salt/pepper. For brightness, add lemon zest before serving.
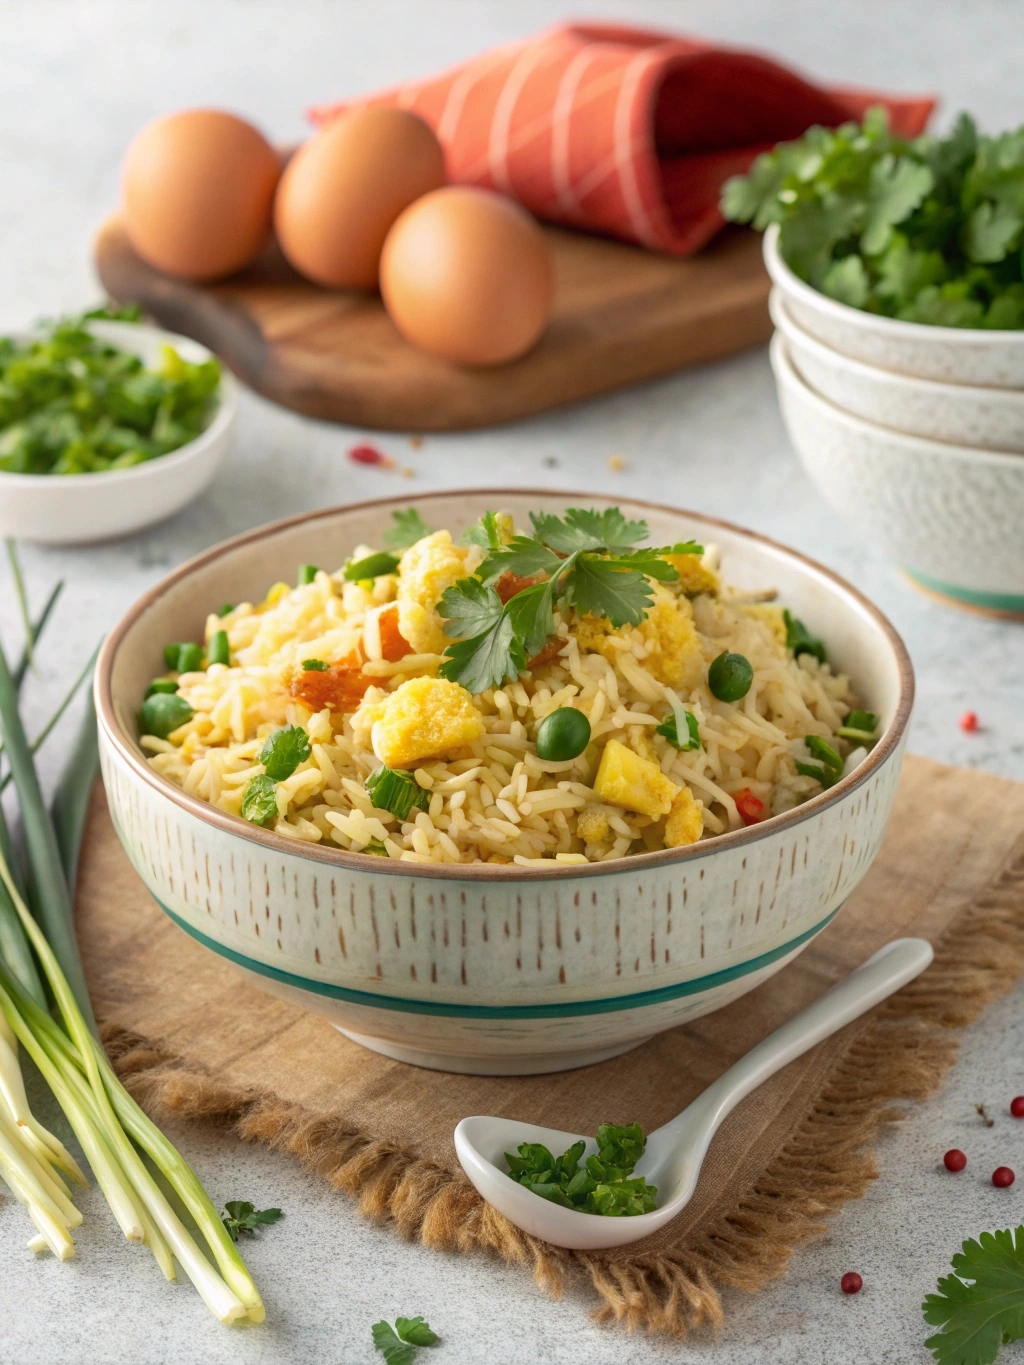
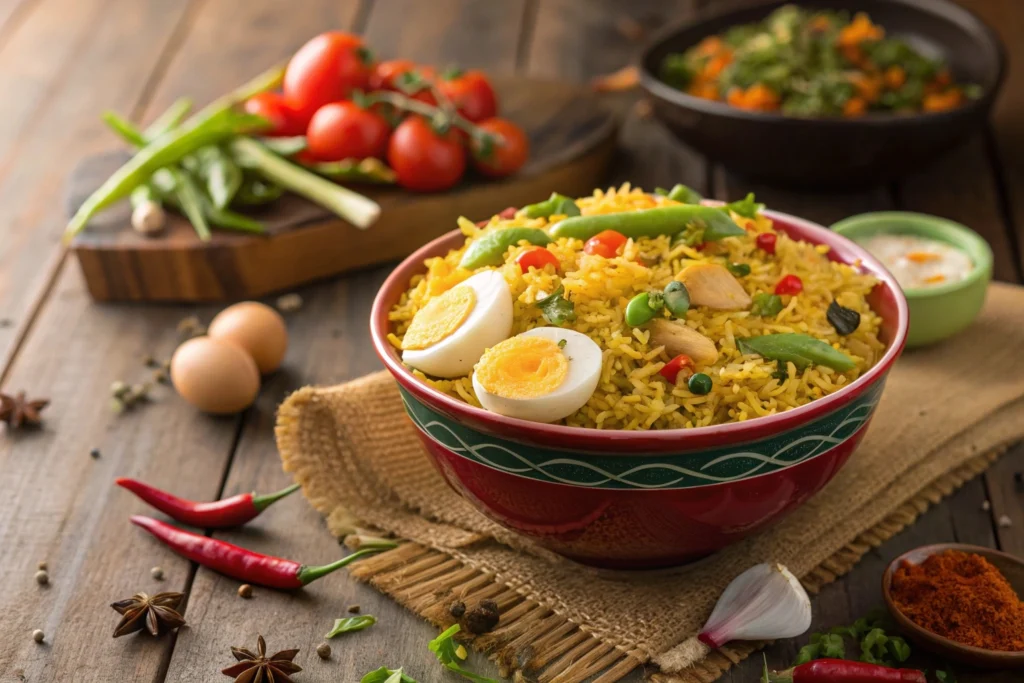
Enjoy a restaurant-quality dish at home with this anjappar style egg fried rice recipe. Packed with vibrant spices, tender eggs, and crisp vegetables, this easy-to-make meal is perfect for a quick dinner or a flavorful lunch treat.
1/2 teaspoon red chili powder (optional, for heat)
Salt, to taste
2 tablespoons vegetable oil
1 tablespoon soy sauce (optional)
Fresh cilantro leaves, for garnishing
Instructions
Prepare the rice: Ensure the rice is pre-cooked and chilled to avoid mushiness during stir-frying.
Beat the eggs: In a bowl, whisk the eggs with a pinch of salt until lightly frothy.
Heat the wok: Place a large wok or deep skillet over medium-high heat and add the vegetable oil.
Sauté aromatics: Add cumin seeds to the hot oil. Once they start to sizzle, stir in the chopped onion, garlic, and grated ginger. Sauté for 1-2 minutes until fragrant.
Cook the eggs: Pour in the beaten eggs and scramble until just set. Remove the eggs from the wok and set aside.
Sauté vegetables: In the same wok, add the diced carrot and green peas. Stir-fry for about 3-4 minutes until the vegetables are tender but still crisp.
Combine ingredients: Add the chilled rice to the vegetables. Stir well to mix and ensure the rice heats evenly.
Season the dish: Sprinkle in turmeric, red chili powder, and salt. Drizzle the soy sauce over the rice, if using, and mix thoroughly.
Reincorporate the eggs: Gently fold the scrambled eggs back into the rice mixture.
Final touches: Stir in sliced scallions and adjust the seasoning if necessary. Garnish with fresh cilantro leaves before serving.
Table of Contents
Discovering a Unique Culinary Experience
What Makes This Recipe Special?
When you try my anjappar style egg fried rice recipe, you’ll quickly notice its unique blend of vibrant spices and fresh veggies. This authentic dish combines the charm of a classic restaurant style egg fried rice with a simple, home-cooked twist. Moreover, each bite delivers a burst of flavor that’s both comforting and exciting. Therefore, you can enjoy a meal that feels indulgent yet is surprisingly easy to make.
The Origins and Inspiration
This recipe draws inspiration from traditional South Indian cuisine and the renowned Anjappar restaurants. In fact, the anjappar style egg fried rice recipe is a modern take on an age-old method of preparing rice, eggs, and spices. For more background on authentic techniques,
What You Will Learn
By following this guide, you’ll discover how to create an exquisite anjappar style egg fried rice recipe step by step. You will learn simple methods for preparing each ingredient, such as cooking long-grain rice to perfection and achieving the ideal scrambled eggs. Furthermore, the instructions cover tips on sautéing vegetables and mixing in traditional Indian spices. Thus, you gain a clear understanding of each step, ensuring you replicate the authentic taste with ease.
Why You Should Try It Today
You deserve a meal that’s both delightful and quick to prepare. With my anjappar style egg fried rice recipe, you can whip up a dish that’s as pleasing to the eye as it is to the palate. Moreover, this recipe offers flexibility—you can adjust the spices and add your favorite veggies, making it perfect for any occasion. So why wait? Embrace this culinary adventure, and soon, you’ll be enjoying a dish that’s both satisfying and full of flavor.
Ingredients and Essential Preparations
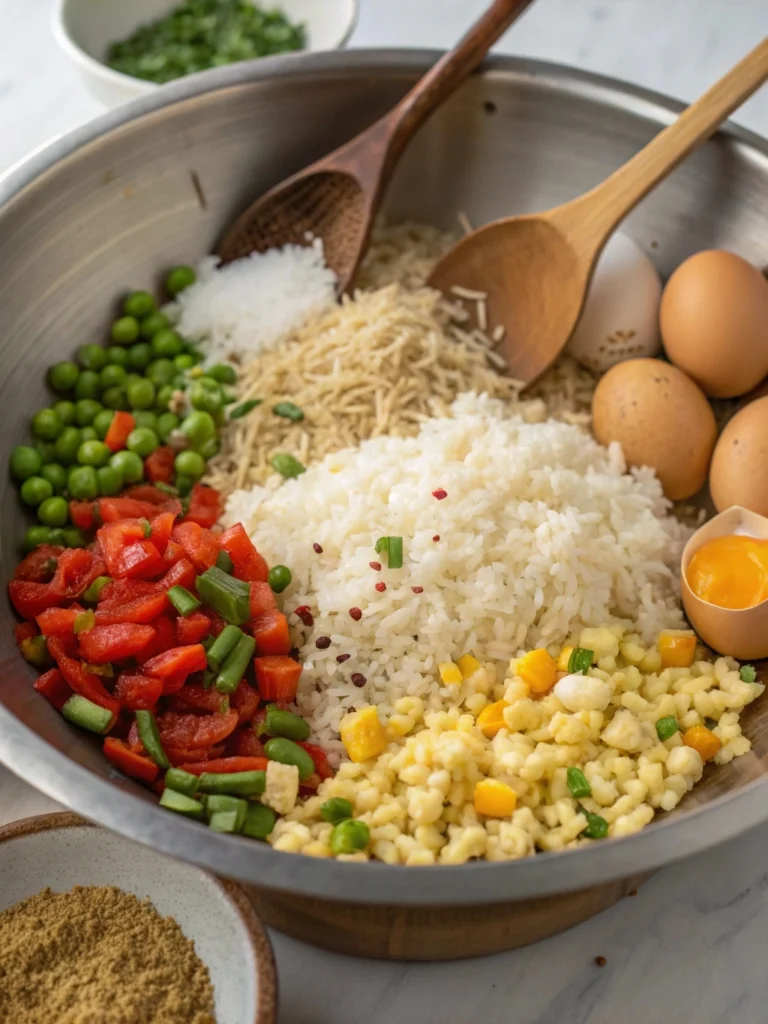
A delicious, restaurant-quality egg fried rice dish
Must-Have Ingredients for an Authentic Dish
For a perfect anjappar style egg fried rice recipe, you will need a mix of fresh and quality ingredients. First, ensure you have long-grain rice, fresh eggs, crisp vegetables, and a variety of spices. Additionally, traditional Indian spices like turmeric and cumin bring that extra kick. Moreover, each component works together to create a dish that feels like a true restaurant style egg fried rice. Thus, choosing the right ingredients is key to success.
Sourcing the Best Ingredients
When you shop for the ingredients, always opt for the freshest options available. For instance, local markets often have the best produce and spices. Furthermore, using high-quality ingredients ensures your anjappar style egg fried rice recipe stands out with authentic taste and vibrant colors.
Prepping Your Kitchen and Ingredients
Before you start cooking, take a moment to prep your kitchen. First, wash and chop all vegetables into bite-sized pieces. Next, cook your rice ahead of time until it’s just right—neither too sticky nor too firm. Additionally, beat the eggs lightly, and keep your spices handy. By preparing these elements in advance, you will find that making your anjappar style egg fried rice recipe becomes a smooth and enjoyable process.
Essential Tools and Equipment
To make your cooking experience hassle-free, gather all necessary kitchen tools. You will need a large wok or a deep skillet to stir-fry the ingredients evenly. In addition, a reliable spatula and a set of measuring spoons help maintain accuracy. Moreover, having a good knife for chopping vegetables is essential. With the right equipment on hand, you can easily whip up a delicious anjappar style egg fried rice recipe that looks as good as it tastes.
Step-by-Step Cooking Instructions
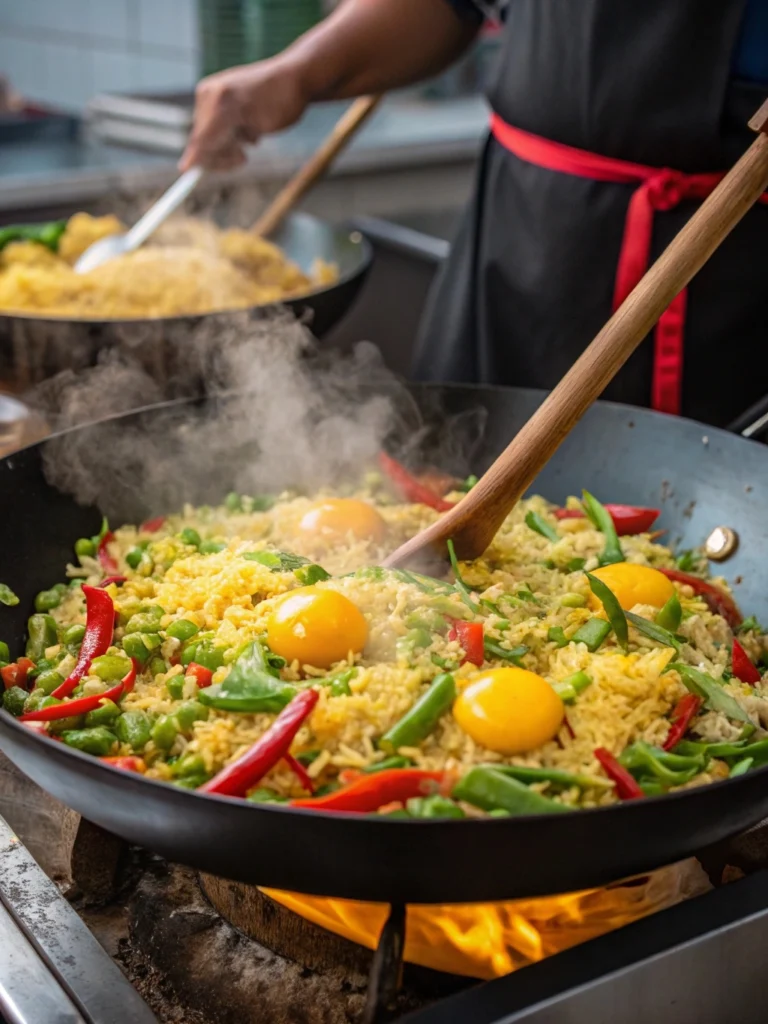
Stir-frying vegetables and spices in a wok
Step 1 – Preparing the Rice and Eggs
To start your anjappar style egg fried rice recipe, you first need to prepare the rice and eggs. First, cook the rice until it is soft yet firm, and let it cool down; this ensures that the rice does not become mushy later. Next, beat the eggs lightly, so they mix well during cooking. Moreover, preparing these basics lays a strong foundation for a dish that bursts with flavor.
Step 2 – Sautéing Vegetables and Spices
After you have the rice and eggs ready, it’s time to sauté your vegetables and spices. Begin by heating a large wok and adding a bit of oil. Then, toss in chopped vegetables like carrots, peas, and scallions, ensuring they soften evenly. Additionally, stir in traditional Indian spices, such as turmeric and cumin, to enhance the taste of your anjappar style egg fried rice recipe. Thus, every ingredient gets the chance to blend beautifully.
Step 3 – Combining All Ingredients
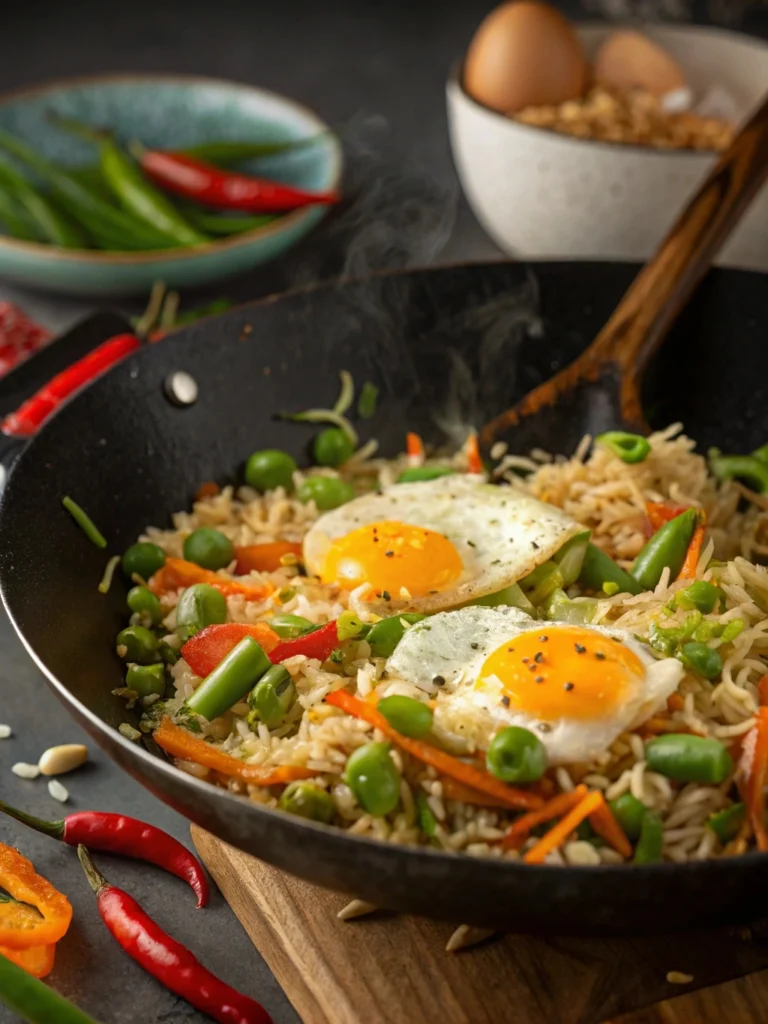
A close-up view of the fresh ingredients cooking.
Now, combine your prepared rice, eggs, and sautéed vegetables. In a large pan, gently mix the ingredients so that each grain of rice is coated with spices and flavors. Also, carefully add the eggs, ensuring they mingle well with the vegetables and rice. Furthermore, stir continuously and evenly; therefore, you achieve a well-blended dish that truly reflects the essence of a delicious anjappar style egg fried rice recipe.
Step 4 – Final Touches and Garnishing
All components of the dish are being combined.
Finally, add the finishing touches to your dish. Sprinkle a little extra spice and garnish with fresh herbs to elevate your anjappar style egg fried rice recipe. Moreover, adjust the seasoning as needed, so that the flavor meets your taste perfectly. In addition, if you need more ideas, consider checking out another relevant recipe article on our site for more cooking tips. Thus, your dish not only looks appealing but also tastes amazing.
Tips, Variations, and Troubleshooting
Enhancing Flavor with Expert Tips
When you cook your anjappar style egg fried rice recipe, adding a few expert tips can really elevate the dish. For example, you might use a pinch of extra cumin or a splash of lemon juice to brighten the flavors. Moreover, stirring continuously helps the spices blend well. Thus, you achieve a perfect balance that makes your dish pop.
Creative Variations for Different Diets
You can easily adapt the anjappar style egg fried rice recipe to suit different diets. For instance, if you’re vegetarian, try adding extra tofu or beans for protein. In addition, you might experiment with other veggies such as bell peppers or broccoli. However, remember to adjust the spices accordingly, so the dish still packs a flavorful punch.
Troubleshooting Common Issues
At times, you might face minor issues while preparing your anjappar style egg fried rice recipe. If the rice turns out too sticky, rinse it under cold water next time to remove excess starch. Furthermore, if the flavor seems bland, consider increasing the amount of spices gradually. Therefore, by tweaking these small details, you can easily fix any issues and enjoy a perfect dish every time.
Presentation and Serving Suggestions
The delicious finished dish, ready to serve.
Lastly, presentation matters when you serve your anjappar style egg fried rice recipe. For example, garnish your dish with fresh herbs like cilantro or a few sliced scallions. In addition, serve it in a warm bowl to keep it inviting. Moreover, pairing it with a side of simple salad or a light soup can enhance the overall meal experience. Thus, you not only enjoy great taste but also a visually appealing dish.
FAQs
What is an anjappar style egg fried rice recipe? This recipe is a unique take on traditional fried rice inspired by the flavors of Anjappar restaurants. It blends well-cooked rice, scrambled eggs, and a mix of fresh vegetables with Indian spices to create a dish that is both satisfying and easy to make. Essentially, you get a home-cooked meal with a restaurant twist.
Can I substitute ingredients in the anjappar style egg fried rice recipe? Absolutely, you can customize this recipe to fit your taste and dietary needs. For example, if you prefer a vegetarian version, simply replace the eggs with tofu or add extra vegetables. However, make sure that any substitutions still complement the signature blend of spices to maintain the authentic flavor.
How long does it take to make the anjappar style egg fried rice recipe? Typically, you can have this dish ready in about 30 minutes if you have all your ingredients prepped. Moreover, the recipe is designed to be quick and efficient, so even on busy days, you can enjoy a delicious, restaurant-quality meal without spending hours in the kitchen.
Can I prepare the anjappar style egg fried rice recipe ahead of time? Yes, you can prepare parts of the recipe in advance. For instance, you can cook the rice and chop the vegetables ahead of time, then combine everything when you’re ready to serve. However, for the best texture and flavor, it’s recommended to enjoy the dish fresh whenever possible.
Conclusion
In summary, you now have all the details you need to create a mouth-watering anjappar style egg fried rice recipe. From selecting the right ingredients to mastering each step, this guide has provided clear and actionable tips to ensure your dish turns out perfectly every time. Enjoy experimenting with flavors, and don’t hesitate to make this recipe your own.
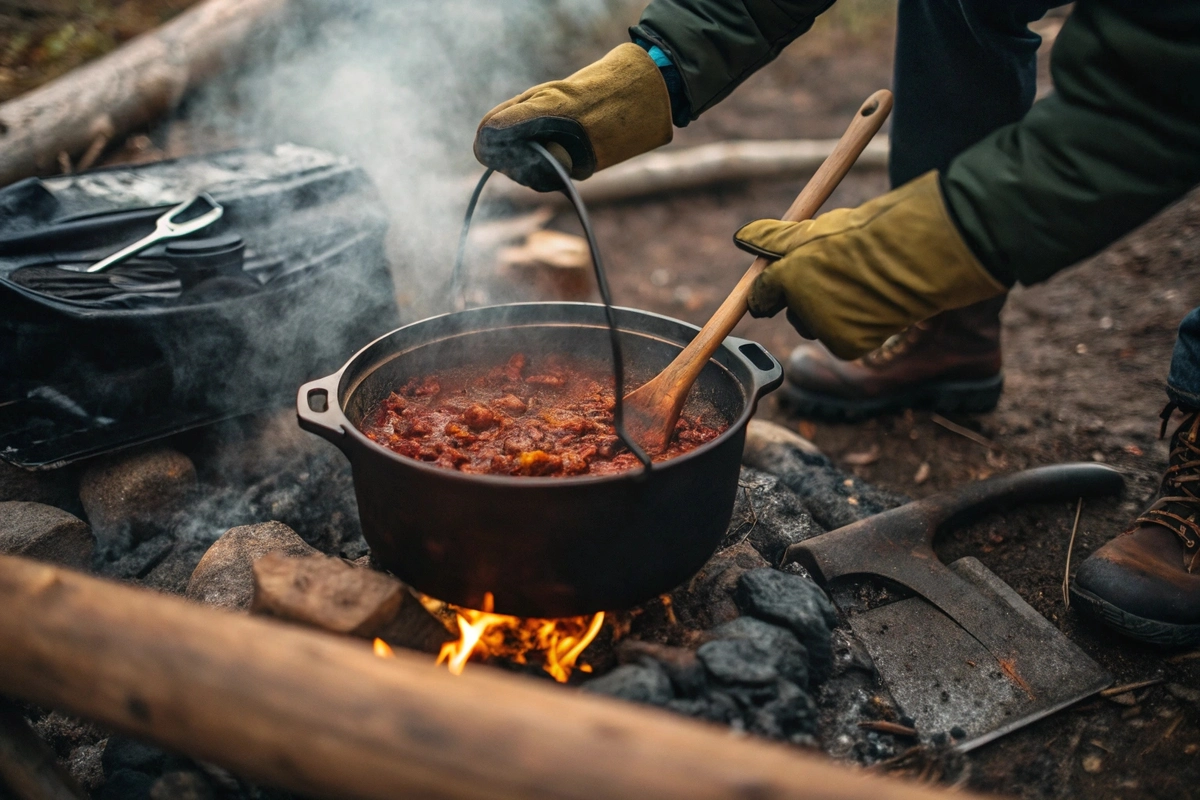
Let’s face it: not all camp meals hit the mark. But this deer camp venison chili recipe? Oh, it’s a bullseye. Packed with fire-roasted tomatoes, cumin-kissed broth, and meat so tender it’ll make your crew forget they’re eating wild game. Best part? You’ll whip it up in 60 minutes flat—no fancy gear, no frills. Trust us, this chili isn’t just food; it’s campfire camaraderie in a bowl. Grab your spoon and dig in.
Table of Contents
Why This Venison Chili is Perfect for Deer Camp
Nothing beats a hearty, smoky chili after a day in the woods. This deer camp venison chili recipe isn’t just filling it’s designed for hunters who crave comfort without the hassle. Let’s break down why it’s a campfire must-have, whether you’re feeding a crew or refueling solo.
Quick Prep for Busy Hunters
You’ve spent hours tracking deer, so dinner shouldn’t feel like another chore. Thankfully, this chili cooks in 1 hour with minimal prep. Here’s the kicker: brown your ground venison while chopping onions and garlic—no fancy techniques needed. In addition, it’s a one-pot meal, meaning less cleanup and more time swapping stories around the fire. Pro tip: Pre-measure spices at home to save time.
Bold Flavors That Complement Wild Game
Venison’s rich, earthy taste can steal the show—if you balance it right. That’s why this recipe leans on smoked paprika, cumin, and a dash of cocoa powder for depth. On the other hand, if you’re wary of gamey flavors, a splash of apple cider vinegar brightens the dish. For example, one tester said, “It’s like Texas chili met a campfire and they became best friends.”
Campfire or Stovetop Flexibility
No campfire? No problem. While this deer camp venison chili recipe shines in a Dutch oven over flames, your stovetop works just fine.
Feed a Hungry Crowd Affordably
Let’s face it: feeding hunters is like fueling a small army. Luckily, venison is cheaper (and leaner) than beef if you process your own harvest. Plus, this recipe stretches with beans and tomatoes no one leaves hungry. In fact, one batch serves 8, and leftovers freeze perfectly.
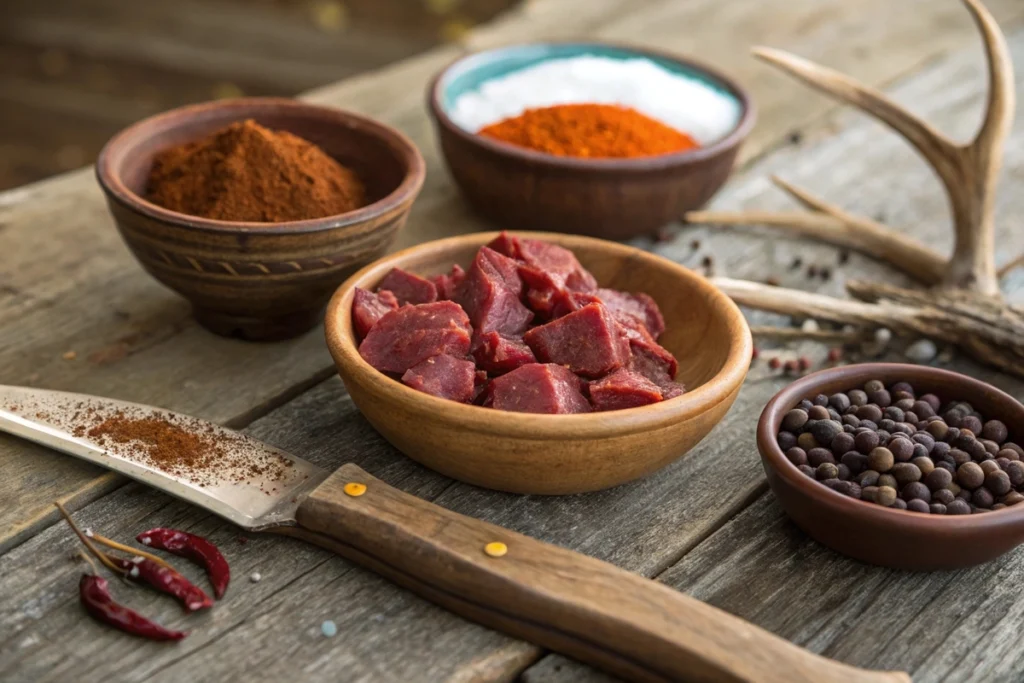
Ingredients for a Hearty Wild Game Chili
Quality venison and spices create bold, campfire-ready flavors.
Great deer camp venison chili recipe starts with the right ingredients. Let’s break down what you’ll need to turn ground venison into a smoky, satisfying meal that’ll warm your crew from the inside out.
Choosing Quality Venison (Fresh or Frozen)
Fresh or frozen?Here’s the deal: Fresh venison delivers the best flavor, but frozen works if you’re thawing last season’s harvest. However, avoid meat with a strong gamey odor it’s a sign of poor processing.
Essential Spices for Smoky Depth
Don’t skimp on spices—they’re the soul of your deer camp venison chili recipe. Start with chili powder (2 tbsp), smoked paprika (1 tbsp), and cumin (1 tsp) for that campfire-kissed flavor. On the other hand, if you’re out of cumin, coriander makes a bright substitute. Fun fact: A pinch of cocoa powder deepens the richness without sweetness.
Beans, Tomatoes, and Secret Add-Ins
Beans or no beans?That’s your call. Kidney beans add bulk, but purists might skip them. Either way, fire-roasted tomatoes are non-negotiable their charred sweetness balances venison’s boldness. Want a pro twist? Stir in a bottle of dark beer or a dash of coffee for earthy complexity. Bonus tip: If your crew loves heat, toss in a diced jalapeño (seeds included!).
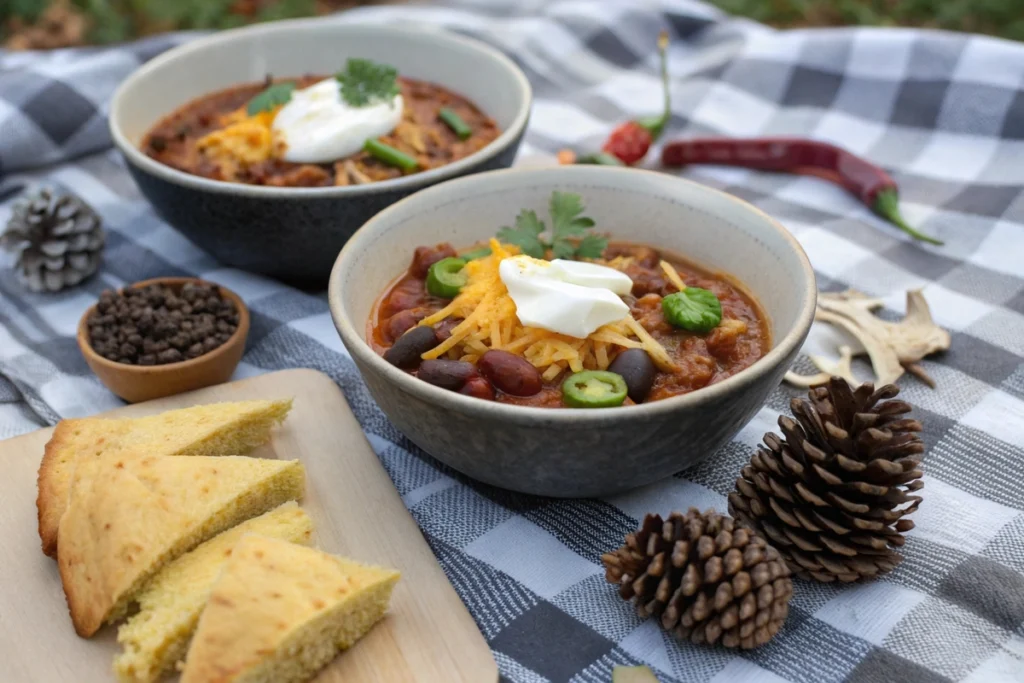
Toppings to Elevate Your Bowl
Here’s where the magic happens. Set out a toppings bar with shredded cheddar, sour cream, and diced onions. For a crunch, crush tortilla chips or add our campfire skillet cornbread on the side. Trust us: A squeeze of lime cuts through the richness, making every bite as fresh as a morning in the woods.
Step-by-Step Venison Chili Instructions
Ready to turn that ground venison into a campfire masterpiece? Let’s dive into this deer camp venison chili recipe with foolproof steps. No fancy skills needed—just a pot, a spoon, and a hunger for hearty flavors.
H3: Browning Venison for Maximum Flavor
First things first: Heat oil in your Dutch oven or pot. Add ground venison and break it into crumbles. Why? Searing locks in juiciness and tames any gamey undertones. Meanwhile, toss in diced onions and garlic their sweetness balances the meat’s richness.
Layering Spices and Simmering Basics
Now, the fun part: Sprinkle chili powder, smoked paprika, and cumin over the meat. Stir well to coat every bite—this builds depth fast. Next, pour in crushed tomatoes, broth, and a splash of beer (trust us, it’s worth it). Then, let it bubble gently for 30 minutes. Remember: Low and slow avoids burnt spices.
Adjusting Heat and Thickness
Is your chili too thin? Mash a handful of beans or simmer uncovered for 10 minutes. Prefer it fiery? Add cayenne or diced jalapeños. On the other hand, if it’s too thick, splash in broth or water. Either way, taste as you go seasoning is your secret weapon.
Serving Suggestions for Campfire Nights
Finally, ladle that smoky chili into bowls and let your crew go wild with toppings. Think: shredded cheese, avocado slices, or a dollop of sour cream.
Pro Tips for Perfect Deer Camp Chili
Want to turn your deer camp venison chili recipe from good to legendary? These pro tips—straight from seasoned hunters and chefs will help you dodge pitfalls and boost flavor.
Top your chili with cheese, jalapeños, and pair with cornbread!
Make-Ahead and Freezing Strategies
Got a big hunt coming up? Prep this chili ahead! Simply cook it fully, cool it, and freeze in airtight containers for up to 3 months. When reheating, add a splash of broth to revive the smoky richness. Bonus: Frozen chili tastes even better spices meld like old friends around a campfire.
Tenderizing Tough Cuts of Venison
Tough meat? No sweat. Marinate tougher cuts (like neck or shank) in beer or apple cider vinegar for 2 hours before cooking. Alternatively, simmer the chili longer on low heat collagen breaks down, turning chewy bites into buttery goodness. Pro tip: Coffee in the braising liquid adds deep, earthy notes without bitterness.
Swapping Venison for Other Wild Game
Out of venison?Elk, bear, or even duck work in this deer camp venison chili recipe. Just remember: Leaner meats (like elk) need extra oil, while fatty game (like bear) may require draining.
Avoiding Common Chili Mistakes
First-timer jitters?Skip these blunders:
Overseasoning early: Salt lightly at first—you can add more later.
Undercooking spices: Toast chili powder in oil for 1 minute to unlock boldness.
Overcrowding the pot: Brown meat in batches for better caramelization. Above all, taste as you go. After all, you’re the boss of your broth.
FAQs About Deer Camp Venison Chili
How to Make My Chili Thicker?
If your deer camp venison chili recipe feels too thin, simmer it uncovered for 10–15 minutes to reduce liquid. For faster results, mix 1 tablespoon cornstarch with 2 tablespoons cold water, then stir it into the chili. Alternatively, mash a handful of beans or add a sprinkle of masa harina (corn flour) for a gluten-free fix.
Why Is Deer Meat Not Sold in Stores?
In most U.S. states, wild venison can’t be sold commercially due to hunting regulations and food safety laws. However, farm-raised venison is available at specialty markets though it’s pricier. That’s why many hunters process their own deer for recipes like this hearty venison chili.
How to Thicken Chili That’s Too Watery?
Beyond simmering or cornstarch, crushed tortilla chips or instant potato flakes work wonders. For example, stir in ¼ cup crushed chips—they’ll soften and thicken the broth while adding a subtle corn flavor. Just remember: Add thickeners slowly to avoid overdoing it.
Can You Eat Chili After 5 Days?
Yes, if stored properly. Keep your chili in an airtight container in the fridge, and it’ll stay safe for up to 5 days. However, always reheat it to 165°F to kill bacteria. When in doubt, freeze leftovers within 3 days for best quality.
Conclusion
Your deer camp venison chili recipe is more than just a meal—it’s a campfire tradition that blends smoky spices, tender wild game, and simplicity. Whether you’re cooking over flames or your stovetop, this 1-hour chili delivers hearty comfort without the fuss.
Remember these key takeaways:
Use fresh or thawed venison for the best flavor.
Adjust thickness and heat to your crew’s taste.
Freeze leftovers for quick meals during hunting season.
Who doesn’t love coming home to a kitchen filled with the aroma of high protein crock pot recipes ? Imagine tender, juicy chicken or savory beef stew waiting for you after a long day! With these meals, not only do you save time, but you also fuel your body with nutrients. Plus, they’re easy enough for even beginners to whip up
Table of Contents
Why Choose High Protein Crock Pot Recipes?
Choosing high protein crock pot recipes can transform your meal prep routine by combining convenience with nutrition. These meals not only save time but also provide the energy and nutrients your body needs to thrive, whether you’re aiming for muscle growth or simply maintaining a balanced diet. Let’s explore why these recipes deserve a spot in your kitchen.
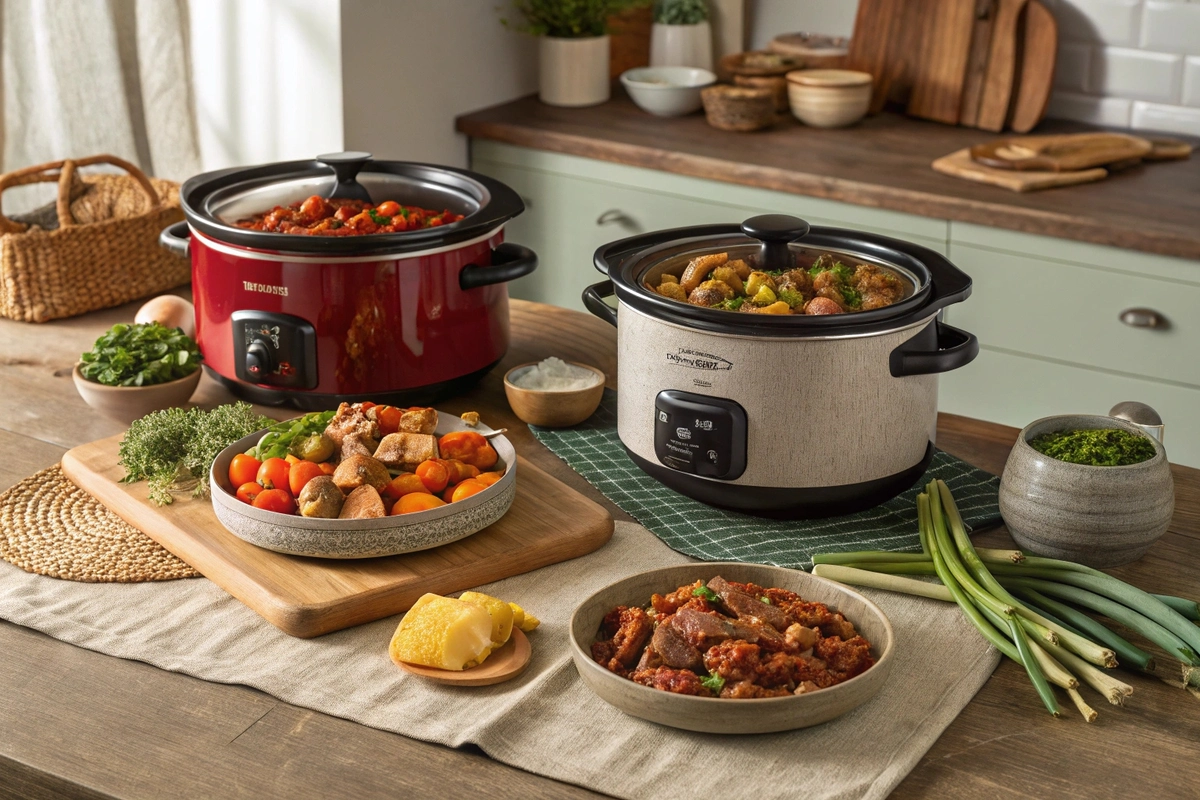
Benefits of Slow Cooker Meals
Slow cooker meals are more than just a convenient option; they’re a game-changer for busy lifestyles. By allowing ingredients to simmer gently over hours, slow cookers lock in flavors and retain essential nutrients, making them healthier alternatives to fast-cooking methods. Moreover, they reduce hands-on cooking time, giving you extra hours in the day to focus on what truly matters. However, it’s important to note that while slow cookers simplify life, they require thoughtful preparation to ensure the best results.
Time-Saving Tips for Preparing High Protein Crock Pot Recipes
To make the most of your slow cooker, consider planning ahead. For instance, chop vegetables and marinate proteins the night before so everything is ready when you wake up. Additionally, batch cooking making double portions and freezing leftovers can save even more time in the long run. In fact, many people find this method particularly helpful during hectic weeks. Thus, investing in quality storage containers ensures your meals stay fresh and flavorful.
For those looking for inspiration, check out trusted culinary blogs like Food For Fitness, which offers a wide variety of high-protein slow cooker options. Their collection includes dishes like Slow Cooker Beef Bourguignon and Chicken Satay, proving that healthy eating doesn’t have to be boring.
Selecting Quality Ingredients for Your Dishes
Simple steps for a mouthwatering meal.
When preparing high protein crock pot recipes, selecting top-notch ingredients makes all the difference. Opt for lean cuts of meat such as chicken breast or grass-fed beef, and pair them with nutrient-rich vegetables like spinach or bell peppers. On the other hand, don’t overlook plant-based proteins like lentils or chickpeas, which add variety and texture to your meals. Furthermore, using fresh herbs and spices enhances flavor without adding unnecessary calories.
Enhancing Flavor Profiles with Aromatic Spices
Adding depth to your high protein crock pot recipes starts with experimenting with aromatic spices. Consider blends like cumin, turmeric, or smoked paprika to create layers of flavor that tantalize the taste buds. In addition, incorporating fresh herbs like cilantro or parsley at the end of cooking provides a burst of freshness. Therefore, playing around with different combinations allows you to personalize each dish according to your preferences, ensuring every bite is as satisfying as the last.
Exploring Our Top 10 High Protein Crock Pot Recipes
A classic French-inspired dish made easy.
When it comes to high protein crock pot recipes, variety is key. Whether you’re a fan of comforting stews, spicy curries, or zesty tacos, there’s something for everyone. Below, we’ve curated a list of our top picks that combine convenience with flavor, ensuring your weeknight dinners are both satisfying and nutritious.
Slow Cooker Marry Me Chicken
Start your journey with this crowd-pleaser: Slow Cooker Marry Me Chicken. This dish features tender chicken breasts marinated in a tangy sauce, making it perfect for family meals. In addition to being delicious, it’s packed with protein, helping you meet your daily nutritional goals. For those who love experimenting with flavors, try adding fresh herbs like rosemary or thyme to enhance the taste further.
Beef Bourguignon Stew – A Classic Twist
If you’re looking for a hearty option, look no further than Beef Bourguignon Stew. This French-inspired recipe combines tender beef chunks with red wine, mushrooms, and onions for a rich, savory experience. While it may sound complicated, the slow cooker does all the hard work for you. Moreover, its high protein content makes it ideal for muscle recovery or simply staying full longer.
Slow Cooker Red Thai Curry – Spicy and Flavorful
Switch things up with an international twist: Slow Cooker Red Thai Curry. Packed with aromatic spices and coconut milk, this dish delivers a burst of flavor while keeping you energized throughout the day. However, if you prefer milder options, reduce the amount of chili paste used in the recipe. On the other hand, adding extra tofu or shrimp can boost the protein content even further.
White Chicken Chili – Comfort in a Bowl
End this section with a comforting favorite: White Chicken Chili. With its creamy texture and smoky undertones, this recipe is sure to become a staple in your rotation. Not only is it easy to prepare, but it also provides a generous serving of protein thanks to the inclusion of chicken and beans. Therefore, it’s great for busy nights when you need a quick yet wholesome meal
Enhancing Flavor Profiles in Your High Protein Crock Pot Recipes
Creating delicious and nutritious meals starts with mastering the art of enhancing flavor profiles. Whether you’re a seasoned chef or a beginner, these tips will help you take your high protein crock pot recipes to the next level.
Choosing the Right Spices for Your Dishes
Selecting the appropriate spices is crucial when preparing high protein crock pot recipes. For instance, using cumin and paprika can add depth to Mexican-inspired dishes, while turmeric and curry powder bring an exotic twist to Indian-style stews. In addition, fresh herbs like cilantro or parsley provide a pop of color and freshness that complements any dish. Therefore, experimenting with different spice combinations allows you to personalize each meal according to your taste preferences.
Balancing Ingredients for Optimal Taste
Comfort food at its finest.
Balancing ingredients ensures your high protein crock pot recipes are not only nutritious but also flavorful. Consider pairing lean proteins like chicken breast or tofu with nutrient-rich vegetables such as spinach, carrots, or bell peppers. Moreover, adding a splash of citrus juice or vinegar at the end of cooking can brighten up the flavors without overpowering them. On the other hand, too much seasoning might mask the natural taste of the ingredients, so it’s important to strike the right balance.
Incorporating Aromatics for Extra Depth
Aromatics play a significant role in elevating the taste of your meals. Garlic, onions, and ginger are staples in many cuisines and add layers of complexity to your high protein crock pot recipes. For example, sautéing these aromatics before adding them to the slow cooker enhances their flavor profile and creates a richer base for your dish. Thus, taking the extra step to prepare your aromatics beforehand pays off in terms of taste and satisfaction.
Adding Texture with Nuts and Seeds
To make your high protein crock pot recipes even more satisfying, consider incorporating nuts and seeds for added texture. Almonds, walnuts, or pumpkin seeds not only boost the nutritional value but also add crunch to otherwise soft textures. Additionally, they pair well with both savory and sweet dishes, offering versatility in your meal planning. However, be mindful of allergies when introducing new ingredients to your family’s diet.
Common Mistakes to Avoid When Cooking High Protein Crock Pot Recipes
Even the most experienced cooks can make mistakes when preparing high protein crock pot recipes. By being aware of these common pitfalls, you can ensure your meals turn out perfectly every time. Let’s dive into some tips to help you avoid these errors.
Overcooking Vegetables in Your Slow Cooker
One of the biggest issues people face is overcooking vegetables, which can leave them mushy and unappetizing. To prevent this, try adding harder vegetables like carrots or potatoes during the last hour of cooking instead of at the beginning. In addition, consider partially precooking them to speed up the process while maintaining their texture. Thus, planning ahead ensures your veggies remain crisp and flavorful.
Underseasoning Your High Protein Crock Pot Recipes
Underseasoning is another frequent mistake that can ruin an otherwise delicious meal. Since flavors tend to mellow out over long cooking times, it’s essential to season generously at the start. For example, use a blend of spices and herbs to create layers of taste that develop as the dish simmers. However, remember to taste periodically and adjust seasoning as needed to achieve the desired flavor profile.
Choosing the Wrong Cooking Setting
Selecting the wrong cooking setting can also impact the quality of your high protein crock pot recipes. While the low setting works well for tender cuts of meat, tougher cuts benefit from higher heat to break down connective tissues more effectively. Moreover, switching between settings midway through cooking may affect the final outcome, so choose wisely based on your ingredients and desired results.
Neglecting Cleanup and Maintenance
Finally, neglecting cleanup and maintenance can shorten the lifespan of your slow cooker. After each use, allow the appliance to cool completely before washing, and inspect the seal regularly to ensure it remains intact. Additionally, storing your slow cooker properly helps preserve its functionality for years to come. Therefore, taking good care of your equipment ensures consistent performance and reliable results with every recipe.
FAQs
What are the benefits of slow cooker meals?
Slow cooker meals offer numerous advantages that make them a favorite for many home cooks. For starters, they encourage eating at home, which can save money and promote healthier eating habits. Additionally, the extended cooking times allow flavors to meld beautifully, creating richer tastes in your high protein crock pot recipes. The lower temperatures used by slow cookers also reduce the risk of burning or overcooking food, ensuring tender results every time . Plus, because slow cookers use less energy than conventional ovens, they’re an eco-friendly choice.
How do you eat high protein meals?
Eating high protein meals involves incorporating lean meats like chicken breast, turkey, or fish into your diet, along with plant-based options such as beans, lentils, and tofu. When preparing these ingredients, consider using a slow cooker to lock in nutrients and flavor while saving time. For instance, high protein crock pot recipes like beef bourguignon or chicken chili provide both convenience and nutritional value. Remember to balance your protein intake with healthy fats and carbohydrates for a well-rounded diet.
How much faster does a Crock-Pot cook on high?
A Crock-Pot set to “high” generally cooks about twice as fast as it would on the “low” setting. While the exact speed depends on the recipe and appliance model, switching to high can cut cooking times significantly, making it ideal for last-minute meal prep. However, keep in mind that some recipes may lose their depth of flavor if cooked too quickly, so plan accordingly based on your schedule and preferences.
Is Crock-Pot cooking healthy?
Yes, Crock-Pot cooking is considered healthy due to its ability to retain nutrients during the cooking process. The slow, steady heat allows foods to cook gently without losing essential vitamins and minerals. Moreover, slow cookers often require minimal added fats or oils, helping you prepare low-calorie, nutrient-dense meals. By choosing high protein crock pot recipes and pairing them with fresh vegetables, you can create balanced dishes that support your health goals.
Conclusion
In summary, high protein crock pot recipes offer a practical solution for busy individuals seeking nutritious and delicious meals. From enhancing flavor profiles through extended cooking times to simplifying meal prep with minimal effort, slow cookers bring convenience and variety to your kitchen. By avoiding common mistakes, selecting quality ingredients, and experimenting with spices, you can craft meals that fuel your body and satisfy your taste buds. Whether you’re aiming for muscle-building proteins or simply healthier eating, these recipes have something for everyone. So why not give them a try today?
There’s something magical about the rich, smoky aroma of a classic meatloaf recipe Creole baking in the oven. The mix of ground beef, bell peppers, and Cajun spices fills the kitchen with warmth and nostalgia. Whether you’re a seasoned cook or a first-timer, this dish is bound to impress.
Table of Contents
1. What Makes Creole Meatloaf Special?
Creole cuisine is all about big flavors, bold spices, and rich textures. A classic meatloaf recipe Creole embodies this tradition, combining juicy ground beef, aromatic vegetables, and a perfectly seasoned glaze. Unlike traditional meatloaf, this dish packs a spicy kick with its signature Creole seasoning and zesty tomato-based topping. But what exactly sets it apart? Let’s break it down!
The Unique Flavors of Creole Cuisine
Creole cooking is a beautiful blend of French, Spanish, African, and Caribbean influences, creating a cuisine that’s both vibrant and deeply flavorful. The secret to these bold flavors lies in the seasoning. A proper meatloaf recipe Creole isn’t complete without a signature spice mix featuring paprika, garlic powder, onion powder, cayenne, oregano, and thyme.
Another key component? The Holy Trinity of Creole cooking onion, bell pepper, and celery. This aromatic trio builds a rich foundation, adding sweetness, earthiness, and depth to the meatloaf. Unlike a standard meatloaf that leans on basic salt and pepper, Creole-style meatloaf boasts a warm, smoky, and slightly spicy bite in every forkful.
Pro Tip: Want to intensify the flavors? Let the meat mixture sit for at least 30 minutes before baking, allowing the seasonings to fully infuse the meat!
Key Ingredients for Authentic Creole Meatloaf
To achieve that authentic Southern taste, you’ll need the right ingredients. Here’s what makes this meatloaf recipe Creole stand out:
Gather all the fresh ingredients to make the best Creole meatloaf
Ground beef & pork – A mix of beef and pork creates the best balance of flavor and tenderness.
Holy Trinity (onion, bell peppers, celery) – Essential for depth and aroma.
Creole seasoning – The heart and soul of the dish, adding smoky, savory, and spicy elements.
Breadcrumbs & eggs – Help bind everything together while keeping the texture light and moist.
Tomato-based glaze – A tangy mix of ketchup, Worcestershire sauce, and hot sauce, brushed on for extra flavor and caramelization.
Using fresh, high-quality ingredients is key to achieving the deep, rich taste Creole cuisine is known for.
How to Choose the Best Ingredients
Selecting the right ingredients can make or break your meatloaf recipe Creole. Here’s what to look for:
Meat – Use 80/20 ground beef for a good balance of fat and flavor. Leaner meat can make the loaf dry.
Bell Peppers – Red, green, or a mix of both adds sweetness and crunch.
Spices – Freshly ground spices deliver the best flavor—pre-ground versions lose their potency over time.
Breadcrumbs – Opt for panko breadcrumbs for a lighter texture, or use crushed saltine crackers for extra flavor.
For a healthier option, swap ground beef for ground turkey and use almond flour instead of breadcrumbs.
Creole vs. Cajun Meatloaf – What’s the Difference?
People often mix up Creole and Cajun cooking, but there are key differences:
Feature
Creole Meatloaf
Cajun Meatloaf
Spices
Paprika, cayenne, garlic, oregano
Heavy on black pepper, cayenne, and smoked paprika
Base Flavor
Rich, often tomato-based
Rustic, earthier, sometimes smokier
Cooking Style
More refined, influenced by European techniques
Simpler, using bold, spicy flavors
2. Step-by-Step: How to Make the Best Creole Meatloaf
Making a delicious meatloaf recipe Creole is easier than you think! With the right ingredients and a few simple steps, you’ll have a juicy, flavorful meatloaf that’s perfect for any meal. This guide will walk you through the entire process, from preparing the ingredients to baking and serving.
Step 1: Preparing the Ingredients
Before you start mixing, it’s essential to prep your ingredients for the best results. The secret to a perfect meatloaf recipe Creole lies in using fresh vegetables, quality meat, and bold seasoning.
Dice the Holy Trinity – Finely chop onions, bell peppers, and celery to ensure they blend seamlessly into the meat mixture.
Mix your spices – If using homemade Creole seasoning, combine paprika, cayenne, garlic powder, onion powder, thyme, and oregano for an authentic taste.
Choose the right meat – A blend of ground beef and pork adds richness and moisture. Aim for 80/20 beef for a tender texture.
Prep your binding ingredients – Lightly beat the eggs and soak breadcrumbs in milk to keep the meatloaf juicy.
Pro Tip: Let your chopped vegetables sit in a paper towel for a few minutes to remove excess moisture. This prevents a soggy meatloaf!
Step 2: Mixing the Meatloaf Base
Once your ingredients are ready, it’s time to create the perfectly seasoned meatloaf mixture.
In a large bowl, combine the ground beef, pork, breadcrumbs, eggs, Worcestershire sauce, and Creole seasoning.
Gently mix the ingredients with your hands or a wooden spoon. Overmixing can make the meatloaf dense and tough, so keep it light!
Add the diced Holy Trinity vegetables and continue folding until evenly distributed.
Form the mixture into a loaf shape on a parchment-lined baking sheet.
Want a spicier kick? Add extra cayenne pepper or a splash of hot sauce for more heat!
Step 3: Shaping and Baking the Meatloaf
Now that your meatloaf recipe Creole is perfectly mixed, it’s time to shape and bake it to perfection.
Shaping the Creole meatloaf for perfect baking results
Shape the meatloaf into a firm but not compacted loaf. You can use a loaf pan for even cooking or free-form it on a baking sheet for more crispy edges.
Bake at 375°F (190°C) for about 45 minutes. This ensures a golden crust while keeping the inside tender.
Halfway through baking, drain any excess grease from the pan to prevent a soggy bottom.
Step 4: Preparing the Zesty Creole Glaze
A great meatloaf recipe Creole wouldn’t be complete without a rich, tangy glaze. This simple homemade glaze enhances the flavors and creates a caramelized topping.
Creole Meatloaf Glaze Recipe:
½ cup ketchup
2 tablespoons brown sugar
1 teaspoon Worcestershire sauce
½ teaspoon Creole seasoning
1 teaspoon hot sauce (optional for extra spice)
How to Apply:
Mix all ingredients in a small bowl until smooth.
Brush half of the glaze over the meatloaf after 30 minutes of baking.
Add the remaining glaze in the last 10 minutes for a sticky, flavorful finish.
Love bold flavors? Try adding a dash of honey or molasses for a slightly sweet twist!
Step 5: Resting and Serving
Patience is key! Letting your meatloaf recipe Creole rest ensures maximum juiciness.
Remove from the oven and let the meatloaf sit for 10 minutes before slicing. This allows the juices to redistribute, preventing dryness.
Slice into thick, hearty portions and serve with mashed potatoes, Cajun rice, or sautéed greens.
Garnish with fresh parsley or extra Creole seasoning for added color and flavor.
Want to elevate your meal? Serve alongside Cajun Sausage and Rice for a complete Southern-inspired dinner!
3. Pro Tips for the Perfect Creole Meatloaf
A great meatloaf recipe Creole isn’t just about following the steps—it’s also about mastering the little details that take it from good to amazing. Whether you want a juicier texture, a spicier kick, or a foolproof glaze, these pro tips will elevate your Creole meatloaf to the next level.
Secret #1: Keep It Moist and Tender
One of the biggest mistakes people make with meatloaf is ending up with a dry, tough loaf. However, there are several easy ways to keep your meatloaf recipe Creolejuicy and tender:
Use a mix of ground meats – Combining ground beef and pork (or even turkey) creates a softer texture because pork has more fat than beef alone.
Don’t skip the milk and breadcrumbs – Breadcrumbs soaked in milk or broth add moisture, preventing a crumbly, dry loaf.
Add grated vegetables – Onions, bell peppers, and celery release natural juices, keeping the meatloaf soft and flavorful.
Pro Tip: If you’re worried about a dry meatloaf, cover it loosely with foil while baking, then uncover it in the last 15 minutes to caramelize the glaze.
Secret #2: Don’t Overmix the Meat
It might seem like a good idea to mix your meat thoroughly, but overworking the mixture can result in a dense, chewy meatloaf.
Here’s how to mix without overdoing it:
Use your hands – Gently fold the ingredients together instead of pressing them too hard.
Mix just until combined – Stop once everything is evenly blended.
Chill before shaping – Let the mixture sit in the fridge for 10–15 minutes before forming the loaf. This helps it hold its shape without becoming compacted.
Overmixing compresses the meat, making it tough rather than tender. Instead, aim for a light, airy texture by mixing gently but thoroughly.
Secret #3: Let It Rest Before Slicing
If you’ve ever sliced into a fresh meatloaf only to see all the juices run out, you know why resting is important. Cutting into hot meatloaf too soon can cause it to lose moisture, leaving it dry and crumbly.
To ensure your meatloaf recipe Creole stays moist and flavorful:
Let it rest for at least 10 minutes after removing it from the oven.
Cover it loosely with foil to trap heat while allowing the juices to redistribute.
Slice it with a sharp knife to prevent tearing or crumbling.
Taking this extra step will make a huge difference in how juicy and tender your final dish turns out!
Secret #4: Elevate the Glaze
A good glaze adds sweetness, tang, and spice, making the top of the meatloaf irresistibly caramelized. However, instead of using plain ketchup, try these glaze upgrades:
Honey & Worcestershire Sauce – Adds depth and a rich umami flavor.
Creole Mustard & Brown Sugar – Gives a sweet yet spicy kick.
Hot Sauce & Molasses – Creates a smoky, spicy contrast.
For the best results, apply the glaze in two layers:
Halfway through baking – This allows it to soak into the meat.
At the last 10 minutes – Creates a beautiful, glossy finish.
4. Serving Ideas & Delicious Pairings
A well-made meatloaf recipe Creole is flavorful on its own, but the right side dishes and variations can elevate it to a whole new level. Whether you’re serving it for a weeknight dinner, a holiday meal, or a family gathering, these delicious pairings will complement the rich, bold flavors of Creole-style meatloaf.
Best Side Dishes for Creole Meatloaf
Pairing your meatloaf recipe Creole with the right side dishes enhances its flavors and creates a balanced meal. Here are some of the best sides to serve alongside your meatloaf:
Serve your Creole meatloaf with classic Southern side dishes
Cajun Rice – A spicy, seasoned rice dish with bell peppers, onions, and a touch of heat to complement the meatloaf’s Creole flavors.
Garlic Mashed Potatoes – Creamy and buttery mashed potatoes provide a smooth, comforting contrast to the meatloaf’s bold spices.
Collard Greens – A Southern classic! Slow-cooked greens with smoked ham or bacon add a rich, savory depth.
Cornbread – Slightly sweet and crumbly, cornbread pairs beautifully with the zesty tomato glaze of the meatloaf.
Roasted Okra or Green Beans – Adds a light, crispy texture to balance out the richness of the dish.
Alternative Variations
Want to customize your meatloaf recipe Creole to fit different tastes or dietary needs? Try these fun and easy variations:
Spicy Creole Meatloaf – Increase the cayenne pepper and add diced jalapeños for an extra fiery kick.
Turkey Creole Meatloaf – Swap ground beef and pork for ground turkey to create a lighter, leaner version while still keeping the bold flavors.
Keto Creole Meatloaf – Use almond flour instead of breadcrumbs and replace the sugar in the glaze with a sugar-free alternative to keep it low-carb.
Stuffed Creole Meatloaf – Add a center layer of cheese, sautéed mushrooms, or andouille sausage for a delicious surprise inside each slice.
Each of these variations keeps the heart of Creole flavors alive while allowing for personalization based on dietary preferences.
How to Store & Reheat Meatloaf
If you’ve made a large batch of meatloaf recipe Creole, you’ll want to store and reheat it properly to keep it moist and flavorful.
Storing Meatloaf:
Refrigerator: Store slices in an airtight container for up to 4 days.
Freezer: Wrap individual slices in plastic wrap and foil, then freeze for up to 3 months.
Reheating Meatloaf:
Oven (Best Method): Wrap in foil and heat at 300°F (150°C) for 15–20 minutes to keep it juicy.
Microwave: Heat in 30-second intervals, adding a splash of broth if needed.
Stovetop: Sear slices in a hot skillet for a slightly crispy edge while keeping the inside tender.
Proper storage and reheating preserve the texture and taste, so your leftovers taste just as good as the first serving!
How to Turn Leftovers into a New Meal
Leftover meatloaf recipe Creole can easily be repurposed into new and exciting dishes. Instead of reheating the same slice, try these creative leftover ideas:
Creole Meatloaf Sandwich – Slice the meatloaf and serve it on a buttery toasted bun with lettuce, tomato, and a drizzle of Creole mustard.
Meatloaf Tacos – Crumble leftover meatloaf and serve in warm tortillas with shredded cabbage, salsa, and a spicy aioli drizzle.
Stuffed Peppers – Chop up meatloaf and mix it with rice, then stuff into bell peppers and bake for a delicious one-pan meal.
Meatloaf Hash – Sauté diced meatloaf with potatoes, onions, and bell peppers for a hearty breakfast hash.
FAQs About Creole Meatloaf
What is Creole Meatloaf?
Creole meatloaf is a Southern-inspired twist on classic meatloaf, infused with bold spices, the “Holy Trinity” of vegetables (onion, bell pepper, celery), and a rich, tangy tomato glaze. Unlike traditional meatloaf, which relies on simple seasonings, a meatloaf recipe Creole is packed with Creole seasoning, giving it a zesty, slightly smoky, and mildly spicy flavor. This dish embodies the vibrant influences of French, Spanish, African, and Caribbean cuisines, making it a staple in Louisiana cooking.
What is the Secret to Moist Meatloaf?
A dry meatloaf is a common mistake, but there are several key techniques to keeping your meatloaf recipe Creolejuicy and tender:
Use a mix of meats – A combination of ground beef and pork (or even turkey) provides the best texture and fat content.
Don’t skip the binder – Breadcrumbs soaked in milk help retain moisture and prevent crumbling.
Incorporate vegetables – The Holy Trinity (onions, bell peppers, celery) adds natural juiciness and depth of flavor.
Avoid overmixing – Gently combine ingredients to keep the meatloaf light and airy.
Let it rest – Allowing your meatloaf to sit for at least 10 minutes before slicing ensures the juices redistribute, keeping each bite moist and flavorful.
Following these tips will guarantee a tender, succulent meatloaf every time!
What Ethnicity Made Meatloaf?
Meatloaf has European origins, with roots tracing back to German, Scandinavian, and Dutch cuisines. These cultures had a long tradition of using ground meat, breadcrumbs, and seasonings to create flavorful, economical dishes. When immigrants brought their recipes to America, meatloaf evolved into a classic comfort food, with regional variations like Southern, Creole, and Cajun meatloaf adding distinct spice blends and flavors.
The Creole variation stands out because of its Louisiana influence, blending French, Spanish, and African culinary traditions into a dish that’s rich, bold, and unique.
What is the Basic Meatloaf Formula?
The foundation of any great meatloaf follows a simple 1:½:1:¼ formula:
1 pound of ground meat (beef, pork, or turkey)
½ cup of breadcrumbs (or crushed crackers)
1 egg (for binding)
¼ cup of liquid (milk, broth, or tomato sauce)
For a meatloaf recipe Creole, you’d also incorporate:
Conclusion: Try This Flavor-Packed Creole Meatloaf Today!
This meatloaf recipe Creole delivers rich, bold flavors, tender texture, and a perfectly caramelized glaze, making it a standout Southern dish. By following these easy steps, pro tips, and serving suggestions, you can create a delicious homemade meatloaf that’s both comforting and full of Creole flair.
This meatloaf recipe Creole is a rich and flavorful twist on the classic comfort dish. Infused with Creole seasoning, the Holy Trinity of vegetables (onion, bell pepper, celery), and a tangy tomato-based glaze, this meatloaf is juicy, tender, and packed with bold Southern flavors. Perfect for a weeknight dinner or a special gathering, this dish pairs beautifully with mashed potatoes, Cajun rice, or cornbread.
Ingredients
Scale
Meatloaf Base:
1 lb ground beef (80/20 for best texture)
½ lb ground pork (for extra juiciness)
½ cupbreadcrumbs (or crushed saltine crackers)
½ cupwhole milk (for moisture)
2large eggs (lightly beaten)
1 small onion, finely diced
½green bell pepper, finely diced
½red bell pepper, finely diced
1 stalk celery, finely diced
2 cloves garlic, minced
2 tbspCreole seasoning (store-bought or homemade)
1 tbspWorcestershire sauce
1 tspsmoked paprika
½ tspcayenne pepper (adjust for heat preference)
1 tbspparsley, chopped (optional)
½ tspsalt (adjust to taste)
½ tspblack pepper
Creole Glaze:
½ cupketchup
2 tbspbrown sugar
1 tspWorcestershire sauce
1 tspCreole mustard (or Dijon mustard)
1 tsphot sauce (optional for extra heat)
½ tspCreole seasoning
Instructions
Step 1: Prepare the Ingredients
Preheat your oven to 375°F (190°C) and line a baking sheet with parchment paper or lightly grease a loaf pan.
In a small bowl, combine breadcrumbs and milk, letting them soak for 5 minutes to add moisture to the meatloaf.
Step 2: Mix the Meatloaf Base
In a large mixing bowl, combine ground beef, ground pork, soaked breadcrumbs, eggs, Worcestershire sauce, and all seasonings.
Add in the diced onion, bell peppers, celery, and minced garlic.
Using clean hands or a wooden spoon, gently mix the ingredients until just combined. Do not overmix, or the meatloaf will become dense.
Step 3: Shape & Bake
Shape the mixture into a loaf shape and place it on the prepared baking sheet. Alternatively, press it into a greased loaf pan.
Bake for 30 minutes, uncovered.
Step 4: Make the Creole Glaze
While the meatloaf bakes, mix ketchup, brown sugar, Worcestershire sauce, mustard, hot sauce, and Creole seasoning in a bowl.
Step 5: Glaze & Finish Baking
After 30 minutes of baking, remove the meatloaf from the oven and brush half of the glaze over the top.
Return it to the oven and bake for another 15–20 minutes until the glaze caramelizes and the internal temperature reaches 160°F (71°C).
In the last 5 minutes of baking, add the remaining glaze for a richer flavor.
Step 6: Rest & Serve
Remove the meatloaf from the oven and let it rest for 10 minutes before slicing. This helps retain moisture.
Slice and serve with your favorite Southern sides like Cajun rice, mashed potatoes, or cornbread.
Notes
For a spicier version: Increase cayenne pepper or add diced jalapeños to the mix.
For a leaner option: Swap ground pork for ground turkey and use low-fat milk.
For a keto-friendly version: Replace breadcrumbs with almond flour.
Storage: Store leftovers in an airtight container in the fridge for up to 4 days. Reheat in the oven at 300°F (150°C) for best results.
Freezing: Wrap slices in plastic wrap and foil before freezing for up to 3 months.
Look, I’m not here to sell you a ~culinary journey~. This ground chicken Mexican corn recipe is for hungry humans who want bold flavor without babysitting a stove. Crispy-edged chicken? Check. Sweet-and-smoky corn? Double-check. A one-pan cleanup? Mic drop. Pro tip: Wear stretchy pants. Things might get greedy.
Table of Contents
Why You’ll Love This Recipe
Craving a meal that’s quick, tasty, and doesn’t dirty every dish in your kitchen? This ground chicken Mexican corn recipe checks all the boxes and then some. Let’s break down why it’ll become your new weeknight obsession.
Perfect for Busy Weeknights
Let’s face it: nobody wants to babysit a stove after a long day. Good news this 30-minute meal cooks in one pan, which means less time scrubbing and more time relaxing. For example, while the ground chicken browns, you can prep toppings like creamy avocado or crisp lettuce. Plus, leftovers reheat like a dream (more on that later). In short, it’s the ultimate ”I’m tired, but I still want flavor” solution.
Balanced Flavor & Nutritio
Unlike greasy takeout, this dish packs lean protein from ground chicken and fiber from sweet corn. Think smoky paprika, earthy cumin, and a squeeze of lime to brighten things up. Want a pro tip? Toss in a handful of black beans for an extra fiber boost. Best part? It’s hearty without weighing you down perfect for post-dinner energy.
Customizable for Dietary Needs
Whether you’re gluten-free, dairy-free, or just picky, this recipe bends to your needs. For instance:
Swap regular tortillas for corn tortillas (gluten-free!).
Skip the cheese and add smashed avocado for creaminess.
Prefer heat? Throw in diced jalapeños or a dash of hot sauce. Bottom line: Your kitchen, your rules.
Budget-Friendly & Meal-Prep Ready
Ground chicken and frozen corn are wallet-friendly staples, making this dish kind to your grocery budget. Even better, it’s a meal-prep superstar. Here’s how: Double the batch, portion into containers, and freeze. When cravings strike, reheat it for tacos, salads, or even stuffed peppers. Pro tip: Add a splash of broth while reheating to keep the chicken juicy.
Ingredients & Substitutions
Let’s break down what you’ll need (and how to tweak it) for thisground chicken Mexican corn recipe. Whether you’re raiding your pantry or adapting for dietary needs, we’ve got you covered.
Simple pantry staples like chili powder, cumin, and lime create bold flavor.
Essential Ingredients for Authentic Flavor
First things first: The soul of this dish lies in three key players. Ground chicken (thighs for richness or breast for leaner bites) brings protein, while fresh or frozen corn adds sweetness. Don’t skip the spices—smoked paprika, cumin, and chili powder create that smoky, earthy backbone. For brightness, a squeeze of lime juice and handful of cilantro are non-negotiable.
Optional Add-Ins for Extra Zing
Want to level up? Toss in pantry staples or leftovers for flair. For example:
Black beans (drained and rinsed) for fiber and texture.
Diced bell peppers or onions sautéed with the chicken.
Cotija cheese crumbles or crema for creamy richness. Feeling adventurous? Stir in a spoonful of chipotle in adobo—just a dab adds smoky heat.
Ingredient Swaps for Allergies/Diets
No stress if you’re missing something. This ground chicken Mexican corn recipe is a chameleon:
Dairy-free? Skip the cheese and use avocado or cashew cream.
Low-carb? Swap corn for zucchini or cauliflower rice.
Ground turkey or beef work if chicken’s not your vibe (just adjust cooking time). Craving crunch? Serve in lettuce wraps instead of tortillas.
Tools You’ll Need
You don’t need fancy gear, but these tools make life easier:
A large skillet (cast-iron for better browning).
Wooden spoon to break up the chicken without scratching pans.
Citrus juicer (because hand-squeezing limes is messy).
Step-by-Step Cooking Guide
Ready to transform simple ingredients into a showstoppingground chicken Mexican corn recipe? Follow these foolproof steps—no chef skills required.
Prep Your Ingredients (5 Minutes)
First, dice 1 small onion and mince 2 garlic cloves. Meanwhile, if using frozen corn, thaw 1.5 cups in a colander under cold water. Pro tip: Pat the corn dry with a paper towel to avoid a soggy skillet. Got fresh corn? Char it briefly in a dry pan for smoky depth.
Cook the Ground Chicken (10 Minutes)
auté onions and spices to build the recipe’s smoky-sweet base.
Heat1 tbsp oil in a large skillet over medium-high. Add1 lb ground chicken, breaking it into crumbles with a wooden spoon. Cook until no pink remains (5-7 minutes). Drain excess fat, but leave a bit for flavor. Season lightly with salt here—trust me, the spices come next!
Build the Flavor Base (8 Minutes)
Toss in the onions and garlic, sautéing until golden (2-3 minutes). Sprinkle1 tsp chili powder, 1 tsp cumin, and ½ tsp smoked paprika over the mix. Stir to coat everything in those earthy, smoky spices. Then, add the corn and 2 tbsp lime juice, cooking until the kernels soften (3-4 minutes). Want more heat? Now’s the time to add diced jalapeños!
Finish & Serve (7 Minutes)
Remove the skillet from heat. Fold in ¼ cup chopped cilantro and ½ cup crumbled cotija cheese (optional). Serve immediately with warm tortillas, lime wedges, and avocado slices. Leftovers? Store in an airtight container for up to 3 days.
Serving Ideas & Pro Tips
Yourground chicken Mexican corn recipeis ready now let’s make it shine! From creative twists to foolproof storage hacks, here’s how to maximize flavor and minimize fuss.
Stuff tacos, salads, or nachos with this versatile skillet mix.
Creative Ways to Serve
Don’t just stop at tacos! This dish is a meal-prep superstar that morphs into new meals effortlessly. For example:
Stuff bell peppers with the mix, top with cheese, and bake at 375°F for 15 minutes.
Toss it into lettuce wraps with a drizzle of crema for a low-carb lunch.
Layer it over tortilla chips with melted cheese for 10-minute nachos. Craving something fresh? Mix leftovers into a salad with crunchy romaine and zesty lime dressing.
Meal Prep & Storage Hacks
Want to save time? Cook a double batch and freeze portions for lazy days. Here’s how:
Let the mixture cool completely.
Divide into airtight containers or freezer bags (squeeze out excess air).
Label with the date it keeps for 3 months. When reheating, add a splash of broth or water to revive moisture. Pro tip: Freeze individual servings for solo meals!
Spice Level Adjustments
Not everyone loves fiery heat—and that’s okay!Tailor the spice level to your crowd:
Mild: Skip chili powder and use smoked paprika for depth without burn.
Medium: Add 1 diced jalapeño (seeds removed) to the skillet.
Extra hot: Stir in 1 tsp chipotle powder or a dash of hot sauce. Test as you go you can always add heat, but you can’t take it away!
Pairing with Sides & Drinks
Round out your meal with sides that complement the smoky-sweet flavors:
Cilantro-lime rice: Our 5-minute version balances richness.
Grilled zucchini: Toss slices with olive oil and chili powder.
Classic margarita: A tart cocktail cuts through the spices.
FAQs
Can I use ground turkey instead of ground chicken in this recipe?
Absolutely! Ground turkey works perfectly—just add 1 tbsp olive oil while cooking to keep it moist. The smoky spices and sweet corn pair beautifully with turkey, making it a leaner (but just as tasty) twist on this ground chicken Mexican corn recipe.
How do I make this dish spicier?
Want more heat? Toss in diced jalapeños while sautéing the onions, or stir in ½ tsp cayenne pepper with the spices. For a finishing kick, drizzle with hot sauce or sprinkle crushed red pepper flakes before serving.
Can I use fresh corn instead of frozen?
Yes! Fresh corn adds a sweet, summery crunch. Cut kernels off 2 ears of corn and char them in the skillet for 2-3 minutes before adding the chicken. Pro tip: Save the cobs for making homemade corn broth (a zero-waste win!).
How long does this recipe last in the fridge?
Store leftovers in an airtight container for up to 3 days. To reheat, warm it in a skillet with a splash of broth or water to keep the ground chicken juicy. Avoid microwaving—it can dry out the spices.
Conclusion
In short, this ground chicken Mexican corn recipe is your ticket to a 30-minute dinner that’s bold, flexible, and anything but boring. Whether you’re craving tacos, salads, or nachos, the smoky-sweet combo of ground chicken, charred corn, and zesty lime will keep your taste buds dancing. Don’t forget: Double the batch for effortless meal prep, tweak the spice level to your mood, and pair it with sides like cilantro-lime rice for a full fiesta. Ready to cook? Grab that skillet, and let’s get sizzling!
Whip up this smoky, zesty ground chicken Mexican corn recipe in one pan! Perfectly balanced with sweet corn, bold spices, and fresh lime, it’s ideal for tacos, salads, or a standalone skillet meal.
Ingredients
1 lb ground chicken (thigh or breast)
1.5 cups corn kernels (fresh, frozen, or canned)
1 small onion, diced
2 garlic cloves, minced
1 tbsp olive oil
1 tsp chili powder
1 tsp ground cumin
½ tsp smoked paprika
Juice of 1 lime (about 2 tbsp)
¼ cup fresh cilantro, chopped
Salt and pepper to taste
Optional: ½ cup black beans (drained), ¼ cup cotija cheese, avocado slices, jalapeños
Instructions
Prep Ingredients: Dice the onion, mince the garlic, and thaw frozen corn (if using).
Cook Chicken: Heat olive oil in a large skillet over medium-high. Add ground chicken, breaking it into crumbles. Cook until no pink remains (5-7 minutes). Drain excess fat.
Sauté Aromatics: Add onion and garlic to the skillet. Sauté until softened (2-3 minutes).
Add Spices: Stir in chili powder, cumin, smoked paprika, and a pinch of salt. Toast for 1 minute until fragrant.
Mix in Corn: Add corn (and black beans, if using). Cook for 3-4 minutes until corn is tender.
Finish with Lime & Herbs: Remove from heat. Stir in lime juice and cilantro. Taste and adjust seasoning.
Serve: Top with cotija cheese, avocado, or jalapeños. Serve with tortillas, rice, or over greens.