Pickle Pie Pizza: The Ultimate Fusion You Need to Try!

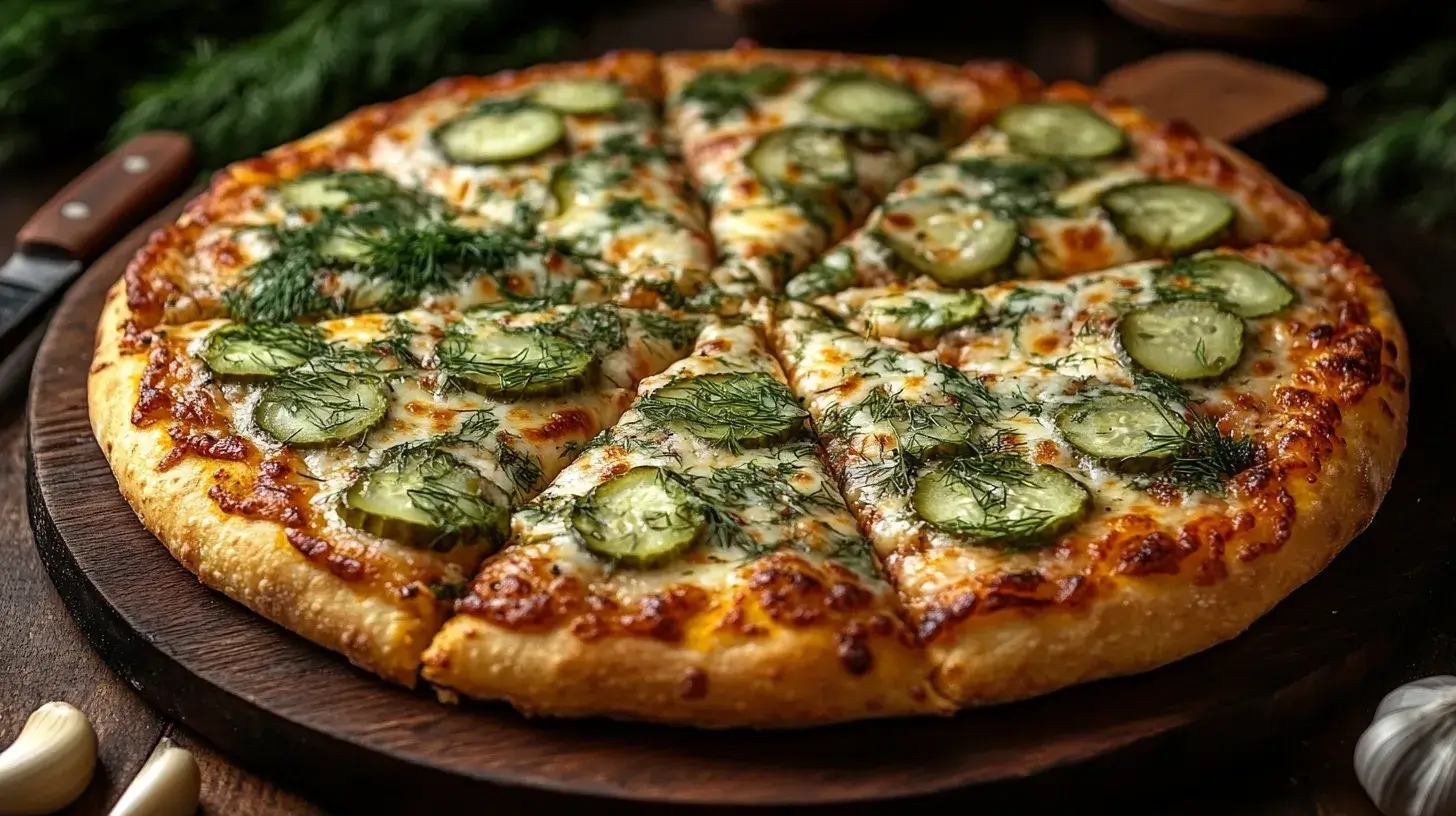
Let’s talk about pickle pie pizza. Yes, you read that right pickles on pizza! But this isn’t just any ordinary slice. This flavor-packed creation takes the zing of dill pickles, the creaminess of garlic sauce, and the stretch of mozzarella cheese, and blends it all into one unforgettable bite. It’s the kind of dish that makes you wonder why you didn’t try it sooner.

What’s more, pickle pie pizza is the ultimate crowd-pleaser. It’s perfect for those who love bold flavors and crave something a little different. Serve it at a party and watch your guests go from skeptical to smitten after just one bite. The best part? You don’t need fancy equipment or professional skills to whip this up. All you need is a handful of ingredients, a little enthusiasm, and a love for all things tangy and cheesy. Ready to dive into this culinary adventure? Let’s get started on your new favorite pizza recipe!

What Is Pickle Pie Pizza?

The Origins of Pickle Pizza

The fascinating rise of pickle pie pizza is a testament to how creativity and culinary trends often come together to produce something extraordinary. Although the exact origin of this dish is hard to pinpoint, many credit its popularity to artisan pizza makers who wanted to cater to adventurous eaters. Over the years, it has evolved from a quirky novelty into a mainstream favorite, especially among pickle enthusiasts. This dish combines classic pizza elements with the zesty charm of pickles, making it a must-try for anyone looking to spice up their pizza nights.

Notably, some restaurants in the U.S. Midwest were among the first to experiment with pickles as pizza toppings. Their success quickly inspired home cooks and food bloggers to create their own versions of this unique recipe. As a result, pickle pie pizza has become a viral sensation on social media platforms, thanks to its unexpected yet delightful flavor.

Why Pickle Pie Pizza Stands Out

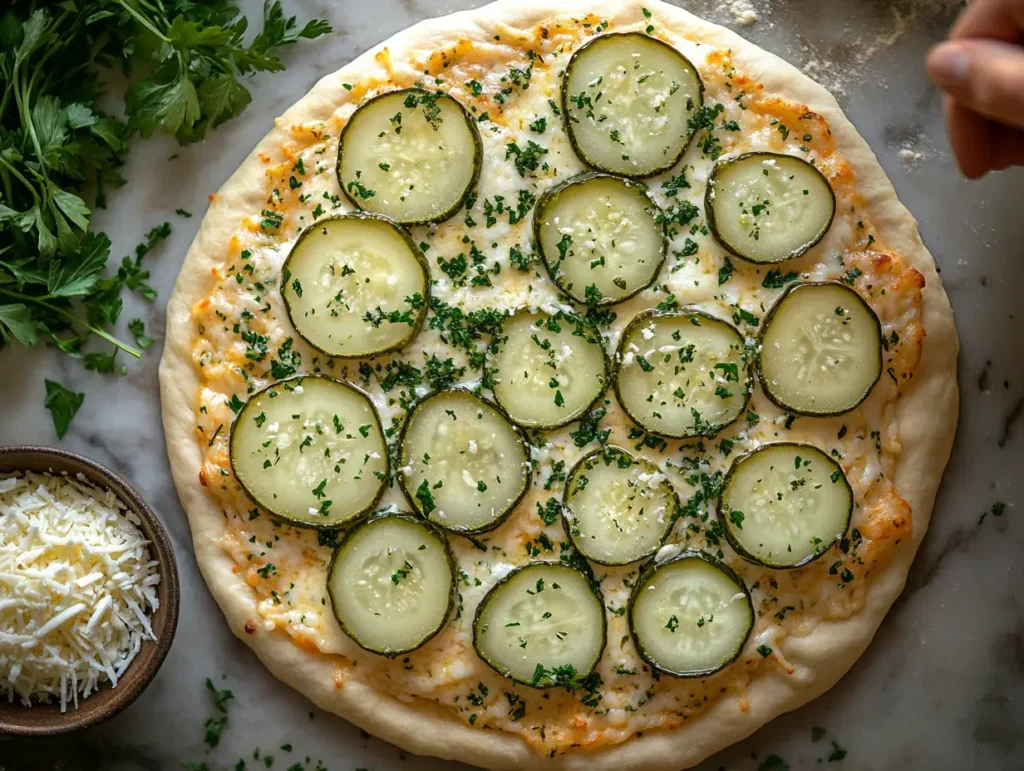
What makes pickle pie pizza such a showstopper is its balance of bold, tangy flavors with the comforting creaminess of traditional pizza. Unlike a standard pepperoni slice, this pizza offers a refreshing twist that satisfies your cravings for something new. The sharpness of dill pickles pairs beautifully with melted mozzarella cheese and a creamy garlic sauce, creating a flavor profile that’s as memorable as it is delicious.

For those who love to explore food fusions, this pizza ticks all the boxes. It’s adventurous yet approachable, making it perfect for family dinners or casual get-togethers. Plus, its vibrant presentation—golden crust, bright green pickles, and bubbling cheese—is bound to grab everyone’s attention.

Ingredients That Make It Unique

The secret to a great pickle pie pizza lies in its carefully chosen ingredients. While the star of the show is undeniably the pickles, other components play an equally important role in creating a well-rounded flavor.

Pizza dough spread with creamy garlic sauce on a wooden board, ready for toppings.
Spread a generous layer of creamy garlic sauce over the pizza dough for the perfect base.
  • Dill Pickles: Opt for high-quality pickles with a sharp tang, as they’re the hero of this dish. Sweet pickles can work too, but dill offers the best balance.
  • Mozzarella Cheese: Its mild, creamy taste complements the boldness of the pickles without overpowering them.
  • Creamy Garlic Sauce: This sauce acts as the base, adding richness and depth to the pizza. You can easily make it at home or use a store-bought version.
  • Pizza Crust: Whether you prefer a thin crust for crispiness or a thicker one for heartiness, the crust should provide a sturdy foundation for the toppings.

Pickle Pizza vs. Traditional Pizza

If you’re wondering how pickle pie pizza compares to traditional pizza, the difference lies in its bold use of tangy, unexpected flavors. While a classic pizza relies on tomato sauce and pepperoni, this version swaps out those familiar elements for a creamy base and pickles, making it a refreshing alternative.

Another key distinction is the texture. The crunch of pickles contrasts beautifully with the gooey cheese, creating a multi-dimensional eating experience. For those who love experimenting with flavors, this pizza offers an exciting departure from the norm without straying too far from the comfort of a beloved dish.

For more on unique pizza trends, check out this guide to creative pizza toppings from Serious Eats.

How to Make Pickle Pie Pizza at Home

A golden-brown pickle pie pizza baking in the oven with melted cheese and tangy pickles.
A pickle pie pizza with bubbling cheese and tangy pickles, baking in the oven to a golden-brown perfection.

Step-by-Step Instructions

Making pickle pie pizza is surprisingly simple, even for beginner cooks. Follow these steps:

  1. Prepare the Dough: Roll out your pizza dough on a floured surface. Preheat your oven to 425°F (220°C) for a crisp crust.
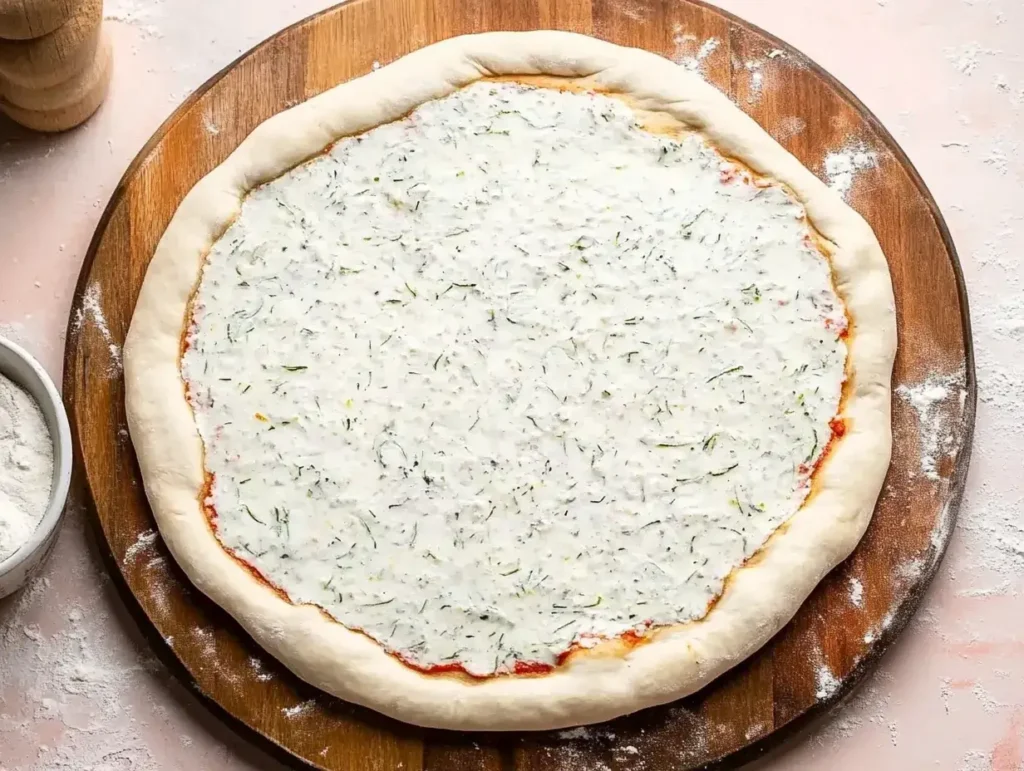
  2. Spread the Sauce: Evenly coat the base with creamy garlic sauce, leaving about an inch around the edges.
  3. Layer the Pickles: Arrange thinly sliced dill pickles over the sauce. Overlap them slightly for consistent flavor in each bite.
  4. Add Cheese: Sprinkle shredded mozzarella generously over the pickles.
  5. Bake to Perfection: Place your pizza on a hot baking stone or tray and bake for 12-15 minutes, or until the crust is golden and the cheese is bubbly.

For a detailed breakdown of pizza baking tips, check out this comprehensive guide to pizza-making.

Tips for Achieving the Best Results

Perfecting your pickle pie pizza requires a few insider tricks:

  • Prevent a Soggy Crust: Pat your pickle slices dry with a paper towel before placing them on the dough. Excess moisture can ruin the texture.
  • Use a Pizza Stone: Baking on a preheated stone ensures an evenly cooked crust with just the right amount of crunch.
  • Season Wisely: A sprinkle of dried dill or red pepper flakes can add a flavor boost without overpowering the pickles.

Customization Ideas

One of the best things about pickle pie pizza is how customizable it is. Here are a few variations to try:

  • Spicy Kick: Add jalapeños or a drizzle of hot sauce for a fiery twist.
  • Protein Power: Top with crumbled bacon or shredded chicken to make it heartier.
  • Vegan Option: Swap the mozzarella for plant-based cheese and use vegan garlic sauce.

Get creative and make this recipe your own—there’s no wrong way to enjoy pickle pie pizza.

The Flavor Experience: Why You’ll Love Pickle Pie Pizza

Unbaked pickle pie pizza topped with dill pickles and shredded mozzarella cheese on a marble surface.
The unbaked pickle pie pizza, generously topped with dill pickles, mozzarella cheese, and fresh parsley, ready to go in the oven.

A Tangy Explosion of Flavors

One bite of pickle pie pizza is all it takes to understand why this dish has captured the hearts of adventurous eaters everywhere. The tangy crunch of dill pickles harmonizes with the creamy garlic sauce, creating a bold and unique flavor profile. Unlike traditional pizza toppings, pickles bring a zesty brightness that balances the richness of the melted mozzarella cheese.

Each bite is a delightful contrast: the crisp pickles pop against the gooey cheese, and the savory crust provides the perfect foundation. It’s a combination you didn’t know you needed, but once you try it, there’s no going back.

Perfect for Pickle Lovers

If you’re someone who can’t get enough of pickles—whether they’re on a sandwich, in a salad, or straight out of the jar—pickle pie pizza is your dream come true. This pizza is essentially a celebration of all things pickle, featuring the ingredient front and center.

Unlike other recipes where pickles take a backseat, here they are the star. Their tangy, salty bite is enhanced by the subtle flavors of the garlic sauce and cheese. For pickle enthusiasts, this pizza is more than a meal—it’s a statement.

Crowd-Pleasing Appeal

Whether you’re hosting a game night, throwing a casual dinner party, or simply looking to surprise your family with something different, pickle pie pizza is guaranteed to be a hit. Its unique flavor profile makes it a conversation starter, while its familiar pizza base ensures it’s still approachable for everyone.

For guests who might be skeptical, you can offer mini slices as appetizers. Once they take a bite, they’ll be lining up for seconds. And if you’re serving a variety of pizzas, this tangy option will stand out from the crowd. For other fun party ideas, check out How to Make Juicy Baby Back Ribs with Beer & Steak Seasoning

A Conversation Starter

Food isn’t just about taste it’s also about the stories and memories it creates. Serving pickle pie pizza is a great way to spark conversations and share laughs with your guests. The unexpected topping choice will intrigue your friends and family, giving you the perfect opportunity to talk about how you discovered or created the recipe.

Whether you’re introducing this dish at a casual dinner or bringing it to a potluck, you can be sure it will leave a lasting impression. Food trends come and go, but the joy of sharing a unique dish like pickle pie pizza is timeless.

Dill Pickle Pizza

Dill pickle pizza is a variation that stays true to the core concept while keeping things simple and classic. This version highlights the crisp, tangy flavor of dill pickles combined with a creamy garlic sauce and gooey mozzarella cheese. The secret to its popularity lies in its ability to balance the boldness of the pickles with the smoothness of the cheese, creating a slice that’s surprisingly addictive.

For a bit of extra flair, you can sprinkle fresh dill on top right after baking. It’s a small touch that enhances the overall flavor and gives the pizza an elevated look. Dill pickle pizza has become a hit at many restaurants, showcasing how this unconventional topping can be an absolute game-changer.

Sweet and Spicy Pickle Pizza

If you’re a fan of bold flavors, the sweet and spicy pickle pizza variation is perfect for you. This version combines the tanginess of pickles with a drizzle of honey or a sprinkle of brown sugar to add sweetness, while chili flakes or sliced jalapeños bring the heat. The result? A mouthwatering fusion that’s both sweet and savory, with a fiery kick.

This variation works well for those who love experimenting with contrasts in their food. Pair it with a light salad or a refreshing beverage to cool down the spice, and you’ve got a meal that’s sure to impress.

Gluten-Free and Vegan Option

One of the best things about pickle pie pizza is how easily it can be adapted for dietary preferences. For a gluten-free option, use a cauliflower crust or a pre-made gluten-free pizza base. Both work wonderfully and allow the pickles and cheese to remain the stars of the dish.

For vegans, simply swap out the mozzarella cheese for your favorite plant-based alternative and use a dairy-free garlic sauce. With so many great vegan products available today, this version tastes just as delicious as the original.

Serving Suggestions and Pairing

Best Sides to Serve with Pickle Pie Pizza

Pairing the right sides with your pickle pie pizza can enhance the meal and make it even more memorable. A crisp green salad with a tangy vinaigrette is an excellent choice to complement the bold flavors of the pizza. The freshness of the salad balances the richness of the cheese and sauce, offering a refreshing contrast.

For something heartier, consider a creamy coleslaw with a hint of sweetness. The crunch of the coleslaw pairs well with the pickles’ tang, creating a textural harmony. Additionally, roasted vegetables like asparagus or Brussels sprouts add a savory touch to round out the meal.

Ideal Beverages to Pair

When serving pickle pie pizza, the right drink can take the experience to the next level. A light, citrusy beer, such as a pilsner or a wheat ale, complements the tangy pickle flavors without overwhelming them. For non-alcoholic options, try a sparkling lemonade or a cucumber-infused water both enhance the refreshing qualities of the pizza.

For those who enjoy cocktails, a classic Bloody Mary with its spicy, savory profile pairs perfectly with the boldness of the pizza. Its briny undertones mirror the pickles, creating a flavor match that’s hard to beat.

How to Store Leftovers

If you happen to have leftover pickle pie pizza, storing it properly ensures it retains its flavor and texture. Allow the pizza to cool completely before wrapping each slice individually in aluminum foil or storing them in an airtight container. This method prevents the crust from becoming soggy and keeps the toppings fresh.

For reheating, avoid using a microwave, as it can make the crust chewy. Instead, place the slices on a baking sheet and reheat them in an oven preheated to 375°F (190°C) for about 8-10 minutes. This method restores the crispness of the crust while warming the toppings evenly.

Creative Presentation Ideas

Serving pickle pie pizza creatively can make your dish the highlight of any gathering. For parties or game nights, cut the pizza into bite-sized squares or triangles and arrange them on a wooden serving board. Garnish the platter with small bowls of dipping sauces, such as ranch, garlic aioli, or spicy mayo, to give guests a variety of options.

For a more formal presentation, serve individual mini pickle pizzas. Simply use smaller dough rounds, and follow the same steps to create personalized portions. Add a sprinkle of fresh dill or a drizzle of olive oil just before serving to elevate the visual appeal.

FAQs

What does pickle pie taste like?

Pickle pie has a unique flavor that’s both tangy and savory. The pickles deliver a sharp, briny kick, balanced by the creamy richness of the garlic sauce and mozzarella cheese. Every bite combines the crunch of the pickles with the gooeyness of melted cheese, creating a satisfying contrast of textures. If you love bold, zesty flavors, pickle pie pizza offers a one-of-a-kind taste experience that’s sure to please your palate.

What does pickle pizza taste like?

Pickle pizza is a delightful fusion of tangy, cheesy, and savory flavors. The pickles add a bright and zesty punch, while the creamy garlic sauce replaces traditional tomato sauce, giving it a smooth, rich base. Topped with mozzarella, the pizza achieves a perfect balance of sharpness and creaminess. If you’re craving something adventurous yet comforting, pickle pie pizza delivers a flavor profile that’s surprisingly addictive.

Who invented pickle pizza?

The exact origins of pickle pizza are unclear, but its rise to fame can be credited to creative artisan pizza makers in the United States, particularly in the Midwest. These chefs experimented with pickles as a topping, creating a dish that quickly became a viral sensation. Today, pickle pie pizza is featured on menus across the country and is a favorite for food lovers seeking something different and exciting.

What is a football pie pizza?

A football pie pizza is a fun, football-shaped pizza often made for game-day celebrations. It’s designed to resemble a football, with a crust shaped like an oval and toppings arranged to mimic the stitching and design of a football. While it doesn’t typically include pickles as a topping, you can adapt the concept to create a pickle pie pizza version, combining the playful shape with tangy pickle flavors for a crowd-pleasing treat.

Conclusion

Pickle pie pizza is more than just a meal it’s a bold and delicious culinary adventure that brings together the tangy crunch of pickles, the creamy richness of garlic sauce, and the comforting familiarity of pizza. From understanding its origins to exploring creative variations, you now have all the tools and inspiration to make this unforgettable dish your own.

Whether you’re a pickle enthusiast or simply curious about trying something new, pickle pie pizza is guaranteed to impress. Its unique flavor profile, adaptability for dietary preferences, and ability to spark conversations make it a standout choice for any occasion. Plus, with the simple recipe and serving suggestions provided, you can easily recreate this dish at home and wow your friends and family.

So, what are you waiting for? Roll up your sleeves, gather your ingredients, and get ready to bake the most tangy, cheesy, and exciting pizza you’ve ever had. Trust us—your taste buds will thank you!

sushi order topped with salmon nyt You Need to Try

If there’s one thing that can turn an ordinary sushi night into a culinary adventure, it’s a sushi order topped with salmon. Bursting with buttery richness, a hint of sweetness, and that signature melt-in-your-mouth texture, salmon has a way of elevating any sushi platter. Whether it’s the classic simplicity of salmon nigiri or a bold, spicy salmon roll, every bite offers a harmonious balance of flavors that’s pure magic.

But here’s the kicker the New York Times (NYT) has spotlighted some truly irresistible salmon sushi creations that you absolutely have to try. From innovative pairings like avocado and salmon to the smoky allure of aburi sushi, there’s a world of options waiting to tempt your taste buds.

The Unique Flavor Profile of Salmon Sushi

When it comes to sushi, the flavor of salmon-topped sushi stands out for its rich and velvety texture. Salmon has a natural sweetness and buttery smoothness that pairs beautifully with sushi rice, creating a harmonious blend of flavors. This balance of textures—soft salmon against firm, seasoned rice is what makes every bite so satisfying.

But the experience doesn’t stop there. Chefs often enhance the salmon’s umami with subtle additions like sesame seeds, tangy citrus, or delicate soy glaze. No wonder a sushi order topped with salmon nyt has become a global favorite.

For many, salmon sushi isn’t just a meal it’s a sensory delight. From the vibrant color of the fish to its melt-in-your-mouth consistency, it’s easy to see why the New York Times (NYT) highlights salmon as one of the top choices in their sushi reviews.

A Global Trend: Salmon in Japanese Cuisine

Did you know that salmon wasn’t always a staple in traditional Japanese sushi? Historically, sushi featured local fish like tuna or snapper. However, as sushi gained popularity worldwide, salmon emerged as a star ingredient, particularly in Western-style rolls. Today, salmon is one of the most requested toppings in a sushi order topped with salmon, as mentioned by the NYT.

Countries like Norway played a significant role in popularizing salmon sushi globally by introducing high-quality, farm-raised salmon to Japanese markets in the late 20th century. This innovation made salmon sushi accessible and safe to eat, helping it become a beloved choice worldwide.

To learn more about salmon’s rise in global cuisine, check out this trusted resource on the history of sushi.

Health Benefits of Eating Salmon-Topped Sushi

A sushi order topped with salmon nyt isn’t just delicious—it’s also a smart choice for your health. Packed with omega-3 fatty acids, salmon supports heart health, brain function, and glowing skin. Its high protein content makes it perfect for a light, nutritious meal that keeps you full without feeling weighed down.

Moreover, salmon is rich in essential vitamins like B12 and D, making it a nutrient-dense addition to your diet. Combined with sushi rice’s energy-boosting carbs and other fresh ingredients like avocado or cucumber, salmon-topped sushi is as balanced as it is flavorful.

No wonder the New York Times (NYT) frequently highlights salmon sushi as a wholesome indulgence worth every bite.

The Versatility of Salmon in Sushi Creations

One of the reasons salmon remains a favorite in sushi is its incredible versatility. For instance, whether served raw, seared, or smoked, salmon adapts beautifully to different culinary styles. In a sushi order topped with salmon, you might encounter salmon nigiri, where a fresh slice of salmon is paired with perfectly seasoned rice, or a bold spicy salmon roll that combines heat and creaminess.

Moreover, even fusion dishes like salmon-avocado rolls or aburi salmon (lightly torched for a smoky flavor) showcase how chefs around the world continue to innovate with this classic ingredient. Thus, each variation offers a unique flavor journey, proving that there’s no wrong way to enjoy salmon-topped sushi.

From traditional Japanese preparations to creative global twists, salmon brings a depth of flavor and creativity that captivates sushi lovers everywhere. Therefore, it remains a top choice for those seeking both comfort and culinary adventure.

NYT’s Top Picks for Salmon-Topped Sushi

Classic Salmon Nigiri – A Timeless Choice

When it comes to a sushi order topped with salmon, salmon nigiri remains a classic. Indeed, this simple yet elegant option combines thinly sliced, fresh salmon atop perfectly seasoned sushi rice. Each bite, therefore, offers a delicate balance of rich flavors and tender textures.

In addition, the New York Times (NYT) often highlights salmon nigiri for its authenticity and quality, making it a must-try for sushi lovers. The secret to enjoying this dish lies in its freshness—always look for vibrant, firm fish that glistens naturally.

Moreover, for readers exploring sushi for the first time, salmon nigiri is a great entry point. Its uncomplicated flavors thus let you fully appreciate the artistry of sushi without overwhelming your palate.

Salmon Sashimi – Pure and Unadulterated

If you’re craving salmon’s unfiltered flavors, salmon sashimi is your go-to. Unlike nigiri, sashimi skips the rice, focusing solely on the fish. A sushi order topped with salmon nyt often includes this delicacy, celebrated for its purity and melt-in-your-mouth texture.

The NYT emphasizes the importance of knife skills in creating sashimi, as each slice needs to be perfectly uniform to enhance the experience. Whether paired with soy sauce or enjoyed as-is, salmon sashimi offers a luxurious treat for your taste buds.

Aburi Salmon Sushi – A Seared Sensation

Chef torching aburi salmon nigiri
A chef torching aburi salmon nigiri to create a smoky, flavorful twist.

Aburi salmon is a game-changer in the world of sushi. Lightly seared with a torch, this dish adds a smoky twist to your sushi order topped with salmon. The subtle charring enhances the salmon’s natural oils, creating a complex and satisfying flavor profile.

The NYT praises aburi sushi for its innovative take on traditional ingredients. Whether drizzled with a light sauce or topped with garnishes like green onions or roe, aburi salmon is as visually stunning as it is delicious.

If you’re new to aburi-style sushi, ask your server for recommendations or seek out restaurants known for their creative touches.

Salmon and Avocado Rolls – A Match Made in Heaven

One of the most popular fusion options, salmon and avocado rolls, combines creamy avocado with the rich flavors of salmon. This pairing is a hit among sushi enthusiasts for its buttery texture and refreshing taste.

The NYT frequently highlights the versatility of avocado in sushi, especially when paired with fresh salmon. Whether you’re dining out or crafting sushi at home, these rolls are crowd-pleasers that never fail to impress.

Adding a dash of sesame seeds or a drizzle of spicy mayo can elevate this roll even further, offering a delightful balance of flavor and crunch.

Creative Twists on Salmon-Topped Sushi

Fusion Sushi Rolls with Salmon

sushi order topped with salmon nyt
A fusion-style salmon and avocado sushi roll, garnished with sesame seeds.

When it comes to fusion cuisine, sushi chefs have embraced bold creativity, especially with a sushi order topped with salmon. Fusion rolls take the classic elements of salmon sushi and pair them with unexpected ingredients like jalapeños, cream cheese, or mango. These combinations add exciting layers of flavor and texture.

One standout is the “Dragon Roll,” featuring salmon, avocado, and a drizzle of spicy mayo. For those who enjoy a kick of heat, spicy salmon rolls with sriracha or chili oil are an excellent choice. These rolls, often praised by the New York Times (NYT), are a perfect way to experience sushi in a new, adventurous light.

Vegan Alternatives Inspired by Salmon Sushi

For those exploring plant-based options, vegan alternatives to a sushi order topped with salmon are on the rise. In fact, chefs now use creative ingredients like marinated carrot ribbons, tomato slices, or smoked watermelon to mimic the texture and flavor of salmon.

Moreover, these vegan “salmon” creations often include the same signature garnishes—like sesame seeds, nori, and soy sauce—providing a familiar sushi experience. According to the NYT, many sushi restaurants now offer innovative plant-based rolls that even non-vegans find irresistible. Thus, the appeal of these options continues to grow among diverse audiences.

DIY Salmon Sushi at Home – Step-by-Step Recipe

Making your own sushi order topped with salmon nyt at home can be a fun and rewarding experience. Here’s a simple step-by-step recipe to try:

  1. Prepare the rice: Cook sushi rice according to the package instructions. Season it with rice vinegar, sugar, and salt. Let it cool.
  2. Slice the salmon: Using a sharp knife, cut fresh salmon into thin slices. Ensure the fish is sushi-grade for safety.
  3. Assemble the sushi: Lay a sheet of nori on a bamboo mat. Spread rice evenly, leaving a 1-inch border. Add thin slices of salmon and optional fillings like avocado or cucumber.
  4. Roll it up: Use the bamboo mat to roll the sushi tightly. Seal the edge with a touch of water.
  5. Cut and serve: Slice the roll into even pieces and serve with soy sauce, wasabi, and pickled ginger.

Aburi-Inspired Salmon Creations

Inspired by traditional aburi sushi, many chefs now experiment with seared salmon in innovative ways. Beyond sushi rolls, aburi-style salmon is now used in poke bowls, salads, and even tacos. Thus, these smoky, flavorful dishes have gained attention for their versatility and visual appeal.

In addition, the NYT has highlighted restaurants that push the boundaries of salmon cuisine, incorporating bold sauces like yuzu mayo or ponzu glaze. Therefore, if you’re looking for a unique twist on a sushi order topped with salmon, exploring aburi-inspired dishes is a must.

How to Order the Best Salmon-Topped Sushi

Tips for Selecting Fresh Salmon Sushi

When making a sushi order topped with salmon, freshness is everything. High-quality salmon should have a vibrant, slightly translucent color and a clean, ocean-like aroma. Avoid fish that looks dull or has an overly fishy smell—it’s a sure sign it’s past its prime.

The New York Times (NYT) recommends seeking out sushi restaurants with a strong reputation for sourcing sushi-grade salmon. Always ask your server about the fish’s origin to ensure you’re getting the freshest possible ingredients.

Pairing Suggestions for Salmon Sushi

Pairing the right side dishes and beverages can elevate a sushi order topped with salmon from good to unforgettable. Soy sauce and wasabi are traditional complements, but don’t overlook the zesty tang of pickled ginger to cleanse your palate between bites.

For beverages, sake is a classic choice that pairs well with the buttery richness of salmon. If you prefer something non-alcoholic, green tea or sparkling water with a hint of citrus can provide a refreshing contrast to the rich fish.

Understanding Sushi Menus Like a Pro

Navigating a sushi menu can feel overwhelming, especially with the variety of options available. When placing a sushi order topped with salmon, look for terms like “nigiri” (a slice of salmon over rice), “sashimi” (just the fish), or “roll” (salmon paired with other ingredients wrapped in seaweed and rice).

The NYT highlights the importance of understanding common terms like aburi (seared sushi) or omakase (chef’s choice), which often features premium salmon preparations. Familiarizing yourself with these terms can help you make confident choices and fully enjoy your dining experience.

For tips on managing rice texture, check out our article on keeping rice from expanding in soup

Looking for the best places to enjoy a sushi order topped with salmon? Fortunately, the New York Times (NYT) frequently features top sushi restaurants known for their exceptional quality and innovation. In cities like New York, Los Angeles, and Tokyo, you’ll find endless options, ranging from traditional sushi bars to modern fusion eateries.

If you’re unsure where to start, however, online reviews and guides can be valuable resources. For example, platforms like Yelp or TripAdvisor provide recommendations from other sushi enthusiasts, which can make your search much easier. In addition, don’t forget to reserve your spot early, as popular places often fill up quickly. By planning ahead, you can ensure a seamless and enjoyable sushi experience.

FAQs

What kind of sushi roll is topped with salmon?

A sushi roll topped with salmon often includes a variety of fresh and flavorful combinations. Popular choices include the spicy salmon roll, which blends salmon with a spicy mayo sauce, and the Philadelphia roll, which pairs salmon with cream cheese and cucumber for a creamy texture. Additionally, the Rainbow roll features salmon as one of the many vibrant toppings layered over a California roll.

When you order a sushi order topped with salmon, you’ll find it pairs beautifully with avocado, sesame seeds, and sauces like ponzu or teriyaki for an elevated experience.

What is sushi with raw salmon on top called?

Sushi with raw salmon on top is traditionally called salmon nigiri. This simple yet elegant dish consists of a slice of fresh, raw salmon placed over a compact bed of seasoned sushi rice. Typically, it’s garnished with a light brush of soy sauce, a hint of wasabi, or even a sprinkle of sesame seeds to enhance its flavors.

Moreover, salmon nigiri is celebrated for its ability to highlight the purity and natural richness of the fish. Not only does it offer a melt-in-your-mouth texture, but it also delivers a delicate balance of umami and sweetness. Consequently, when you’re considering a sushi order topped with salmon, this classic option often stands out.

What is Aburi?

Aburi refers to a sushi preparation technique where the fish, such as salmon, is lightly seared using a torch or flame. This process caramelizes the surface, creating a smoky flavor while preserving the fish’s natural tenderness.

In a sushi order topped with salmon, aburi-style sushi is often a standout choice for its blend of traditional and modern techniques. It’s frequently garnished with sauces or toppings like yuzu mayo, roe, or green onions to add complexity to the dish.

What is sashimi vs nigiri?

Both sashimi and nigiri are classic options in Japanese cuisine, but they differ in presentation and preparation.

  • Sashimi consists of thinly sliced raw fish, such as salmon, served without rice. It focuses purely on the quality and texture of the fish.
  • Nigiri pairs a slice of fish, like salmon, with a small bed of seasoned sushi rice, often bound by a thin strip of seaweed.

When deciding between these in a sushi order topped with salmon, choose sashimi for a pure, unadulterated taste of the fish and nigiri for a combination of textures.

Conclusion

A sushi order topped with salmon nyt offers an unforgettable blend of flavors, textures, and culinary artistry. From the simplicity of salmon nigiri to creative fusion rolls and smoky aburi-style preparations, there’s no shortage of ways to enjoy this iconic sushi ingredient.

Throughout this guide, you’ve explored the top NYT-recommended options, learned how to select fresh salmon sushi, and discovered the unique health benefits of this beloved fish. Whether you’re a seasoned sushi enthusiast or trying it for the first time, salmon-topped sushi is a versatile and delicious choice that’s sure to delight your taste buds.

As you savor your next sushi experience, remember to pair your meal with complementary sides, ask questions about menu items to ensure you’re getting the best quality, and don’t be afraid to try new twists like aburi or fusion rolls. With these tips and insights, you’re ready to confidently order and enjoy the best salmon-topped sushi.

baby back ribs with beer and Montreal steak seasoning

Imagine sinking your teeth into juicy baby back ribs that are perfectly tender, infused with the rich flavors of beer, and seasoned with the bold zest of Montreal steak seasoning. Moreover, this baby back ribs with beer and Montreal steak seasoning recipe is not just a meal—it’s an experience that brings the smoky, savory goodness of a backyard BBQ right into your kitchen. Additionally, whether you’re a seasoned grill master or a home cook looking to impress, this recipe is easy to follow and promises delicious results every time. Therefore, let’s dive into the steps that will transform ordinary ribs into a mouthwatering masterpiece your family and friends will rave about!

1. Gathering Your Ingredients

1.1 Essential Ingredients for Juicy Ribs

To create succulent baby back ribs with beer and Montreal steak seasoning, you need to start with the right ingredients. Here’s what you’ll need:

  • Baby Back Ribs: Choosing the right cut is crucial for tenderness. Look for ribs with a good amount of meat and minimal fat.
  • Montreal Steak Seasoning: This blend adds depth and a savory kick to your ribs.
  • Beer Selection: Opt for a lager or ale to enhance the taste without overpowering the flavors.

1.2 Additional Flavor Enhancers

Enhancing your ribs with a few extra ingredients can elevate the flavor profile:

  • Barbecue Sauce: Selecting the perfect sauce complements the savory seasoning.
  • Honey or Brown Sugar: Adds a sweet glaze that balances the spices.
  • Garlic and Onion Powder: These boost the seasoning profile, adding more layers of flavor.

1.3 Tools and Equipment Needed

Having the right tools makes the cooking process smoother:

  • Meat Thermometer: Ensures your ribs reach the perfect doneness.
  • Rib Racks: Helps in arranging ribs evenly for uniform cooking.
  • Aluminum Foil: Retains moisture during baking, keeping your ribs juicy.

1.4 Table: Ingredients List

IngredientQuantity
Baby back ribs2 racks (about 4 lbs)
Montreal steak seasoning3 tablespoons
Beer (lager or ale)1 bottle (12 oz)
Barbecue sauce1 cup
Honey2 tablespoons
Brown sugar2 tablespoons
Garlic powder1 teaspoon
Onion powder1 teaspoon
Salt and pepperTo taste

2. Preparing the Ribs

Preparing baby back ribs with beer and Montreal steak seasoning
Step-by-step preparation of juicy baby back ribs.

2.1 Cleaning and Trimming the Ribs

Before you start, it’s essential to prepare your ribs properly:

  • Removing the Membrane: Flip the ribs bone-side up and slide a knife under the membrane. Use a paper towel to grip and pull it off for easy removal.
  • Trimming Excess Fat: Trim any large pieces of fat to ensure lean and flavorful ribs.

2.2 Applying the Montreal Steak Seasoning

Seasoning is key to flavorful ribs:

  • Even Coating: Sprinkle the Montreal steak seasoning evenly over both sides of the ribs. Massage it in to ensure thorough coverage.
  • Marinating Time: Allow the ribs to marinate for at least 2 hours, preferably overnight, to let the flavors penetrate the meat.

2.3 Marinating with Beer

Beer not only adds flavor but also helps tenderize the meat:

  • Beer Selection: Choose a lager or ale for a balanced taste. Each type of beer can impart a different flavor profile to the ribs.
  • Marinating Process: Place the seasoned ribs in a large container and pour the beer over them. Ensure the ribs are well-covered and refrigerate for the recommended time.

2.4 Resting the Ribs

After marinating, let your ribs rest:

  • Importance of Resting: Resting enhances tenderness by allowing the juices to redistribute.
  • Covering and Refrigeration: Cover the container and refrigerate the ribs for at least 2 hours, or overnight for best results.

3. Cooking Methods for Baby Back Ribs

Choosing the right cooking method can truly make or break your ribs. Moreover, each technique imparts its own unique flavor and texture, thereby allowing you to customize your baby back ribs with beer and Montreal steak seasoning to your personal taste. For instance, here we’ll delve deeper into three popular methods: oven baking, grilling, and smoking. Additionally, we’ll compare these methods to help you decide which one suits your needs best.

3.1 Oven-Baked Baby Back Ribs

Oven baking is a reliable and straightforward method that ensures consistent results every time. It’s especially great for those who prefer a hands-off approach without compromising on flavor or tenderness.

Preheating and Setup

First, preheat your oven to 300°F (150°C). This low and slow temperature is key to achieving tender ribs. While the oven is heating, prepare a baking sheet by placing a rib rack on it. If you don’t have a rib rack, you can use a wire cooling rack to elevate the ribs, allowing heat to circulate evenly around them.

Baking Instructions

Place your prepared ribs on the rack, bone side down. Cover the ribs tightly with aluminum foil. This creates a steamy environment that helps the ribs cook evenly and retain moisture. Bake the ribs in the preheated oven for 2.5 to 3 hours. You’ll know they’re done when the meat starts to pull away from the bones and becomes tender.

Wrapping in Foil

Wrapping the ribs in foil is a crucial step in this method. It retains moisture, preventing the ribs from drying out. Additionally, the foil helps to trap the flavors from the beer and seasoning, infusing the meat with a rich, savory taste. For an extra layer of flavor, you can add a splash of beer inside the foil packet before sealing it.

Tips for Oven-Baked Ribs

  • Check for Tenderness: After the initial baking time, gently twist a bone to see if the meat is tender. If it’s not quite there, rewrap and bake for an additional 30 minutes.
  • Broil for a Finish: If you prefer a bit of a crispy exterior, uncover the ribs during the last 10 minutes of baking and switch your oven to broil. Keep a close eye to prevent burning.

3.2 Grilling Baby Back Ribs with Beer

Moreover, grilling introduces a delightful smoky flavor that oven baking simply can’t replicate. Additionally, this method is perfect for those who enjoy the process of grilling and the unique taste it imparts to the ribs. Furthermore, grilling allows you to engage more interactively with your cooking, making it a rewarding experience. Therefore, if you prefer a hands-on approach and crave that authentic BBQ smokiness, grilling is the ideal choice for your baby back ribs with beer and Montreal steak seasoning.

Preparing the Grill

First, start by setting up your grill for indirect heat. This involves arranging the coals or burners on one side of the grill, thereby leaving the other side cooler. By doing so, indirect heat ensures that the ribs cook slowly without direct exposure to the flames, which can cause burning. Consequently, this method helps achieve tender and evenly cooked ribs without the risk of charring. Additionally, maintaining a consistent temperature is crucial, therefore using a reliable grill thermometer can help you monitor and adjust the heat as needed. Moreover, setting up the grill correctly not only prevents burning but also enhances the overall smoky flavor of your baby back ribs with beer and Montreal steak seasoning.

Grilling Techniques

Juicy baby back ribs with beer and Montreal steak seasoning
Perfectly glazed baby back ribs infused with beer and Montreal steak seasoning.

Place the ribs on the cool side of the grill, bone side down. Close the lid and maintain a steady temperature of around 250°F (121°C). Cook the ribs for 2 to 3 hours, turning them occasionally to ensure even cooking. Maintaining a consistent temperature is essential for tender, juicy ribs.

Basting with Beer Mixture

Occasionally baste the ribs with your beer marinade to keep them moist and enhance their flavor. You can use a brush or a spray bottle for this purpose. Basting not only adds moisture but also helps the seasoning penetrate deeper into the meat, resulting in a richer taste.

Tips for Grilling Ribs

  • Control the Heat: Use a thermometer to monitor the grill’s temperature. Too much heat can dry out the ribs, while too little can result in undercooked meat.
  • Add Wood Chips: For an extra smoky flavor, add wood chips like hickory or apple to your grill. Soak them in water for at least 30 minutes before adding to prevent them from burning too quickly.
  • Avoid Flare-Ups: Keep a spray bottle of water nearby to manage any flare-ups caused by dripping fat.

3.3 Smoking Baby Back Ribs

Smoking is the ultimate method for infusing deep, rich flavors into your ribs. This technique requires a bit more time and attention but rewards you with exquisitely tender and flavorful meat.

Using a Smoker

Begin by preheating your smoker to 225°F (107°C). Choose wood chips that complement the flavor of your ribs, such as hickory for a strong smoky taste or apple for a slightly sweet aroma. Place the ribs in the smoker, bone side down, ensuring they are not touching the sides to allow smoke to circulate freely.

Smoke Flavor Infusion

Smoke the ribs for 4 to 5 hours, adding wood chips as needed to maintain a consistent smoke throughout the cooking process. The slow exposure to smoke allows the ribs to absorb the flavors deeply, resulting in a complex and satisfying taste.

Cooking Duration

Patience is key with smoking. The extended cooking time at a low temperature ensures that the ribs become incredibly tender, with the meat easily pulling away from the bones. To test for doneness, insert a meat thermometer into the thickest part of the ribs; they should reach an internal temperature of 195°F (90°C).

Tips for Smoking Ribs

  • Maintain Consistent Temperature: Fluctuations in temperature can affect the tenderness of the ribs. Use a reliable thermometer to monitor and adjust as needed.
  • Spritzing with Beer: Every hour or so, spritz the ribs with a mixture of beer and apple juice to keep them moist and enhance the flavor.
  • Rest Before Serving: After smoking, let the ribs rest for about 20 minutes. This allows the juices to redistribute, ensuring every bite is juicy and flavorful.

3.4 Comparison of Cooking Methods

Each cooking method offers unique benefits and caters to different preferences and setups. Here’s a detailed comparison to help you choose the best approach for your baby back ribs with beer and Montreal steak seasoning recipe.

Oven vs. Grill vs. Smoker

MethodProsCons
Oven Baking– Easy and consistent results- Minimal setup- Great for beginners– Lacks smoky flavor- Less interactive
Grilling– Adds a smoky flavor- Interactive cooking- Versatile– Requires more attention- Weather dependent
Smoking– Deep, rich smoky flavor- Extremely tender meat- Authentic BBQ taste– Time-consuming- Requires specialized equipment

Flavor Profiles

  • Grilling and Smoking: Both methods impart a smoky taste to the ribs, but smoking offers a more intense and layered smoky flavor. Grilling provides a slightly charred exterior with a subtle smokiness, especially if you use wood chips.
  • Oven Baking: This method keeps the flavors more contained, allowing the beer and Montreal steak seasoning to shine without the added smokiness. It’s ideal for those who prefer a cleaner, more straightforward flavor profile.

Ease of Preparation

  • Oven Baking: The simplest method with minimal hands-on time. Perfect for those who want a hassle-free cooking experience.
  • Grilling: Requires more attention to maintain temperature and manage flare-ups. Ideal for those who enjoy the process of grilling and want to engage more with their cooking.
  • Smoking: Demands the most time and equipment but rewards with unparalleled flavor and tenderness. Best suited for dedicated BBQ enthusiasts willing to invest the extra effort.

Choosing the Best Method for Your Setup

Consider the following factors when deciding which cooking method to use:

  • Equipment Available: If you have a smoker, smoking your ribs can yield fantastic results. If not, oven baking or grilling are excellent alternatives.
  • Time Constraints: Oven baking is quicker and less time-consuming compared to smoking. Grilling falls somewhere in between, depending on your setup and attention to detail.
  • Desired Flavor: For the most authentic BBQ flavor, smoking is the way to go. If you prefer a simpler, yet still delicious method, oven baking is ideal. Grilling offers a balance between the two, adding some smokiness without the complexity of smoking.

Enhancing Your Cooking Method

Regardless of the method you choose, there are additional tips and tricks to elevate your baby back ribs with beer and Montreal steak seasoning recipe.

Using Marinades and Bastes

Incorporate a beer-based marinade or baste to infuse extra flavor and moisture into the ribs. This not only enhances the taste but also helps in tenderizing the meat.

Temperature Control

Maintaining a steady temperature is crucial for achieving tender ribs. Invest in a good quality meat thermometer to monitor internal temperatures accurately.

Resting the Meat

Allowing the ribs to rest after cooking is essential. This step lets the juices redistribute, ensuring each bite is juicy and flavorful.

Experimenting with Flavors

Don’t be afraid to experiment with different types of beer or seasoning blends. Each variation can bring a new dimension to your ribs, making the cooking process even more enjoyable.

4. Finishing Touches and Serving

Once your ribs are cooked to perfection, it’s time to add the final touches and serve them up.

4.1 Applying the Barbecue Sauce Glaze

A good glaze can take your ribs to the next level:

  • Timing for Glaze Application: Apply the barbecue sauce during the last 30 minutes of cooking.
  • Glazing Techniques: Brush the sauce evenly over the ribs and let it caramelize for a sticky, flavorful coating.

4.2 Resting After Cooking

Allow your ribs to rest before serving:

  • Final Rest Period: Let the ribs rest for about 10 minutes after cooking to let the juices redistribute.
  • Covering Ribs for Warmth: Tent the ribs with foil to keep them warm and moist.

4.3 Slicing the Ribs

Proper slicing ensures an appealing presentation:

  • Proper Cutting Techniques: Use a sharp knife to cut between the bones for clean, even slices.
  • Serving Presentation: Arrange the ribs on a platter and garnish with fresh herbs for an appetizing look.

4.4 Pairing with Side Dishes

Complete your meal with delicious sides:

  • Coleslaw and Baked Beans: Classic BBQ sides that complement the rich flavors of the ribs.
  • Cornbread and Grilled Vegetables: Adds variety and a touch of sweetness to the meal.
  • Beverage Pairings: Craft beers, iced tea, or lemonade pair wonderfully with the smoky and savory flavors of the ribs.

5. Tips and Tricks for Perfect Ribs

Achieving perfectly juicy and flavorful ribs requires some insider tips:

5.1 Ensuring Maximum Tenderness

Tender ribs are the hallmark of a great recipe:

  • Low and Slow Cooking: Cooking ribs at a low temperature for an extended period ensures tenderness.
  • Moisture Retention Techniques: Using foil and marinades effectively keeps the ribs moist and succulent.

5.2 Flavor Boosters

Enhance the flavor profile of your ribs with these boosters:

  • Additional Spices and Herbs: Consider adding paprika, cumin, or thyme to the seasoning mix for extra depth.
  • Marinade Variations: Experiment with different types of beer or add ingredients like soy sauce or Worcestershire sauce to your marinade for unique flavors.

5.3 Troubleshooting Common Issues

Avoid common pitfalls with these solutions:

  • Dry Ribs: Prevent dryness by not overcooking and ensuring proper moisture retention during cooking.
  • Flavor Imbalance: Adjust seasoning and glaze quantities to achieve the perfect balance of savory and sweet.
  • Cooking Time Adjustments: Adapt cooking times based on your oven or grill type to ensure ribs are cooked perfectly.

5.4 Storage and Reheating

Store and reheat your ribs without losing flavor:

  • Storing Leftover Ribs: Refrigerate ribs in an airtight container for up to 3 days or freeze for longer storage.
  • Reheating Techniques: Reheat ribs in the oven wrapped in foil to maintain moisture, or gently microwave them with a splash of water or sauce.

Frequently Asked Questions (FAQs)

Is Montreal steak seasoning good for ribs?

Yes, Montreal steak seasoning is excellent for ribs as it adds a robust and savory flavor that enhances the meat’s natural taste. Its blend of spices complements the richness of the ribs, making them more delicious and flavorful.

What is the best seasoning to put on ribs?

The best seasoning for ribs depends on your flavor preference. Popular options include Montreal steak seasoning, BBQ dry rubs, garlic and onion powders, and sweet spices like brown sugar. Experimenting with different blends can help you find your perfect match.

Which of the cooking methods is best for baby back ribs?

The best cooking method for baby back ribs is subjective and depends on your equipment and desired flavor. Oven baking is great for ease and consistency, grilling adds a smoky flavor, and smoking offers the most authentic BBQ taste. Each method can produce tender and juicy ribs when done correctly.

What is the difference between Montreal and Chicago steak seasoning?

Montreal steak seasoning typically includes garlic, coriander, black pepper, and dill, offering a robust and savory flavor. Chicago steak seasoning may have a different spice blend, often sweeter or with additional herbs. The exact differences can vary by brand, but Montreal seasoning is generally more aggressive and savory.

What are ribs usually served with?

Ribs are usually served with classic BBQ sides such as coleslaw, baked beans, cornbread, and grilled vegetables. These sides complement the rich and savory flavors of the ribs, creating a balanced and satisfying meal.

What would you have with barbecue ribs?

With barbecue ribs, you can enjoy a variety of sides like potato salad, macaroni and cheese, corn on the cob, and pickles. Additionally, beverages like craft beer, iced tea, or lemonade pair wonderfully with the smoky and savory flavors of the ribs.

Conclusion

Crafting the perfect juicy baby back ribs with beer and Montreal steak seasoning is both an art and a science. By carefully selecting your ingredients, mastering your cooking method, and adding those finishing touches, you can create a mouthwatering dish that stands out at any gathering. Whether you prefer the convenience of oven baking, the smoky allure of grilling, or the deep flavors from a smoker, this recipe offers flexibility and delicious results every time. So, gather your ingredients, follow these steps, and enjoy the delightful experience of serving tender, flavorful ribs that everyone will love. Happy cooking!

The Best Pepper Steak Recipe for Quick Weeknight Dinners

You know that moment when you crave a satisfying meal, yet you need it straightaway? That’s precisely where this pepper steak recipe becomes a game changer. It combines a savory marinade, crisp peppers, and tender steak slices in one glorious skillet. Altogether, you get a balanced and mouthwatering dinner without spending hours in the kitchen.

Furthermore, this dish doesn’t rely on obscure ingredients or complicated steps. Instead, it features staples like bell peppers, onions, soy sauce, and a few flavorful spices. Additionally, it cooks in minimal time. If you wish to find reliable ways to choose wholesome protein sources, check out Harvard’s Protein Guidelines because they offer insights on adding lean proteins to your meal plan. You’ll see how a combination of lean steak and vibrant vegetables can fit into a healthy diet.

Why This Pepper Steak Recipe Stands Out

You might’ve scrolled through dozens of stir-fry ideas previously, but this one truly shines. Evidently, it’s the perfect union of taste, speed, and simplicity. Although other pepper steak variations use similar components, the approach here saves you time and delivers robust flavor. Accordingly, let’s see why:

Stir-fried pepper steak with red, yellow, and orange bell peppers, onions, and sesame seeds in a skillet.
A vibrant stir-fry of pepper steak and fresh vegetables, cooked to perfection.

Savory Flavors & Balanced Texture

  1. Quick Marinade: A blend of soy sauce, garlic, ginger, and cornstarch creates a savory base. This soy sauce marinade gently tenderizes the meat.
  2. Bright Bell Peppers: Red, green, or yellow peppers don’t just look pretty. Similarly, they offer a mild sweetness that pairs well with the steak’s richness.
  3. Subtle Heat: Red pepper flakes or even chili oil can give it a gentle bite. Certainly, you can adjust this for your spice tolerance.

Easy Preparation & Minimal Cleanup

  1. Fast Cooking: All steps—marinating, slicing, and stir-frying—happen quickly. Therefore, you won’t spend hours in the kitchen.
  2. One-Pan Meal: Using a single wok or skillet minimizes your cleanup. Indeed, that leaves you with more time to relax afterward.
  3. Less Stress: Because everything fits in one cooking vessel, you don’t juggle multiple pots and pans. Comparatively, other recipes often require more equipment.

Adaptable to Your Diet & Family Needs

  1. Lean Cuts: Flank steak or sirloin steak work beautifully, and both are comparatively leaner.
  2. Add More Veggies: Broccoli florets, snap peas, or mushrooms can easily join the party. Furthermore, it’s simple to omit what you dislike.
  3. Family-Friendly Appeal: Kids usually enjoy the colors and mild flavors. Nonetheless, you can spice it up for those who love heat.

Budget-Friendly

  1. Affordable Ingredients: Basic veggies and a modest amount of steak keep costs down.
  2. Reduced Waste: Leftovers reheat well, henceforth saving you from tossing extra produce.
  3. Smart Substitutions: If steak is pricey, try cuts on sale or buy in bulk and freeze portions. Eventually, you’ll notice the savings.

Gathering Your Ingredients and Tools to make pepper steak recipe

A cutting board with raw beef slices, fresh bell peppers, garlic, parsley, sesame seeds, black pepper, and sauce ingredients.
Fresh and colorful ingredients ready to create the perfect pepper steak recipe.

Before you start cooking, you’ll want to initially round up everything you need. Doing so avoids frantic dashing around the kitchen. Likewise, it streamlines your efforts, making mealtime a breeze.

Steak Selection

  • Flank Steak, Sirloin, or Round Steak: Choose a lean cut that’s easy to slice thin.
  • Marbling Check: Some marbling improves flavor. However, excessive fat can lead to greasiness.

Vegetable Essentials

  • Bell Peppers: Use red, green, or yellow. Mixing these adds color.
  • Onions: Medium white or yellow onions offer sweetness.
  • Optional Veggies: Try mushrooms, snap peas, or zucchini if you want variety.

Sauce & Seasonings

  • Soy Sauce: Regular or low-sodium. Subsequently, you can control saltiness better with a low-sodium version.
  • Cornstarch: Helps thicken your sauce.
  • Garlic & Ginger: Explicitly, these add zing.
  • Sesame Oil: A small drizzle provides a nutty fragrance.
  • Red Pepper Flakes: Adjust to your preferred spice level.

Tools for Efficiency

  • Wok or Large Skillet: A wide pan ensures even cooking.
  • Sharp Knife & Cutting Board: For thin, uniform slicing.
  • Measuring Cups & Spoons: You’ll need them for precise sauce mixing.
  • Paper Towels: Pat the steak dry to help with searing.

Recipe Ingredients in a Table

Below is a quick table so you can gather items without confusion. Afterward, you can prepare your workspace for an effortless cooking session.

IngredientQuantityNotes
Flank Steak (or Sirloin)1 lb (approx. 450g)Sliced thinly against the grain
Bell Peppers2 large, slicedRed, green, or a mix
Onion (medium)1, slicedWhite or yellow, thin slices
Soy Sauce3 tbspRegular or low-sodium
Garlic (minced)2 clovesFresh for stronger flavor
Ginger (minced)1-inch piecePeeled, grated or minced finely
Cornstarch2 tspFor marinade and sauce thickening
Sesame Oil1 tspAdds nutty aroma
Red Pepper Flakes¼ tspOptional, adjust to preference
Vegetable Oil1-2 tbspFor cooking (can use canola or peanut oil)
Water or Beef Broth¼ cupOptional, for thinning sauce if too thick

Step-by-Step Guide to Making the Best Pepper Steak

You’re now ready to bring this pepper steak recipe to life. Initially, be sure you have enough space around your stove. Certainly, you’ll want to move swiftly as the cooking progresses, especially if you decide to stir-fry. Let’s break it down to keep things clear.

1. Marinating the Steak

  1. Slice Thinly: Pat the steak dry before slicing it across the grain. This method shortens muscle fibers, leading to tender bites.
  2. Mix the Marinade: Whisk together 2 tablespoons of soy sauce, a clove of minced garlic, half of the ginger, and 1 teaspoon of cornstarch. Afterward, you might add red pepper flakes if you want some gentle warmth.
  3. Soak the Steak: Combine the sliced steak with the marinade in a bowl. Albeit a short marinade, 15 minutes is enough to infuse flavor. You can marinate for up to two hours, altogether intensifying taste.
  4. Avoid Over-Marination: If you let it sit for too long, the texture can turn mushy. Hence, 15 minutes to half an hour strikes the perfect balance.

2. Preparing the Vegetables

  1. Bell Peppers: Wash and slice them into thin strips. Comparatively, you may go thicker if you like them crunchier.
  2. Onions: Slice into half-moons or wedges. Eventually, your onions will sweeten as they cook.
  3. Optional Add-Ons: Mushrooms or snap peas need quick rinsing and trimming. Shortly, these can be tossed in alongside the peppers for extra color.

3. Stir-Frying the Steak

  1. Heat Your Pan: Warm a wok or skillet over high heat with a tablespoon of oil. Simultaneously, let it get really hot—steak sizzles best on high heat.
  2. Cook in Batches: Overcrowding lowers heat and steams the meat. Therefore, stir-fry the steak in portions to get that nice sear. Each batch should take about 2 minutes per side.
  3. Set Aside Cooked Steak: Transfer browned meat to a plate. Meanwhile, keep the pan hot for the veggies.

4. Making the Sauce

  1. Create the Mixture: In a small bowl, whisk 1 tablespoon of soy sauce with 1 teaspoon of cornstarch, remaining garlic, ginger, and ¼ cup water or beef broth. Add a drop of sesame oil if you like a deeper aroma.
  2. Deglaze the Pan: Add onions and peppers to the hot pan. Initially, stir for a couple of minutes, then pour in the sauce. Henceforth, scrape up any browned bits of steak on the bottom.
  3. Thicken Gently: As the sauce warms, you’ll see it thicken. Occasionally, stir to coat the vegetables. If it’s too thick, add a splash more water or broth.

5. Combine & Finish

  1. Reintroduce the Steak: Put the cooked steak back with the veggies. Shortly, everything will mix and absorb the sauce.
  2. Taste & Adjust: Sample the dish. Comparatively, you may need more soy sauce if it’s too mild, or extra pepper flakes if you like heat.
  3. Final Consistency: Once it’s glossy and well-coated, remove from heat. Surely, you’re ready to serve a piping-hot meal.

Serving Suggestions and Variations

Plate of tender pepper steak topped with sesame seeds and green onions, served with white rice and a side of sauce.
A flavorful pepper steak recipe paired with steamed rice, perfect for any meal.

You’ve just created a delicious pepper steak recipe. Nevertheless, you can elevate it further with smart sides or flavor tweaks. This is your chance to personalize the meal.

1. Best Side Dishes

  • Steamed Rice: White or brown rice works. Likewise, cauliflower rice keeps it low-carb if you’d prefer.
  • Noodles: Lo mein or rice noodles pair splendidly, soaking up the sauce.
  • Light Salad: A crunchy salad can counterbalance the savory components.

2. Creative Variations

  • Spicy Pepper Steak: Add chili oil or hot sauce. Evidently, this spikes the heat for those who like it fiery.
  • Sweet & Sour: Drizzle in honey or brown sugar for a tangy note. Moreover, you can swap peppers for pineapple chunks if you fancy a sweet contrast.
  • Extra Veggies: Toss in broccoli florets or carrots for color. Additionally, water chestnuts lend a fun crunch.

3. Storage & Leftover Tips

  • Fridge Storage: Place leftovers in a sealed container. Identically, they stay fresh for up to 3 days.
  • Easy Reheating: Use a skillet on medium heat. Occasionally, add a splash of water or broth to keep it from drying out.
  • Meal Prep: Cook a big batch on Sunday. Concurrently, portion out your lunches to simplify your workweek.

4. Dietary Adjustments

  • Gluten-Free: Swap soy sauce for tamari or coconut aminos. Nevertheless, confirm all other ingredients are GF-friendly.
  • Low-Sodium: Opt for reduced-salt soy sauce. Furthermore, rinse your veggies well to reduce any hidden sodium in canned items.
  • Meat Substitute: Use tofu or seitan if you’d rather skip steak. Henceforth, marinade times may differ, so keep an eye on texture.

Conclusion

You have just mastered a pepper steak recipe that merges bold flavor, colorful veggies, and an easy cooking method. Surely, it’s a top candidate for busy nights or when you just want a satisfying meal without fuss. Although it looks elaborate, the steps prove otherwise. Comparatively, many takeout options might seem appealing, but this homemade version offers freshness you can taste.

Chiefly, what makes this recipe shine is how approachable it is. Undoubtedly, the marinade hits the sweet spot for taste and tenderness. Meanwhile, high-heat stir-frying keeps each element crisp and juicy.

Lastly, try customizing this dish in line with your family’s tastes. Therefore, if you want even more heat, toss in extra chili flakes. If you adore sweetness, stir in a drizzle of honey or pineapple. The possibilities are endless, so don’t be afraid to experiment. Now’s the time to gather those peppers, slice that steak, and delight in a succulent meal.

Ready to dive in? Grab your wok and start sizzling. Ultimately, the aroma alone will have your household racing to the dinner table.

FAQs: Frequently Asked Questions

What cut of meat is a pepper steak?

Chefs usually choose flank steak, sirloin, or round steak for this recipe. They all offer a balance of lean texture and robust flavor. Slicing them thinly ensures tenderness.

What is pepper steak sauce made of?

Typically, it features soy sauce, cornstarch, garlic, ginger, and sometimes beef broth or water. This combination becomes glossy during cooking, coating the steak and peppers. Some folks also add sesame oil or a sprinkle of sugar for sweetness.

Why is Chinese pepper steak so tender?

High-heat stir-frying, combined with a quick marinade, creates that melt-in-your-mouth feel. Additionally, the marinade’s cornstarch helps lock in moisture, preventing the steak from drying out.

How do you make pepper steak not chewy?

First, slice the steak against the grain in thin strips. Second, marinate it to break down the fibers. Third, cook it quickly over high heat to seal in juices. Overcooking usually leads to chewiness, so keep an eye on the timing.

How much soy sauce in pepper steak recipe?

Most versions call for about three tablespoons of soy sauce total, divided between marinade and sauce. However, you can reduce or increase the amount based on your sodium preference. Remember that low-sodium varieties let you control salt levels more precisely.

Can you use London broil in a pepper steak recipe?

You certainly can. London broil is often a top-round cut that benefits from slicing across the grain. If you marinate it thoroughly, it becomes quite tender and works wonderfully in a stir-fry.

How to make pepper steak recipe?

You slice your steak thinly against the grain, then marinate it in soy sauce, garlic, ginger, and a little cornstarch. Next, stir-fry the peppers and onions, remove them, and cook your marinated steak in a hot wok or skillet. Finally, return the veggies, add your sauce, and let everything come together for a flavorful finish.

If you found this meal idea beneficial, share it with family and friends. Don’t forget to check out our Quickmealsrecipes for more recipes that fit your active lifestyle. Undoubtedly, you’ll discover more easy dinner solutions that save you time and deliver satisfaction. Try this pepper steak recipe tonight and let us know your thoughts!

Beef Petite Sirloin Steak 101: Everything You Need to Know

You’re standing at the meat counter, eyeing each package with both excitement and caution. Something about beef petite sirloin steak draws your attention. The cut looks lean yet promising, and you can almost imagine that mouthwatering sizzle once it hits the pan. At first glance, you might wonder if it’s worth adding to your cart. After all, there are so many steak varieties out there. Nevertheless, the price tag and moderate size make this particular steak seem like a great option for a weeknight dinner or even a special gathering.

If you’ve ever been curious about turning a lean steak cut into a show-stopping meal, you’ve come to the right place. In the next few paragraphs, you’ll discover exactly why beef petite sirloin steak has captured the hearts of both kitchen novices and seasoned home cooks. You’ll learn what makes it special, how to pick the best cut, and how to cook it so it’s flavorful in every bite. By the end, you’ll feel confident in serving this juicy, tender steak to friends, loved ones, or even just yourself after a long day. So, slip on your apron. Let’s dive into the world of one of the most underrated cuts of beef.

Understanding Beef Petite Sirloin Steak

Definition & Origin

You might be asking: What exactly is beef petite sirloin steak? Essentially, it’s a segment carved from the sirloin primal, sitting just behind the loin region. It’s notably smaller than typical sirloin cuts, which is why it often carries the name “petite.” Despite its more modest size, this lean beef cut generally presents a robust flavor. You’ll find it to be quite satisfying, albeit not as fatty as certain premium steaks.

Moreover, the history behind the sirloin section traces back to old-school butchering traditions. Traditionally, the sirloin primal was broken down into top sirloin, bottom sirloin, and a handful of smaller cuts—like this petite sirloin. Because it’s leaner, you might need to pay attention to cooking methods that infuse moisture and maintain tenderness. If you’d like a more detailed look into how beef cuts are categorized, you can check out the official USDA guide on general meat labeling. It explains the broad categories of each primal region.

Texture & Flavor Profile

Beef petite sirloin steak doesn’t carry the same degree of marbling that you’d see in a ribeye or New York strip. Consequently, it’s essential to follow cooking tips that ensure it stays tender. You’ll notice a hearty bite that, when cooked right, yields a juicy texture. Indeed, marinating or seasoning well can amplify its natural taste.

Comparatively, some folks sense a mild beefiness similar to top sirloin. Tender petite sirloin might not melt in your mouth in the same way as a more expensive steak, yet it can still become a succulent meal with minimal effort. In addition, you’ll discover that it pairs nicely with strong flavors like garlic, soy sauce, or dried herbs.

There are many reasons this specific steak is gaining traction. First and foremost, it tends to be more budget-friendly than certain high-end cuts. Furthermore, it’s versatile—you can grill it, pan-sear it, or even toss it in the oven if you prefer a more hands-off method. Additionally, it’s available in most grocery stores, which makes it convenient when you’re looking for a quick dinner idea.

  • Cost-Effective: You get a solid portion of lean protein for a respectable price.
  • Moderately Easy to Find: Most supermarkets carry some form of petite sirloin.
  • Cooks Quickly: The smaller size shortens steak cooking times.

Overall, beef petite sirloin steak hits the sweet spot between affordability and taste. If you’re striving to eat better or simply expand your steak repertoire, this cut deserves a place in your kitchen. For additional inspiration, you can see how professional chefs handle lean sirloin cuts on the BBC Good Food site, which often shares practical cooking suggestions.

How to Choose the Perfect Beef Petite Sirloin Steak

Color & Freshness

When you head to your local store, pay attention to color. Look for a vibrant, dark-red hue without excessive browning around the edges. Equally, the packaging should be intact, with no leaks or unpleasant odors. Before placing the steak in your cart, double-check the sell-by date. Likewise, keep an eye on any discount stickers. Occasionally, you can snag a top-notch steak at a bargain price right before its expiry date—just be sure to cook it sooner rather than later.

Furthermore, observe the texture if the package allows. Any slimy residue or questionable smell indicates you should probably pass. Essentially, you want a steak that looks firm, fresh, and appealing, ensuring you begin with the best possible starting point.

Marbling & Thickness

Because beef petite sirloin steak is quite lean, you won’t see large streaks of intramuscular fat. Nevertheless, a bit of fine marbling can promote extra moisture during cooking. The thickness often ranges between an inch to an inch and a half. If it’s thicker, you might need to adjust cooking times accordingly. Conversely, a thinner cut will cook more swiftly but may risk overcooking if not watched carefully.

When in doubt, talk to the butcher if one is available. They usually know a great deal about the day’s fresh supply, and they can even help you pick a piece that suits your cooking style. Comparatively, that personal touch sometimes leads to the best flavor outcome.

Organic vs. Conventional

Some individuals prefer organic beef for peace of mind, while others find conventional cuts to be more budget-friendly. Generally, this choice comes down to your preferences and dietary priorities. Nevertheless, don’t assume organic always means superior taste. It just offers certain assurances about feed quality and farming practices.

If you’re trying to decide, weigh factors like cost, availability, and your personal stance on pesticides or hormones. Undoubtedly, you can create a delicious meal with either choice, provided you follow the right techniques.

Storage Guidelines

You’ll want to handle your steak properly, especially if you’re not cooking it the same day. Place it in the coldest part of your refrigerator for up to two days. If you’re planning a meal further down the line, freeze it in airtight packaging to maintain freshness. Markedly, wrapping the steak in a layer of plastic wrap and then a freezer-safe bag reduces the risk of freezer burn.

When you’re ready to use it, allow it to thaw safely in the fridge. Previously, some folks thawed meat on the counter, but that’s risky for bacteria growth. Thawing in the fridge keeps the temperature consistent and safer for consumption.

Flavorful Ways to Cook Beef Petite Sirloin Steak

Essential Cooking Methods

There are plenty of ways to cook this nutritious lean cut. However, the following methods shine in terms of convenience and flavor:

  1. Pan-Seared: If you love a crusty exterior, pan-searing is your friend. Preheat a cast-iron skillet, add oil, and let it shimmer. Gently place your steak inside, hearing that sizzle that tells you it’s browning properly. Afterward, flip once a crust forms, surely about 2–3 minutes per side.
  2. Grilling: For a smoky essence, toss your beef petite sirloin steak on a hot grill. Brush the grates with oil to prevent sticking. Keep an eye on your timing—generally, 3–4 minutes per side yields a medium-rare center, though it also depends on thickness. Stick a thermometer in the thickest part if you want to be certain.
  3. Oven-Roasting: If your cut is on the thicker side, consider oven-roasting. Firstly, sear it on the stove to lock in juices, then transfer it to a preheated oven (around 400°F) for a few minutes to finish cooking. Eventually, this method keeps the interior juicy while still giving you an appealing crust.

Want more quick ways to prepare dinners? Check out How To Make Beef Bottom Round Steak Tender And Juicy Every Time

Steak Doneness & Internal Temps

It’s crucial to pay attention to steak cooking times, especially when dealing with a lean cut:

  • Rare: 125°F (52°C)
  • Medium-Rare: 130°F (54°C)
  • Medium: 140°F (60°C)

Insert a digital meat thermometer into the steak’s center to verify. Then, let it rest for a few minutes before slicing. Resting your steak prevents juices from spilling out prematurely. You’ll thank yourself when each slice tastes moist and succulent.

Beef Petite Sirloin Steak Marinade & Seasoning Tips

Raw Beef Petite Sirloin Steaks with Garlic and Herbs
Two raw petite sirloin steaks ready for seasoning and marinating

Marinating is often the key to success with any tender petite sirloin, especially if you want extra flavor. A quick marinade might include olive oil, garlic, soy sauce, and a splash of vinegar. Altogether, the acidic component helps tenderize the muscle fibers, while the oil keeps things from drying out.

Suggested Basic Marinade

  • 2 Tbsp olive oil
  • 1 tsp garlic powder
  • 1/2 tsp black pepper
  • 1 tsp sea salt
  • 1 Tbsp Worcestershire sauce

Moreover, you can throw in dried herbs like rosemary or thyme if you enjoy earthy flavors. Let the steak soak for at least 30 minutes—any longer, and the marinade can penetrate more deeply.

Table: Quick Marinade Ingredients

IngredientAmountNotes
Olive Oil2 tbspAdds moisture, mild flavor
Garlic Powder1 tspBoosts savory depth
Black Pepper1/2 tspProvides gentle heat
Sea Salt1 tspBalances overall taste
Worcestershire Sauce1 tbspContributes tangy richness

After mixing these, coat the steak evenly. Afterwards, pat it dry before cooking to help it sear. If you leave the surface too wet, you may not get that brown crust everyone craves. Nevertheless, do keep a slight film of oil on the meat to reduce sticking in the pan or on the grill.

Nutritional Benefits of Beef Petite Sirloin Steak

Lean Protein Source

Beef petite sirloin steak is typically a leaner choice. Because of its lower fat content, it’s suitable for those who watch their intake yet still crave red meat’s taste. A single serving often packs a punch of high-quality protein essential for muscle building and repair. It’s surely a more nutritious option if you’re trying to balance macros.

Vitamins & Minerals

You’ll find that this lean steak cut also brings key vitamins like B12 and B6 to the table, equally beneficial for energy production and nervous system health. Iron and zinc, two critical minerals, contribute to immunity and oxygen transport. Indeed, incorporating moderate portions of beef petite sirloin steak can help you maintain a balanced meal plan.

  • Iron: Supports hemoglobin function, helping deliver oxygen to cells.
  • Zinc: Aids immune system activity and wound healing.
  • Vitamin B12: Vital for red blood cell formation, particularly in preventing certain forms of anemia.

Calorie & Fat Content

When you look at the label, you may see that a typical 3–4 ounce serving hovers around 150–180 calories, depending on how much visible fat remains. That’s modest compared to fattier cuts like ribeye or T-bone. If you’re cutting calories or simply prefer a less fatty meal, petite sirloin hits a sweet spot. Just remember to watch your portion size because adding sides, sauces, and garnishes can ramp up the total calorie count.

Healthier Cooking Methods

Grilling, broiling, or pan-searing in minimal oil are often considered the best ways to keep your meal wholesome. Avoid deep-frying or drenching the steak in heavy creams. Surely, if you do want a rich sauce, you can whip up a light mushroom gravy or a simple red wine reduction instead. That way, you remain in control of added fats and flavors.

Serving Suggestions & Storage Tips for Beef Petite Sirloin Steak

Cooked Beef Petite Sirloin Steak Served with Vegetables
Sliced petite sirloin steak served with roasted veggies

Sides & Pairings

Sometimes, you want a complete meal that truly highlights the tender petite sirloin on your plate. You might pair it with roasted asparagus or a fresh spinach salad. Alternatively, mashed potatoes deliver a comforting touch. For a lighter option, consider grilled zucchini or bell peppers.

  • Roasted Veggies: Carrots, Brussels sprouts, sweet potatoes
  • Classic Sides: Mashed potatoes, mac & cheese, or a baked potato
  • Healthy Greens: Spinach salad, kale, or sautéed mushrooms

Surely, these pairings accentuate the savory notes of your steak. You could also add a splash of lemon juice or a sprinkle of chopped parsley at the end for an extra flavor lift.

Leftover Ideas

If you end up with extra slices, you can repurpose them in countless ways. Chop them into cubes for a quick stir-fry. Slice them thin for a steak sandwich with onions and peppers. Or lay them atop a hearty salad for a protein-packed lunch. You can find more leftover-friendly recipes on our site at Quickmealsrecipes – Leftover Creations.

Stored properly in the fridge, leftover steak stays good for about two to three days. Subsequently, you can freeze it for up to two months if you want to use it in stews or soups later on.

Storage & Reheating Best Practices

Use airtight containers or wrap your steak in foil. Place it in the refrigerator if you plan on consuming it soon. If you wish to freeze it, use freezer-safe ziplock bags and label them with the date. When reheating, opt for low heat. You can warm it in a skillet with a touch of broth or in an oven set at around 300°F. This gentle approach helps retain moisture. Likewise, zapping it in the microwave can sometimes cause it to become rubbery, so be cautious if you choose that route.

Table: Simple Steak Meal Plan

DayMealNotes
MondayPetite sirloin with roasted vegetablesLean approach, quick to prepare
TuesdaySteak sandwich with sautéed onionsGreat for lunch, add melted cheese if desired
WednesdayStir-fry with petite sirloin stripsBalanced with rice or noodles

Using a meal plan like this ensures that you don’t waste your beef petite sirloin steak. You’ll keep variety in your dinners and lunches, consequently making the most of your grocery budget.

Conclusion

Now that you’ve had a closer look at the ins and outs of beef petite sirloin steak, you’re primed to create a memorable meal without breaking the bank. This particular cut brings you a lean, cost-effective way to enjoy that classic steak experience. Surely, you can harness its potential by focusing on proper selection, mindful cooking methods, and strategic seasoning. So, gather your favorite marinades, warm up your skillet or grill, and let the aroma of a perfectly cooked sirloin fill your kitchen.

FAQ: Beef Petite Sirloin Steak

1. How to cook beef petite sirloin steak?

Beef petite sirloin steak is lean yet flavorful. You can season it with salt, pepper, and garlic powder, then either grill or pan-sear it over medium-high heat for 2–3 minutes per side. To finish, let it rest for a few minutes so the juices redistribute before serving.

2. What is beef petite sirloin steak?

Beef petite sirloin steak is a smaller, leaner cut from the larger sirloin primal. It offers robust beefy flavor with less marbling than other sirloin cuts, making it a budget-friendly yet satisfying choice for quick meals.

3. How to cook beef petite sirloin steak in the oven?

To cook beef petite sirloin steak in the oven, start by searing it on the stovetop for about 2 minutes per side to form a crust. Then, transfer the steak to a preheated oven at 400°F (200°C). Cook for 5–10 minutes (depending on thickness) until it reaches your preferred doneness. Rest it for 5 minutes before slicing.

4. Aldi USDA Choice Black Angus Beef Petite Sirloin Steaks Pack

Aldi’s USDA Choice Black Angus beef petite sirloin steaks come pre-packaged, typically in vacuum-sealed packs. They’re known for their tenderness and affordability. Since each pack is portioned, you can easily season, marinate, or cook them in various ways—grilling, broiling, or pan-searing—to enjoy a lean, savory meal.

How To Create Cottage Cheese Snacks That Everyone Will Love

Are you ready to spice up your daily snacking habit with something both delicious and healthy? Cottage cheese snacks might be really what you need! In this article, we’ll take a closer look at why these protein-packed dairy treats have become so well-liked lately. You’ll discover how cottage cheese snacks provide a great balance of key nutrients, making them a wonderful choice for weight management and muscle recovery. Simply, we’ll look into easy sweet and tasty snack ideas, explore creative recipes, and discuss how to mix in a range of tasty toppings.

Also, we’ll cover the different health benefits of this calcium-rich snack, offer simple ways to enjoy it on the go, and share pro tips for improving its taste. Next, we’ll address commonly asked questions, including whether cottage cheese is truly healthy and why it’s a good late-night treat. Certainly, we’ll also highlight relevant external resources—like USDA FoodData Central—to give you reliable nutritional facts along the way. By the time you finish reading, you’ll know exactly how to turn cottage cheese snacks into a hard to resist and healthy part of your day.

What Makes Cottage Cheese Unique?

Certainly, cottage cheese is one of the most flexible cottage cheese treats you can find. Relatively, it has a mild flavor that goes well with varied ingredients—both sweet and salty. Cottage cheese snacks are notable because they’re full of casein protein, which aids muscle building and recovery. So, many health enthusiasts enjoy it before a workout or as a quick snack afterward.

Also, cottage cheese is a healthy cheese snack that includes vitamins and minerals like calcium and phosphorus, which are key for bone health. Overall, this cheese is usually lower in fat compared to many other dairy products, though you can find both low-fat and full-fat types to match different diets.

A Quick Snapshot of Nutritional Benefits

Surely, the nutritional profile of cottage cheese deserves a bit of spotlight. According to the USDA FoodData Central, one cup of low-fat cottage cheese typically contains a significant amount of protein while keeping carbs and calories relatively low. Equally important, it provides B vitamins that help with energy production and metabolism. Because of these qualities, cottage cheese snacks have become a top choice for folks who want an easy healthy snack without sacrificing taste.

Moreover, cottage cheese is a low-carb snack alternative, making it helpful for those following keto or low-carb diets. Indeed, many people appreciate it as a weight loss snack option since the high protein content increases satiety, thereby curbing the urge to overeat. Nonetheless, it’s worth noting that portion control and balanced meals remain key for any long-term wellness goal.

Presently, there’s a rising movement toward wholesome, protein-rich foods. Cottage cheese perfectly aligns with this demand. Many fitness buffs swear by its ability to promote protein satiety. It also delivers essential amino acids. This trend is fueled by the popularity of high-protein meal plans. These plans highlight the importance of quality protein for muscle preservation and weight management.

Furthermore, clean eating enthusiasts have embraced cottage cheese because it’s typically free from excessive additives. This is especially true when you choose simple ingredient labels. Another reason for its rising popularity is its versatility. You can easily blend it into smoothies, pair it with fruits, or whip it into dips. Consequently, cottage cheese snacks serve as a practical solution for anyone who wants more protein and fewer carbs. They fit well into daily routines.

Altogether, the buzz around cottage cheese is hardly surprising. It reflects the current interest in healthier snack options. It also stands out for its adaptability. In addition, it features a robust nutritional profile that benefits health-conscious consumers.

Top Reasons Cottage Cheese Snacks Support a Healthy Lifestyle

Protein Powerhouse

Undoubtedly, cottage cheese snacks are an excellent example of a protein-packed dairy option that can boost overall nutrition. Indeed, they are often praised for their high protein content, chiefly because cottage cheese contains casein, which digests slowly and helps with protein satiety. Consequently, individuals looking to maintain or build muscle often choose cottage cheese as part of their meal plan. Because it’s considered a keto-friendly cheese, you can also fit it into low-carb diets without sacrificing your protein goals.

Furthermore, cottage cheese snacks can keep you energized throughout the day. The steady release of casein protein means you’ll feel fuller for longer, thus helping reduce unnecessary snacking. Additionally, this slow-digesting protein is beneficial if you’re engaged in strength training or high-intensity workouts. When you pair cottage cheese with healthy carbohydrates—like whole-grain crackers or fresh fruits—it can become a balanced, easy healthy snack that supports muscle repair and recovery. Basically, it’s a simple way to include more protein in your routine without resorting to heavily processed sources.

Weight Management and Satiety

Equally important, many people rely on cottage cheese snacks for weight loss. It’s typically low in calories and carbs while still high in essential nutrients. The beauty of cottage cheese is that it adapts to many eating patterns. Some prefer low-fat versions, whereas others pick full-fat types for more satiety. Regardless of its fat content, cottage cheese gives you enough protein to stay satisfied. This is especially true when you combine it with high-fiber foods like veggies or berries.

Moreover, the slow digestion of cottage cheese can help curb cravings. Surprisingly, a small serving can keep you satiated for hours, which is particularly helpful if you’re watching your calorie intake. If you’re interested in exploring more weight-loss-friendly recipes, check out our High-Protein Breakfast Guide. Comparatively, cottage cheese snacks allow you to indulge in a tasty treat while staying on track toward your fitness goals.

Additionally, cottage cheese’s nutrient profile supports overall health, which certainly plays a significant role in successful weight management. By combining cottage cheese with fresh salads or whole-grain bread, you can turn a simple snack into a filling mini-meal. Then again, those looking for a lighter option can top it with sliced cucumber and cherry tomatoes for a crunchy, savory twist.

Rich in Essential Nutrients

Meanwhile, it’s not just protein that makes cottage cheese snacks so impressive. This calcium-rich snack contains vital minerals—like phosphorus—that help maintain strong bones. According to USDA FoodData Central, cottage cheese also provides B vitamins, which play a key role in energy production and metabolism. Certainly, these vitamins support overall bodily functions, making cottage cheese an outstanding addition to a busy lifestyle.

Altogether, combining cottage cheese with various fruits, vegetables, and herbs can boost your vitamin intake even more. Cottage cheese topping ideas—such as chopped bell peppers or strawberries—provide added fiber and antioxidants. Rather than relying on multivitamins alone, you can enjoy real, whole-food nutrition by snacking on cottage cheese throughout the day. Lastly, if you’re aiming to incorporate more micronutrients into your diet, cottage cheese snacks can be a simple and tasty approach. For instance, pair cottage cheese with spinach for a quick nutrient-packed meal.

A rustic ceramic bowl filled with cottage cheese topped with raspberries, peaches, red currants, flax seeds, and a mint sprig.
A nutritious cottage cheese bowl garnished with fresh fruits, seeds, and a mint sprig for a healthy breakfast option.

Quick & Easy Ways to Enjoy Cottage Cheese Snacks

Sweet Pairings

Certainly, one of the most appealing features of cottage cheese snacks is their versatility. This is especially true if you have a sweet tooth. You can top them with fresh berries like strawberries, blueberries, or raspberries. This creates a high-protein snack that bursts with natural sweetness. For a more indulgent twist, drizzle honey or maple syrup on top. It adds sweetness without going overboard.

Meanwhile, if you’re after a low-carb snack alternative, opt for sugar-free jam or sliced peaches. Pairing fruit with cottage cheese is not only delicious but also helps you reach your daily fruit servings. Additionally, you might consider tossing in a few chopped nuts or seeds for added crunch and healthy fats. Altogether, these sweet combos can transform plain cottage cheese into a decadent dessert-like treat—perfect for a mid-afternoon energy boost or a refreshing breakfast.

Layered parfait featuring cottage cheese snacks with fresh berries, granola, and honey.
A delightful cottage cheese parfait layered with granola and raspberries, perfect for a healthy breakfast or snack.

Savory Combinations

On the other hand, if you prefer savory flavors, cottage cheese snacks can quickly be turned into a nutritious curd snack that satisfies salty or spicy cravings. For instance, mix in herbs like chives, basil, or dill, then season with a dash of salt and pepper. Moreover, you can spice it up by adding paprika or red pepper flakes for a little kick. Another option is to combine cottage cheese with diced tomatoes and cucumbers for a refreshing, crunchy salad.

Occasionally, you might want something heartier—like using whole-grain crackers, brown rice cakes, or lettuce wraps as a vehicle for your savory cottage cheese spread. Certainly, you can incorporate pickled vegetables, olives, or avocado slices as well to elevate the flavor profile. When served with these savory elements, cottage cheese snacks become a quick lunchtime staple. Notably, they’re easy to prepare beforehand for your meal prep routine.

On-the-Go Snack Prep

Now, let’s talk about convenience. Because life can get hectic, it’s crucial to have readily available snacks that keep you satisfied. Cottage cheese snacks are perfect for busy days since you can portion them into small containers straightaway. Place toppings like fruit, nuts, or crackers in a separate compartment, so they remain fresh and crispy until you’re ready to eat.

Additionally, if you’re looking for a pre-workout cottage cheese snack, consider mixing cottage cheese with banana slices or peanut butter for a quick dose of carbs and protein. Emphatically, this combination fuels you with sustained energy without weighing you down. Consequently, whether you’re rushing to work or heading to the gym, a well-packed cottage cheese snack can serve as an ideal pick-me-up.

Delectable Recipes to Elevate Your Cottage Cheese Snacks

Cottage Cheese Fruit Parfait

Surely, one of the easiest ways to transform your cottage cheese snacks into a gourmet treat is by layering them in a vibrant fruit parfait. Initially, gather fresh or frozen berries, granola, and a drizzle of honey (or any sweetener you prefer). Then, in a transparent glass, alternately layer low-fat cottage cheese with colorful fruit and crunchy granola. Consequently, you’ll end up with a breakfast or dessert that’s not only visually appealing but also undeniably nutritious.

Because cottage cheese is a protein-packed dairy product, this parfait can serve as a superb morning meal or midday pick-me-up. Furthermore, feel free to incorporate seeds like chia or flax for added fiber. If you’re keen on making it keto-friendly, replace granola with chopped nuts and swap honey for a low-carb sweetener. Basically, this recipe is a simple yet delectable way to enjoy cottage cheese snacks that satisfy both hunger and sweet cravings.

Savory Cottage Cheese Dip

Meanwhile, if you prefer a savory spin, this cottage cheese dip is an easy healthy snack that will impress your taste buds. Basically, combine cottage cheese, fresh herbs (e.g., chives, dill), garlic powder, and a splash of lemon juice in a food processor. Then, blend until you reach your desired texture—some like it smooth, others prefer a chunky feel. Subsequently, season it with salt, pepper, and perhaps a pinch of chili flakes for heat.

As a nutritious curd snack, this dip pairs perfectly with raw vegetables, whole-grain crackers, or even pita chips. Additionally, consider adding Greek yogurt for a creamier consistency. Emphatically, you’ll appreciate how quickly this dip can be whipped up for family gatherings or potlucks. If you’re eager to know more about the nutritional benefits of cottage cheese, check out Mayo Clinic’s dairy recommendations.

Cottage Cheese Pancakes

Altogether, cottage cheese snacks aren’t limited to quick bites—they can star in hearty breakfast recipes too. For instance, cottage cheese pancakes are a weight loss snack option that can fit into a balanced lifestyle. Simply mix low-fat cottage cheese, eggs, oats, and a dash of baking powder until you form a batter. Also, add a bit of cinnamon or vanilla extract for extra flavor. Afterwards, cook the batter on a lightly greased pan until golden on both sides.

Certainly, these pancakes are rich in casein protein benefits and can help stabilize energy levels throughout the day. Serve them with fresh fruit, sugar-free syrup, or nut butter for a meal that feels indulgent yet remains high in protein. Obviously, they’re a fun twist on traditional pancakes, offering a fluffier texture and a delightful tang.

Baked Cottage Cheese Veggie Cups

Lastly, baked veggie cups are a low-carb snack alternative that can seamlessly incorporate your favorite vegetables alongside cottage cheese. By whisking eggs with cottage cheese, diced spinach, onions, and bell peppers, you’ll create a protein-rich batter. Then, pour this mixture into muffin tins and bake until firm. Consequently, the result is a series of bite-sized, savory cups that work well for healthy meal prep or breakfast on the go.

Markedly, you can store these veggie cups in the fridge for several days, making them a handy addition to busy mornings. Furthermore, consider adding shredded cheese, mushrooms, or even cooked turkey bacon for extra flavor.

Tips, Variations, and Serving Suggestions

Flavor Enhancers and Seasonings

When it comes to boosting the taste of cottage cheese snacks, think creatively with herbs, spices, and flavor extracts. For example, basil, dill, or mint can lend a refreshing twist, while a dash of paprika or chili powder can add some kick. Additionally, squeeze fresh lemon or lime juice over your cottage cheese topping ideas to brighten up the overall taste. Similarly, a sprinkling of toasted sesame seeds or sunflower seeds lends a delightful crunch.

Although cottage cheese is already a calcium-rich snack, combining it with healthy fats like avocados or olive oil—enhances mouthfeel and satiety. Another option is to stir in a spoonful of pesto or marinara sauce for an Italian spin. Meanwhile, you could try a touch of salsa or hot sauce for Tex-Mex flair. Practically anything that fits your palate can be used to season cottage cheese snacks in surprising ways.

Dietary Modifications

Surely, one of the best things about cottage cheese snacks is their adaptability to various dietary choices. If you follow a keto or low-carb plan, opt for full-fat cottage cheese instead of sweeteners or high-sugar fruits. Contrarily, if you’re focusing on a lighter approach, pick low-fat cottage cheese and top it with fresh veggies. Notwithstanding, you can easily find lactose-free cottage cheese in many supermarkets to cater to those with lactose intolerance.

Another notable consideration is gluten-free meal planning—pair your cottage cheese with naturally gluten-free ingredients like quinoa, brown rice cakes, or lettuce wraps. Also, vegans can consider dairy-free cheese alternatives, though the texture and nutritional profile differ. Still, cottage cheese snacks offer a broad spectrum of possibilities, so you’re sure to find a variation that meets your health and wellness goals.

Presentation and Plating

Evidently, making your cottage cheese snacks visually appealing can motivate you to enjoy them more often. Think about plating strategies like serving them in colorful bowls or layering them in clear jars. Then, garnish with vibrant elements such as edible flowers, citrus zest, or chopped chives to add a professional flair. Furthermore, arranging a cottage cheese “snack board” with assorted fruit, vegetables, nuts, and crackers can impress guests at parties or gatherings.

Surely, you don’t need a fancy occasion to elevate your food presentation. A quick swirl of honey, a sprig of mint, and a sprinkle of crushed walnuts can make your snack look restaurant-quality. Comparatively, using small ramekins for individual cottage cheese servings can keep portion sizes in check while still feeling indulgent. Ultimately, a little creativity in plating can turn your nutritious snack into an Instagram-worthy dish.

Colorful grazing board with cottage cheese snacks, fresh produce, and assorted toppings.
A creative snack board featuring cottage cheese, fresh fruits, crackers, and almonds for a healthy and balanced meal.

Frequently Asked Questions About Cottage Cheese Snacks

how to eat cottage cheese as a snack?

Undoubtedly, there are plenty of ways to enjoy cottage cheese snacks on a daily basis. For instance, you can eat it straight from the container, although many people like to pair it with fresh fruit or whole-grain crackers. Additionally, consider mixing in chopped vegetables such as cucumbers or tomatoes for a savory twist. Generally, the mild flavor of low-fat cottage cheese adapts easily to both sweet and savory toppings, making it a highly flexible and nutritious curd snack.

what to put in cottage cheese?

Altogether, cottage cheese snacks can be jazzed up with myriad toppings. Firstly, add fresh berries, bananas, or diced peaches for a natural sweetness. Secondly, sprinkle on crunchy elements like granola, nuts, or seeds if you need extra texture. Meanwhile, a savory route might include chopped herbs (e.g., dill or chives) and spices such as paprika or pepper flakes. Contrarily, if you enjoy a heartier option, stir in shredded chicken or avocado for a balanced meal.

is cottage cheese a healthy snack?

Certainly, cottage cheese snacks are known for their health benefits. Notably, cottage cheese is brimming with protein, which keeps you feeling full longer. Moreover, it contains essential nutrients like calcium, phosphorus, and B vitamins that support bone health and metabolism. Comparatively, the relatively low-carb profile makes cottage cheese a weight loss snack option for those watching their carbohydrate intake. Nonetheless, it’s wise to practice portion control and combine it with a balanced diet for the best results.

is cottage cheese a good late night snack?

Basically, cottage cheese snacks can be a great late-night indulgence due to their slow-digesting casein protein. This type of protein helps maintain muscle recovery during sleep and promotes a feeling of satiety. Furthermore, many people find it less likely to cause blood sugar spikes compared to sugary treats. Therefore, topping a small bowl of keto-friendly cheese with berries or chopped nuts can keep you satisfied without making you feel overly full before bedtime.

Final Thoughts on Cottage Cheese Snacks

Emphasizing the Versatility of Cottage Cheese

Overall, cottage cheese snacks deliver an exceptional blend of nutrition, taste, and convenience for people of all lifestyles. Because it’s a high-protein snack idea, cottage cheese fits effortlessly into multiple eating plans—whether you follow low-carb, balanced, or even lactose-conscious diets. Additionally, you can choose between sweet and savory variations, which enables you to keep your meals exciting day after day.

Meanwhile, the protein satiety aspect of cottage cheese supports muscle maintenance and weight management, making it an excellent ally for anyone pursuing a healthier relationship with food. Therefore, it’s no wonder this simple dairy product has taken center stage for those who want an easy healthy snack that actually keeps them feeling satisfied.

Next Steps for Your Culinary Journey

If you’re eager to explore even more ways to include cottage cheese in your meals, feel free to experiment with dips, stuffed vegetables, or layered bowls. Admittedly, the possibilities are endless, so don’t hesitate to play around with different ingredients. Furthermore, you can combine cottage cheese with other high-protein foods like grilled chicken or smoked salmon—for a filling lunch or dinner.

How to Create the Best Cottage Cheese Recipes in Minutes

Looking for new ways to elevate your meal plan? You’ve come to the right spot. In this article, we’ll dive into an array of cottage cheese recipes that are both healthy and downright delicious. Altogether, these recipes promise to satisfy your taste buds whether you’re craving savory breakfast bowls, sweet desserts, or quick snacks.

Undoubtedly, cottage cheese recipes have gained immense popularity, chiefly because they’re versatile and brimming with nutrients. We’ll explore the different types of cottage cheese, discuss the best cooking methods, and reveal the tastiest flavor combinations. Moreover, we’ll walk you through easy meal-prep techniques and highlight common mistakes to avoid.

Why Cottage Cheese Recipes Are Gaining Popularity

Cottage Cheese Recipes for a Protein-Packed Diet

Cottage cheese has long been a high-protein dairy option cherished by fitness enthusiasts and busy individuals alike. Basically, it’s a powerhouse of essential amino acids that help build muscle and maintain overall health. Furthermore, its moderate calorie count makes it a go-to ingredient for those who want to enjoy hearty meals without going overboard. Indeed, many find it easier to incorporate cottage cheese recipes into their routine because of the cheese’s mild flavor, which can seamlessly blend with both sweet and savory dishes.

Understanding the Different Types

Before experimenting with low-carb cottage cheese ideas, it’s wise to understand the various types available in stores. Comparatively, small-curd cottage cheese offers a creamier texture, while large-curd tends to be chunkier. Additionally, you’ll find low-fat versions, which are ideal for calorie-conscious eaters, and full-fat varieties that deliver a richer taste. Meanwhile, whipped cottage cheese brings a velvety consistency perfect for dips or spreads. Notwithstanding which type you choose, always check the label for salt content, as sodium levels can vary significantly across brands.

Nutritional Benefits

Undeniably, cottage cheese holds its ground as a nutrient-dense food. It boasts calcium for strong bones, B vitamins for energy, and casein protein for sustained fullness. According to the USDA FoodData Central, one cup of low-fat cottage cheese provides an impressive protein punch with fewer calories than many other cheese varieties. Consequently, it fits snugly into various eating plans keto, high-protein, or simply balanced. Altogether, these factors make recipes using cottage cheese a smart addition to your weekly meal rotation, ensuring you reap benefits without compromising flavor.

Top Savory Cottage Cheese Dishes to Savor

Cottage Cheese Breakfast Bowls (High-Protein Start)

 Colorful cottage cheese bowl with avocado slices and diced tomatoes
A vibrant mixture of fresh veggies and cottage cheese for a protein-packed start

Looking for cottage cheese recipes that kick off your day on a nutritious note? Then you’ll adore these high-protein cottage cheese recipes made into breakfast bowls. Basically, they’re quick to prepare and undeniably satisfying. First, choose your preferred cottage cheese type—small-curd, low-fat, or even whipped cottage cheese—then layer it with crisp veggies such as diced tomatoes, bell peppers, or cucumbers. Add a pinch of salt, pepper, and perhaps a dash of chili flakes for extra flavor.

Moreover, you can enhance the overall health factor by sprinkling chia seeds or flaxseeds on top. Meanwhile, for those who prefer a hearty bite, toss in pieces of turkey bacon or leftover roasted chicken. Comparatively, some folks even stir in avocado for its creamy texture. Savory cottage cheese toppings like chopped scallions, fresh herbs, and a dollop of hot sauce amp up the flavor.

Creamy Cottage Cheese Dips (Perfect for Parties)

Albeit often underrated, cottage cheese can transform into a show-stopping dip for parties or potlucks. Initially, blend cottage cheese in a food processor until smooth. Then, fold in fresh herbs like dill, parsley, or chives. Additionally, try adding a splash of lemon juice or even Greek yogurt to lighten the texture.

Undoubtedly, these dips outshine many store-bought versions because they’re low in saturated fats but high in protein. Moreover, you can pair them with whole-grain crackers, raw carrot sticks, or sliced cucumbers. Before serving, garnish with olive oil and a sprinkle of paprika to create savory cottage cheese toppings that stand out. Nevertheless, if you’re craving a bolder flavor, incorporate roasted garlic or sun-dried tomatoes. Indeed, these healthy cottage cheese recipes cater to various taste preferences, making them a superb choice for any gathering.

Baked Cottage Cheese Casserole (Hearty and Comforting)

Fancy a comforting meal that doesn’t break the calorie bank? This baked casserole is among the most popular cottage cheese recipes for a reason. First and foremost, sauté onions, mushrooms, and spinach in a pan until they soften. Next, stir in your chosen cottage cheese—full-fat varieties yield a richer taste—along with whisked eggs. Then, season liberally with garlic powder, pepper, and a pinch of salt.

Afterward, pour the mixture into a casserole dish and top with grated mozzarella or cheddar for a golden finish. Bake at 375°F (190°C) for roughly 25–30 minutes, or until the edges turn bubbly and lightly browned. Concurrently, you can incorporate cooked quinoa or brown rice to make the dish more substantial. Finally, let it cool slightly before slicing. Surely, you’ll find it tastes even better the next day, especially when reheated. For an easy side, check out our Chicken Ice Cream Recipe.

Throughout these savory creations, you’ll discover a world of mouthwatering cottage cheese recipes that cater to different palates. Whether it’s a zesty dip or a comforting casserole, cottage cheese proves itself a versatile superstar.

Indulge in Sweet Cottage Cheese Treats

Cottage Cheese and Fruit Parfaits

 Cottage cheese parfait layered with colorful berries and crunchy granola.
A delightful parfait combining cottage cheese, fresh berries, and granola

Craving something sweet yet still hoping to stick to your health goals? Sweet cottage cheese recipes are the answer, and parfaits rank high on the list. Start with a base of cottage cheese whipped versions work especially well then layer it with fresh berries, sliced bananas, or diced peaches. Furthermore, drizzle honey or agave nectar for added sweetness, albeit maple syrup also works beautifully.

Simultaneously, sprinkle in granola or crushed nuts for texture, and you’ll have a snack or dessert that feels indulgent yet remains packed with protein. Thus, these cottage cheese meal ideas double as guilt-free treats. Moreover, you can store them in airtight containers and grab them when you’re in a hurry.

Fluffy Cottage Cheese Pancakes

If you’re on the lookout for cottage cheese recipes that satisfy your morning sweet tooth, these fluffy pancakes certainly fit the bill. Basically, whisk together cottage cheese, eggs, a little flour (or almond flour for a low-carb twist), and a dash of baking powder. Then, blend the batter until smooth, ensuring no large curds remain. Subsequently, pour small circles of batter onto a greased skillet.

Cook each side until golden brown. Indeed, they’re light, airy, and undeniably scrumptious. Also, serve them with fresh fruit and a drizzle of honey or your favorite syrup. Consequently, you have a high-protein breakfast or brunch option sure to please the whole family.

Whipped Cottage Cheesecake Cups

Occasionally, you might fancy a rich dessert without the accompanying guilt. Whipped cottage cheese can be your best friend in this scenario. First, puree cottage cheese in a blender alongside a bit of Greek yogurt, sweetener (like stevia or sugar), and vanilla extract. Then, spoon the mixture into single-serving cups. Next, top each cup with fruit purée, melted dark chocolate, or crushed graham crackers for a no-bake cheesecake vibe.

Comparatively, this technique is far easier than baking a classic cheesecake and spares you excess calories. Meanwhile, you can store these cups in the fridge for up to three days, thus providing a quick snack or dessert. Overall, these healthy cottage cheese recipes confirm that living well doesn’t mean giving up on flavor.

So, who said sweet treats can’t be nourishing? From parfaits bursting with fresh fruit to fluffy pancakes and faux cheesecake cups, these cottage cheese recipes prove you can indulge and still maintain a balanced lifestyle.

Healthy Cottage Cheese Meal Ideas for Busy Schedules

Cottage Cheese Meal Prep Bowls

Creamy cottage cheese dip garnished with fresh herbs
A protein-packed dip perfect for parties or snacks

Are you pressed for time yet eager to eat healthy? Cottage cheese recipes can unquestionably streamline your weekly meal prep. Basically, assemble bowls by starting with a base of cooked quinoa, farro, or brown rice. Then, add a generous scoop of cottage cheese—perhaps small-curd for a creamier texture. Afterwards, layer on your favorite vegetables, like chopped bell peppers, cucumbers, and roasted broccoli.

Furthermore, sprinkle in lean proteins such as grilled chicken or tofu if you prefer a double dose of protein. Indeed, these bowls satisfy your hunger while showcasing protein-packed cottage cheese meals. Later, top it all off with a drizzle of olive oil, a squeeze of lemon, and an optional dash of hot sauce for zing. Certainly, storing them in airtight containers helps the flavors meld together overnight. Hence, your lunch or dinner will be ready whenever you need it—no fuss, just pure convenience.

Low-Carb Cottage Cheese Spinach Bake

Looking for low-carb cottage cheese ideas that deliver tasty results? Then this spinach bake fits the bill. Firstly, sauté onions and garlic in a skillet with a tiny bit of olive oil. Secondly, stir in fresh spinach until it wilts. Next, whisk eggs in a separate bowl and combine them with cottage cheese, along with a pinch of salt and pepper. Surely, fold in the spinach mixture for added nutrients and flavor.

Subsequently, pour the batter into a greased baking dish. Then bake at 375°F (190°C) for around 25 minutes, or until the center is just set. Consequently, you get a savory, protein-packed dish ideal for a quick dinner or even breakfast on the run. Healthy cottage cheese recipes like this are especially popular among individuals following low-carb or keto-friendly eating plans. Additionally, you can store the bake in the fridge for up to three days. For more convenient meal ideas, be sure to explore our Best Leftover Rotisserie Chicken Recipes.

Moreover, many turn to cottage cheese recipes when they want a flexible, wholesome ingredient that marries well with various flavors. Undoubtedly, having reliable meal prep bowls and a hearty spinach bake in your rotation will keep you satiated without sacrificing precious time. Also, if you’re curious about the nutritional breakdown of spinach or cottage cheese, check out USDA FoodData Central for detailed information.

Mastering Cottage Cheese Recipes with Expert Tips

How to Choose the Right Cottage Cheese

Anyone diving into cottage cheese recipes should first identify the best variety to match their preferences. Although small-curd cottage cheese tends to be creamier, large-curd offers more texture. Conversely, whipped cottage cheese spreads effortlessly on toast or crackers. Moreover, you should check labels for sodium content, since some brands are saltier than others. Certainly, it pays to experiment with different fat levels as well—low-fat options cater to those watching calories, whereas full-fat versions provide a richer flavor.

Evidently, reading ingredient lists allows you to avoid unnecessary additives. If possible, opt for brands with simpler ingredient profiles. Additionally, store cottage cheese in the coldest part of your fridge and keep the lid tightly sealed. Indeed, fresh is best when it comes to dairy.

Flavor Enhancers for Cottage Cheese

Occasionally, you may crave bolder tastes in your healthy cottage cheese recipes. In that case, rely on herbs like basil, dill, or chives for a punch of freshness. Still, don’t forget about spices such as paprika, chili flakes, or black pepper to bring out the savory side. Meanwhile, a spoonful of pesto or a drizzle of sriracha might also do the trick if you’re feeling adventurous.

Overall, it’s a breeze to tailor cottage cheese recipes to your palate by mixing in fruits for sweetness or vegetables for an earthy twist. Surely, exploring diverse flavor enhancers keeps mealtime exciting.

Altogether, choosing the right type of cottage cheese and experimenting with seasonings can transform humble dairy into a star component of your meals. Thus, keep tasting and adjusting, since discovering your perfect combination leads to a more satisfying culinary journey.

Avoiding Pitfalls in Cottage Cheese Recipes

Overcooking or Undercooking

Sometimes, cottage cheese recipes go awry when ingredients aren’t cooked at the right temperature. Basically, overcooking a protein-packed dish can dry out the cottage cheese and cause a rubbery texture. Conversely, removing it from the heat too soon may leave the inside undercooked or watery. Therefore, pay close attention to the recommended time and temperature, especially when dealing with baked casseroles or spinach bakes.

Improper Seasoning

Surprisingly, many home cooks either overload their healthy cottage cheese recipes with salt or don’t season enough. Indeed, the simplest way to avoid bland outcomes is to gradually add spices—taste as you go. Additionally, herbs like dill or basil elevate cottage cheese meal ideas without overwhelming the dish. Furthermore, a dash of chili flakes or paprika can introduce a pleasant kick.

Not Draining Excess Liquid

Occasionally, certain cottage cheese recipes call for a drier consistency. However, if you skip the crucial step of draining excess liquid, you might end up with a runny final product. Thus, take a minute to gently press the curds with a spoon or place them in a mesh strainer beforehand. Altogether, this small effort helps maintain the desired texture and ensures you savor every bite.

Frequently Asked Questions About Cottage Cheese

  1. What is the most popular way to eat cottage cheese?
    Undoubtedly, many people enjoy fresh fruit with cottage cheese—e.g., pineapple or berries—for a quick snack. Others, however, love incorporating cottage cheese recipes into their breakfasts by pairing it with toast and avocado. Basically, you can’t go wrong with sweet or savory toppings since cottage cheese has such a mild taste.
  2. What does cottage cheese mix well with?
    Cottage cheese recipes often shine when combined with crunchy vegetables, juicy fruits, or even whole-grain pasta. Additionally, you can stir in fresh herbs, drizzle honey, or add jam for sweetness. Overall, think of cottage cheese as a blank canvas—tweak it to suit your mood and dietary preferences.
  3. Are there any benefits to eating cottage cheese?
    Absolutely! Cottage cheese is rich in protein, calcium, and B vitamins. Hence, it supports muscle repair and bone health. According to USDA FoodData Central, a single serving offers high-quality nutrients with fewer calories than many other cheeses. Consequently, cottage cheese recipes can complement weight management plans and active lifestyles.
  4. What seasoning do you put on cottage cheese?
    Answer: Seasonings like black pepper, paprika, dill, or chili flakes give a flavorful boost. Meanwhile, a squeeze of lemon juice or a dash of hot sauce can add tang or heat. Indeed, many low-carb cottage cheese ideas also incorporate garlic powder, onion powder, or fresh chives for an extra flavor punch.

Can I Freeze Rotisserie Chicken After 4 Days? Save and Store Leftovers Safely

Are you curious and asking yourself, “Can I freeze rotisserie chicken after 4 days?” In this article, you’ll find detailed guidelines to protect flavor, preserve freshness, and follow the best practices for long-term storage success.

Introduction and Key Concepts

Rotisserie chicken remains a hot favorite in the United States. People love it for its convenient, pre-cooked goodness. Also, it offers a quick solution for busy families who want an easy meal without spending hours in the kitchen. However, many of us get stuck with leftover chicken and wonder if it’s still safe to freeze after several days in the refrigerator.

Accordingly, the focus keyword “Can I freeze rotisserie chicken after 4 days?” emerges as a common question. This query arises because many standard guidelines tell us to refrigerate leftover chicken for only three or four days. Beyond that, it may become suspect. But is it truly off-limits once Day 4 rolls around?

Altogether, you’ll see that proper handling methods, safe storage temperatures, and packaging techniques can help you freeze cooked rotisserie chicken before it spoils. Nonetheless, you’ll also learn which steps to follow if you decide to freeze it right on Day 4. Additionally, you’ll get tips for thawing, reheating, and repurposing your chicken in new and creative ways.

If you’re seeking more official insights on cooking safety, you can review guidelines from the Centers for Disease Control and Prevention. Likewise, the Food Safety and Inspection Service of the USDA offers helpful reminders on storing and handling cooked meat. Finally, for general health advice regarding leftovers, the Mayo Clinic’s Food Safety Tips provide quick reference points.

In the subsequent chapter, we’ll unravel official food safety guidelines to better understand how they shape our approach to freezing and storing rotisserie chicken.

Understanding Food Safety Guidelines

Food safety guidelines ensure that cooked foods remain free from harmful bacteria. Comparatively, the U.S. Department of Agriculture (USDA) states that cooked poultry can be kept safely in the refrigerator for around three to four days. After that, bacteria can start multiplying, albeit sometimes slowly. Hence, many families question: “Can I freeze rotisserie chicken after 4 days?” The short answer is that while it’s possible, you must be absolutely certain the chicken hasn’t gone bad.

Official Recommendations for Cooked Poultry

Firstly, official bodies like the USDA emphasize chilling your food at 40°F (4°C) or below. Similarly, they advise placing leftovers in the fridge no later than two hours after cooking. If you’re dealing with a hot environment (over 90°F or 32°C), you have an even smaller window—just one hour. These recommendations come from proven data on bacterial growth. When cooked chicken sits at room temperature too long, microorganisms can flourish.

Additionally, government agencies suggest labeling stored items with the date. That way, you can easily track how many days have passed. Because memory alone can be faulty, a system of labeling reduces confusion. Sometimes, leftover food lingers at the back of the fridge, and you forget exactly when you cooked or bought it.

Bacterial Growth and Temperature Zones

Chiefly, the “Danger Zone” for bacteria is between 40°F (4°C) and 140°F (60°C). During this temperature range, microorganisms multiply quickly. Albeit cooking kills many bacteria, new ones can form once the chicken cools and is exposed to air or surfaces. This is why correct handling—like sealing leftovers in airtight containers—helps mitigate contamination.

Nevertheless, freezing at 0°F (-18°C) or lower greatly slows bacterial growth to nearly zero. This effectively puts the food in “pause” mode. However, if your chicken is already on the brink of spoiling, freezing will not magically fix that. So the question “Can I freeze rotisserie chicken after 4 days?” depends on whether the chicken has been stored safely. If it was well-handled, sealed, and quickly chilled, freezing on Day 4 might be acceptable. But if it sat out for hours or shows spoilage indicators, then no, it’s not worth the risk.

In the next installment, we’ll review how to store rotisserie chicken in the fridge, so you’ll know what conditions lead to safe or unsafe freezing scenarios afterward.

Storing Rotisserie Chicken in the Fridge

Airtight containers with leftover rotisserie chicken labeled in the fridge
Shredded rotisserie chicken in labeled containers, ensuring optimal freshness

After buying a fresh rotisserie chicken, your first step is to get it home swiftly and into the fridge if you’re not planning to eat it right away. Certainly, the less time it spends in the “danger zone,” the better. Many stores keep these chickens under heat lamps or in warming cases. But once you place it into your cart, the cooling clock starts ticking.

Ideal Refrigerator Conditions

Your refrigerator should be set around 37–40°F (3–4°C). Henceforth, use a fridge thermometer to confirm. Many built-in thermostats can be off by a few degrees, so a separate thermometer helps you keep track. Another essential rule is to store the chicken in a sealed container or a zip-top bag. Doing so protects it from air exposure and other strong-smelling foods. Thus, you preserve the bird’s freshness and overall flavor.

Moreover, place the chicken in the coldest part of your fridge, usually near the back or on a lower shelf. This prevents frequent temperature fluctuations caused by the door opening. Additionally, store any sauces or drippings in separate containers to keep the meat from getting soggy.

Signs of Spoilage

Determining whether your chicken remains fresh enough to freeze on Day 4 rests on certain spoilage signs. So, keep an eye out for:

  • Foul Odors: A sour or rotten smell indicates bacterial growth.
  • Slimy Texture: Sticky or mucus-like feel can mean the meat is going bad.
  • Discoloration: Greenish or grayish patches are major red flags.

If any of these appear, discard the chicken rather than freeze it. Also, trust your gut. If something seems off, it’s safer to dispose of it. Foodborne illnesses can be severe, so “better safe than sorry” certainly applies.

In many U.S. households, rotisserie chicken is a staple. Comparatively, it’s cost-effective, easy to prepare, and versatile. But the convenience factor can lull people into a false sense of security. A well-handled chicken can remain fresh for a few days, but not indefinitely. Hence, the question “Can I freeze rotisserie chicken after 4 days?” becomes relevant only if you stored it properly from Day 0 through Day 3.

Still, it’s wise to mark the date you purchased it. If you opened it and left it at room temperature for an extended period, you reduce its safe fridge life. Rotisserie chicken might still appear “normal” on the outside, while harmful bacteria multiply inside. Therefore, the four-day countdown typically starts from the time you placed the bird in the fridge, not from the moment you left the store.

Advancing to the following area, we’ll address the focus query in detail: “Can I freeze rotisserie chicken after 4 days?” Then, we’ll analyze some of the inherent risks and how to mitigate them.

Can I Freeze Rotisserie Chicken After 4 Days?

This question sparks debate among home cooks. The standard advice is to freeze cooked chicken well before the four-day mark. But, undoubtedly, real life happens. You might forget to freeze it earlier, or you planned to eat it yet changed your mind. Now it’s Day 4, and you want to salvage your leftover chicken.

Breaking Down the 4-Day Window

Generally, the USDA suggests that cooked chicken remains safe in the refrigerator for up to four days. If you freeze it earlier, you capture a fresher taste and texture. Day 4 is at the tail end of the recommended safe window. Notwithstanding, if the chicken still smells fine and shows no spoilage signs, you can freeze it. However, you should do so straightaway to keep further bacterial growth at bay.

Equally, consider how the chicken was stored. If you placed it in a sealed container and refrigerated it within two hours of purchase or cooking, you’re probably good. If you let it sit out for ages, those four days might be too long. Contrarily, if you only placed it in the fridge on Day 2, you might have less total “safe time” left.

Risks Versus Realities

Some people freeze chicken on Day 5 or 6 and claim no ill effects afterward. Albeit anecdotal, it underscores that some microbes might not cause an immediate reaction. Conversely, foodborne illnesses can be stealthy. Therefore, freezing on Day 4 is a calculated risk. For best practice, aim for Day 2 or 3, when the bird is still near peak freshness.

Furthermore, once you freeze the chicken, it remains safe indefinitely from a bacterial perspective. However, flavor and texture degrade over time. For best quality, use it within two to three months. Eventually, dryness or freezer burn can creep in, making it less palatable. Packaging is critical: an airtight container or freezer bag with the air pushed out will preserve more moisture.

If you decide to freeze on Day 4, do a quick quality check. Sniff, inspect, and maybe taste a small piece cold. If it passes these simple tests, wrap it up and freeze it promptly. If you have any doubts, discard it. Certainly, no meal is worth a possible foodborne illness.

In the next division, we’ll examine best practices for freezing cooked chicken. Simultaneously, we’ll show you how to package and label your leftovers to avoid freezer burn and confusion later on. Because if you’re going to freeze it, you might as well do it right.

Best Practices for Freezing Cooked Chicken

Person sealing leftover rotisserie chicken in a freezer bag with a date label
Leftover chicken portions placed in labeled freezer bags, ready for long-term storage

Freezing cooked chicken can be a lifesaver on busy weeknights. Certainly, leftover rotisserie chicken brings quick protein to your table. However, preserving its quality calls for strategic methods. By adhering to a few packaging tips, you can prevent both spoilage and freezer burn.

Packaging and Portioning Tips

  1. Cool the Chicken First
    • Let the rotisserie chicken cool down to near room temperature.
    • Place it in the refrigerator for a short while if it’s still warm.
    • This reduces condensation in the packaging.
  2. Portion Control
    • Cut or shred the chicken into manageable pieces.
    • Store each portion in a separate container or bag.
    • Henceforth, you can thaw only what you need rather than the entire bird.
  3. Choose Airtight Containers
    • Use rigid plastic or glass containers with tight-fitting lids.
    • Alternatively, opt for heavy-duty freezer bags.
    • Likewise, remove as much air as possible before sealing.
  4. Label and Date
    • Write the freeze date on the container.
    • Also note the purchase date or day you cooked it.
    • This helps you track how long it’s been in the freezer.

Avoiding Freezer Burn

Freezer burn occurs when cold, dry air contacts the surface of the meat. It changes the texture and flavor, leading to rough, grayish patches. Therefore, minimize air pockets and keep the chicken well-sealed. If you prefer vacuum sealers, they can be handy. Although not mandatory, vacuum sealing drastically cuts down on freezer burn.

Another tip is to freeze the chicken quickly. Placing it flat on a freezer shelf ensures faster solidification. Large lumps of meat take longer to freeze fully, which can compromise quality. Certainly, you might rearrange your freezer to create a space that allows air to circulate around your packed chicken.

Additionally, some cooks add a thin layer of sauce or broth to help lock in moisture. This technique can work well if you plan to use the chicken in soups or stews later. Nevertheless, be careful with liquids because they expand when frozen. Always leave some headspace if storing in rigid containers.

Moving to the next part, we’ll explore thawing and reheating. Once your chicken is frozen—whether on Day 4 or earlier—how you unfreeze it influences its final taste and texture.

Thawing and Reheating Methods

Fridge Thawing vs. Cold-Water Thawing

Thawing your leftover rotisserie chicken properly protects both flavor and food safety. First, fridge thawing is the gold standard. Place the packaged chicken in the refrigerator and let it thaw slowly for about 24 hours, depending on portion size. Because the meat remains below 40°F (4°C), bacterial growth remains minimal.

Alternatively, cold-water thawing is faster. Submerge the sealed chicken in cold water, changing the water every 30 minutes. Hence, your chicken may thaw in just a few hours, albeit you must cook it straightaway. This method is convenient but requires close monitoring to avoid letting the water become warm. Equally, ensure no water seeps into the package.

Microwave Defrost and Oven Reheating

Occasionally, you need your chicken defrosted ASAP. The microwave’s defrost setting can help. However, partial cooking often occurs, creating uneven hot spots. Thus, cook your chicken immediately after microwave thawing. You don’t want partially heated chicken to sit around, as bacteria could grow in those warmed areas.

When it comes to reheating, aim for an internal temperature of 165°F (74°C). Likewise, add a splash of broth or water if you worry about dryness, particularly if the chicken was frozen on Day 4. Nevertheless, short bursts in the microwave or a low-temperature oven can salvage moisture. Avoid overcooking the chicken, because dryness can develop fast.

In the next subsection, we’ll reveal creative, mouthwatering ways to use thawed chicken. You don’t have to settle for a plain dish. Rotisserie chicken—fresh or frozen—fits a range of flavors and recipes.

Creative Ways to Use Thawed Rotisserie Chicken

Rotisserie chicken isn’t just for lazy evenings. Indeed, its tasty, well-seasoned meat complements countless recipes. If you freeze it, there’s no need to worry about monotony. Once thawed, let your imagination run wild.

Meal Ideas and Leftover Inspiration

  1. Chicken Tacos
    • Shred the meat.
    • Sauté with onions, peppers, and taco seasoning.
    • Serve in tortillas with salsa and cheese.
  2. Hearty Soups
    • Add chopped chicken to broth with veggies, noodles, or rice.
    • Season with garlic, thyme, and bay leaves.
    • Simmer until flavors meld.
  3. Chicken Salad
    • Combine shredded chicken with mayonnaise or Greek yogurt.
    • Toss in celery, onions, and grapes for a sweet crunch.
    • Serve in lettuce cups or on whole-grain bread.
  4. Casseroles and Bakes
    • Layer chicken, cream sauce, and veggies in a baking dish.
    • Top with cheese or breadcrumbs.
    • Bake until bubbly and golden.
  5. Quesadillas
    • Sandwich shredded chicken and cheese between tortillas.
    • Brown on a skillet.
    • Slice into wedges.

Enhancing Flavor After Freezing

Comparatively, thawed chicken might lose a bit of its succulence. Therefore, consider simmering it in flavorful sauces—like barbecue, buffalo, or teriyaki—to revive its moisture and taste. Similarly, adding fresh herbs and spices can mask any mild freezer taste. By mixing in new ingredients, you ensure every meal remains exciting.

Meanwhile, rotating cooking methods keeps dinner diverse. Try air-frying leftover chicken to re-crisp the skin or toss it into a stir-fry with soy sauce and vegetables. Indeed, the possibilities are endless. In the next phase, we’ll address popular questions about storage timelines, specifically for rotisserie chicken in the fridge and on the bone.

Frequently Asked Questions (FAQ)

How long is cooked rotisserie chicken good for in the fridge?

Cooked chicken remains safe for three to four days if kept at or below 40°F (4°C). However, many factors—like how quickly you chilled it—can shorten this window. If it still looks and smells fresh on Day 4, freezing might be viable, depending on how it was handled. Nonetheless, earlier freezing leads to better quality.

Rotisserie chicken in fridge for a week

Storing rotisserie chicken in the fridge for a week is risky. Generally, guidelines state that Day 4 is the limit. Past that, bacterial activity can become significant, raising the likelihood of spoilage and foodborne illness. If you cannot eat the chicken within four days, it’s best to freeze it sooner.

How long is rotisserie chicken good for on the bone?

Keeping chicken on the bone can influence its moisture, helping the meat stay juicy. Still, the overall safety timeframe remains roughly the same: three to four days in the fridge. If you plan on using the bones for broth or soup, remove the meat first, then freeze the bones in a separate bag. Therefore, you can prolong the usefulness of the chicken without risking spoilage.

Moving forward to the next topic, we’ll consolidate key insights in the final portion. You’ll discover a succinct recap and some practical pointers to keep your rotisserie chicken experiences safe, satisfying, and easy.

Final Thoughts and Conclusion

Dealing with leftover chicken often brings up that pressing question: “Can I freeze rotisserie chicken after 4 days?” The best answer hinges on how well you stored it during those four days. Certainly, if it shows no signs of spoilage and smells fine, you may freeze it. But for maximum flavor and safety, freeze it earlier—preferably around Day 2 or Day 3.

Moreover, having a system for labeling and dating leftovers can remove all guesswork. If you consistently store your cooked chicken in airtight containers, you preserve its taste and texture far better than if you leave it in loose packaging. Furthermore, when you eventually thaw and reheat, ensure the internal temperature reaches 165°F (74°C). That step guarantees you kill off any lingering bacteria.

Whether you’re a busy parent, a college student, or someone who simply loves convenience, leftover rotisserie chicken can be a meal-saver. Altogether, it’s versatile enough to morph into tacos, casseroles, salads, and more. If you freeze it properly, you’ll have pre-cooked protein ready to go at a moment’s notice.

Ultimately, mindful handling and immediate refrigeration are your greatest allies. If you’re uncertain about the chicken’s condition on Day 4, it’s safer to toss it. However, if you followed all the guidelines—chilling it fast, storing in sealed containers, and keeping the fridge at the right temperature—freezing might still be an option. By adopting these habits, you’ll rarely worry about your rotisserie chicken’s fate, because you’ll have confidence in your method from day one.

Are Rotisserie Chickens Healthy? An Expert Look

Rotisserie chickens have become a go-to meal solution for people who crave both convenience and flavor. However, are rotisserie chickens healthy? It’s a question on many minds, especially as we strive to balance tasty food with better nutrition. Indeed, these pre-cooked birds are widely available in grocery stores and offer a quick fix when you’re short on time. Even so, some folks worry about additives, sodium, or extra calories lurking beneath that crispy, golden skin.

In this article, we’ll explore every angle from the rotisserie chicken nutrition facts to the potential impact of sodium in rotisserie chicken. Along the way, we’ll reveal whether picking up one of these ready-to-eat options is truly a healthful choice or just another trap. Let’s dig in!

Understanding Rotisserie Chickens

Key Nutritional Components of Rotisserie Chicken

At first glance, a rotisserie chicken seems like a straightforward food. After all, it’s just a whole chicken—cooked on a spit until the skin turns crisp and the meat becomes tender. Yet, to figure out are rotisserie chickens healthy? it’s vital to understand their core nutritional profile. Typically, you’ll find that rotisserie chicken is rich in lean protein sources, offering substantial amino acids essential for muscle repair. Thanks to these nutrients, you can feel fuller with fewer total calories compared to fattier meats.

But that’s not all. Rotisserie chicken often contains B vitamins, zinc, and selenium, which support everything from energy production to immunity. Moreover, the protein content can help maintain muscle mass, an especially important factor if you’re trying to manage your weight or stay active. Nevertheless, it’s also worth pointing out that not all parts of the chicken are created equal. For instance, the breast portion tends to be lower in fat and calories, whereas dark meat like thighs or drumsticks carries more saturated fat. So, if you’re counting calories, you may want to consider which piece you’re piling onto your plate.

Common Seasonings and Their Effects

Beyond the bird itself, you should also examine those aromatic rubs and savory glazes. Indeed, store-bought rotisserie vs. homemade can vary greatly in terms of salt and flavor enhancers. Commercially prepared chickens sometimes carry a sodium-heavy injection to boost taste, which could raise heart health concerns if you overindulge. Meanwhile, certain seasonings can include added sugar or preservatives that help the chicken last a bit longer on the shelf.

However, don’t assume all seasonings are unhealthy. Sometimes, herbal mixes or a dash of pepper can elevate the flavor without sending sodium levels sky-high. In short, be sure to check the label—or ask the deli counter for specifics—when deciding which rotisserie chicken to buy. Paying attention to these details helps clarify are rotisserie chickens healthy? overall and lets you make better-informed decisions.

Health Benefits of Rotisserie Chicken

High-Protein, Lean Meat Source

Rotisserie chicken delivers lean protein that can help build and repair muscles. This protein also supports everyday bodily functions, such as producing enzymes and maintaining healthy skin. Not to mention, high-protein foods keep you feeling satisfied for longer periods, so you’re less tempted to reach for empty-calorie snacks. Indeed, many people wonder are rotisserie chickens healthy? when trying to add more protein into their diet, and the answer can be a resounding “yes,” provided they watch out for extra sodium or additives.

Furthermore, rotisserie chicken often contains less fat if you opt for the breast portion, which makes it appealing for those who prefer low-carb meal ideas or follow certain eating plans like keto. But don’t discount the taste of dark meat, which offers higher iron content, even if it also has a bit more saturated fat. Meanwhile, for anyone looking for a quick fix, the convenience of a ready-to-eat bird means you can whip up dinner in no time. If you’re craving a simple side dish to accompany your chicken, you might enjoy the Easy Chicken Bone Broth Recipe. Pairing protein with fiber-rich grains or vegetables can make your meal both well-rounded and delicious.

It’s also worth noting that the cooking method slow-roasting on a spit helps preserve moisture in the chicken. Unlike deep frying, which adds oil, rotisserie cooking relies on the bird’s natural fats for flavor and tenderness. Consequently, you typically get fewer overall calories compared to heavily fried chicken products. Yet, keep in mind that the final nutrition comes down to portion control. Whether you eat the entire bird or just a piece, aim for balance: pair your protein with healthy carbs, good fats, and fresh veggies.

Essential Vitamins and Minerals

Sliced rotisserie chicken breast served with salad
Lean chicken breast paired with fresh greens and wholesome grains

Rotisserie chicken boasts a range of important vitamins and minerals, including zinc, vitamin B12, and selenium. Zinc helps bolster immune function, while B12 supports brain health and energy production. Selenium, on the other hand, operates as a potent antioxidant that can safeguard cells from damage.

Meanwhile, other trace nutrients, like niacin and phosphorus, contribute to overall wellness by aiding metabolism and bone strength. This nutrient-dense profile underscores why many nutritionists say you shouldn’t feel too guilty about enjoying rotisserie chicken—especially if you’re careful to manage sodium and choose healthier sides. Ultimately, the question are rotisserie chickens healthy? hinges on your overall eating habits. With mindful choices, they can absolutely play a positive role in a balanced diet.

Potential Drawbacks and Concerns

Sodium, Preservatives, and Additives

One of the biggest caveats with ready-to-eat chickens is their sodium content. Commercial versions often rely on brining solutions, salt-based seasonings, or preservatives to enhance taste and shelf life. Consequently, you might be consuming more salt than you realize, which can lead to water retention or higher blood pressure over time. Some manufacturers also use sodium phosphate in chicken to keep the meat moist and plump, but this can push sodium levels even higher.

Moreover, food safety guidelines encourage checking labels for compounds like MSG, nitrates, or other flavor enhancers. Although these additives may not be harmful in very small doses, they can accumulate if rotisserie chicken is your go-to meal several times a week. So, if you’re questioning are rotisserie chickens healthy? because of these additives, the short answer is that it depends on how often you indulge and whether you pick lower-sodium brands. Reading labels, asking questions at the deli counter, or even trying an unseasoned or lightly seasoned version can help you keep an eye on hidden components.

Impact of the Chicken Skin and Fats

Another point to consider is the chicken skin. Sure, that crispy exterior can be downright irresistible, but it also harbors extra fat—some of it saturated. If you’re keeping track of heart health or watching your waistline, peeling off the skin could be a worthwhile move. You’ll save calories and reduce saturated fats, which can sometimes be linked to cardiovascular concerns.

Yet, not all fats are created equal. The unsaturated fats in chicken, such as those in the meat itself, can be beneficial when eaten in moderation. Choosing skinless breast cuts, or removing the skin right before eating, tends to strike a nice balance. Doing so allows you to enjoy the classic rotisserie taste without going overboard on less desirable nutrients. After all, the main reason are rotisserie chickens healthy? keeps popping up in nutrition discussions is that people worry about sneaky elements in their meals—like hidden fats or chemical additives.

Why Is Rotisserie Chicken Bad for Your Heart?

Some health experts caution that too much sodium and saturated fat can raise your risk of heart issues. For instance, high sodium intake contributes to hypertension, which strains the cardiovascular system. Saturated fat may potentially raise LDL (“bad”) cholesterol, further exacerbating heart disease risks for certain individuals. Although rotisserie chicken isn’t “bad” across the board, it can become problematic if you eat it excessively or fail to pair it with other healthy chicken meals.

Still, you don’t need to swear off convenience foods altogether. Rather, focus on moderation, variety, and smart preparation. If your weekly menu includes rotisserie chicken, think about balancing it out with low-sodium sides, fresh salads, or roasted vegetables. And if you’re truly worried about additives, consider making your own version at home with a simple seasoning blend and minimal salt. In doing so, you’ll have greater control over the ingredients, and your heart will likely thank you in the long run.

Are Rotisserie Chickens Healthy for Weight Management?

Balancing Calories and Portion Control

Many folks turn to rotisserie chicken because it’s quick, tasty, and versatile. But are rotisserie chickens healthy? when you’re watching your waistline? In most cases, they can be! After all, lean protein sources tend to foster greater fullness, which might help curb mindless snacking. Still, you’ll want to keep an eye on portion sizes. Consuming half a chicken in one sitting can load you up with extra calories, especially if you also indulge in buttery side dishes.

Moreover, be mindful of the dark meat and skin—these areas pack in more fat. If you prefer to save calories, lean into skinless breast meat. Pair your chicken with a light salad or steamed veggies. Such combos deliver vitamins, fiber, and essential minerals, making the meal more balanced and satisfying. If you’re craving more variety, consider turning leftover rotisserie chicken into a healthier wrap or salad. For instance, mix the chicken with crunchy lettuce and a drizzle of olive oil, then wrap it in a whole-grain tortilla.

It’s also wise to stay hydrated and observe your daily calorie intake. Sometimes, thirst masquerades as hunger, making you eat more than you need. By drinking water before and during meals, you support better appetite regulation. Indeed, finding harmony between tasty eating and calorie awareness doesn’t mean you have to skip convenience altogether. Instead, look for small ways to lighten up your plate without sacrificing flavor.

Are Rotisserie Chickens Healthy for Weight Loss?

If you’re trying to lose a few pounds, rotisserie chicken can offer a filling protein source that stops cravings. High-protein foods help keep blood sugar levels steady, which may leave you feeling alert instead of crashing mid-afternoon. Meanwhile, removing the skin is a simple way to cut excess fat. Even so, watch your salt intake. Drinking enough water and adding foods high in potassium (like bananas or spinach) can help balance out salt’s bloating effects.

Rather than focusing on chicken alone, build a meal around it with nutritious sides think whole-grain rice, roasted carrots, or broccoli. You’ll pump up the fiber while maintaining a balanced macronutrient ratio. Ensuring variety in both food choices and cooking methods plays a role in making weight loss sustainable. Ultimately, when you ask “Are rotisserie chickens healthy?” for dropping pounds, the answer is yes—so long as you manage calories, reduce fatty extras, and consider sodium intake.

Comparing Different Rotisserie Chicken Brands and Options

Who Has the Healthiest Rotisserie Chicken?

Nowadays, many supermarkets, membership clubs, and grocery chains tout their own versions of rotisserie chicken. Some advertise low-sodium options, while others claim their birds are “all-natural.” To decide who has the healthiest rotisserie chicken, compare nutritional labels. Check for sodium levels, list of additives, and note any extra sugars in the seasoning. You might find that a certain store uses fewer preservatives or that another brand prides itself on using only organic or antibiotic-free chickens.

Additionally, keep an eye on portion sizes offered. Some vendors serve jumbo birds packed with injections for added moisture, while others rely on a simpler approach. If you see a brand that fits your dietary goals—like lower sodium or fewer additives—give it a try. Reading reviews or asking friends can also give you a sense of flavor and quality.

Tips for Choosing Lower-Sodium or Organic Versions

When pondering are rotisserie chickens healthy?, remember that you’re in control of which type you buy. If sodium content worries you, pick a bird labeled “low-sodium” or “no added salt.” Seek out ingredient lists that limit phosphates, nitrates, or flavor boosters. Meanwhile, organic rotisserie chickens typically come from birds raised without synthetic pesticides or antibiotics. Though they may cost more, many people appreciate the peace of mind.

Should you not find a suitable low-sodium or organic option at your usual store, consider making your own. Season the bird with herbs, lemon juice, and a small amount of salt. Then roast it slowly until it’s golden. By taking a DIY approach, you can manage every ingredient in your meal, leaving you with healthier, delicious food that aligns perfectly with your dietary preferences. If you’d rather not cook from scratch, though, scanning labels and asking questions at the deli counter goes a long way toward ensuring you pick the best rotisserie chicken for you.

Making Rotisserie Chicken Healthier at Home

Removing the Skin and Other Modifications

Carving a homemade rotisserie chicken with herbs
A home-cooked rotisserie chicken with skin removed for a lighter meal

One of the easiest ways to make a rotisserie chicken healthier is by taking off the skin. Yes, that crispy coating might be delicious, yet it can hold extra saturated fats and spices that raise sodium levels. By removing it, you quickly lower the calorie count and reduce the risk of eating too much salt. Moreover, you could marinate your chicken with fresh herbs, lemon juice, or a pinch of black pepper instead of relying on pre-packaged seasoning blends. Doing so ensures you know exactly what goes into each dish, and it lets you skip some of the preservatives found in store-bought versions.

Additionally, consider adjusting cooking times and temperatures if you’re making the chicken from scratch. Slow-roasting at a moderate heat—around 375°F (190°C)—helps render out excess fat while preserving moisture. If you’re worried about dryness, baste the chicken with a small amount of olive oil or low-sodium broth. Keep in mind that controlling your ingredients and techniques at home typically removes the guesswork around are rotisserie chickens healthy? Many folks discover they can enjoy a flavorful meal with less sodium and fewer additives when they cook it themselves.

Pairing Rotisserie Chicken with Nutritious Sides

Another tip is to serve rotisserie chicken alongside fiber-rich grains or colorful vegetables. For instance, brown rice, quinoa, or roasted veggies can provide extra vitamins and minerals. Meanwhile, bright salads—topped with a drizzle of olive oil and vinegar—complement the savory flavors of chicken. Indeed, mixing in leafy greens and beans can boost your daily intake of nutrients like folate, vitamin K, and magnesium. The resulting meal feels both nourishing and energizing, which is a win-win.

If you prefer lighter fare, consider soup or stew made with leftover chicken, plus onions, carrots, and celery. Such a dish is not only comforting but also a convenient way to avoid food waste. Furthermore, turning rotisserie chicken into wraps with whole-grain tortillas or lettuce cups supplies enough protein and keeps the meal interesting. These small tweaks mean you don’t have to ask, “Are rotisserie chickens healthy?” with so much uncertainty. By combining sensible cooking methods with well-rounded side dishes, you’ll enjoy a more balanced and flavorful plate.

Frequently Asked Questions (FAQ)

  1. Are Rotisserie Chickens Healthy for Weight Loss?
    Yes, in moderation. Rotisserie chicken offers lean protein that can boost fullness and help stabilize blood sugar. Removing the skin further trims calories, which may support your weight-loss goals.
  2. Who Has the Healthiest Rotisserie Chicken?
    It varies by store. Some grocery chains or membership clubs provide lower-sodium or organic birds, while others rely on extra brines or additives. Checking labels for sodium content and preservatives is key to finding a healthier option.
  3. Why Is Rotisserie Chicken Bad for Your Heart?
    It isn’t inherently bad, but high sodium and saturated fat levels can pose risks. Consistently eating heavily salted chicken or leaving the fatty skin intact might affect heart health over time.
  4. Is Rotisserie Chicken Healthy Without the Skin?
    Absolutely. Removing the skin slashes most of the saturated fats and cuts back on excess seasonings. Hence, peeling off the skin can make your meal much lighter—yet still packed with protein and nutrients. If you’re pondering, are rotisserie chickens healthy?, going skinless is one simple way to tilt the answer toward “yes.”

Preventing Pitfalls and Final Tips

Summarizing Key Points

When pondering, are rotisserie chickens healthy?, it pays to look at the big picture. On one hand, they supply lean protein and important nutrients, such as zinc, selenium, and B vitamins. On the other hand, commercial rotisserie chickens can hide sneaky sodium or preservatives, which might undermine your dietary goals if you’re not careful. Moreover, choosing breast meat over dark meat and removing the skin are both simple ways to reduce saturated fat.

Still, don’t forget about moderation. While rotisserie chicken can be a lifesaver on busy nights, relying on it too often—especially if it’s heavily salted—may boost your sodium levels beyond a healthy range. Therefore, keeping an eye on serving sizes remains important. Pairing your chicken with fiber-rich grains or vegetables also helps balance your meal and promote good digestion. In fact, selecting fresh sides—like bright salads, roasted veggies, or whole-grain pasta—turns your plate into a powerhouse of vitamins, minerals, and quality protein.

Practical Advice for Everyday Use

To sidestep potential pitfalls, vary your protein intake by mixing in fish, beans, or tofu throughout the week. This variety ensures you’re not overdoing it on any single food. Also, read the labels when grabbing a store-bought bird, so you know what’s inside the marinade or brine. If possible, choose a lower-sodium or “natural” option that lists fewer additives. Better yet, try your hand at roasting a chicken at home; that way, you’ll have complete control over the ingredients.

Finally, remember that small tweaks like trimming away skin or skimping on the salt can make a big difference. Balanced eating isn’t about perfection; it’s about finding consistent, healthier habits. By staying aware and making thoughtful choices, you’ll enjoy rotisserie chicken as both a tasty and beneficial part of your diet.

How Long is Leftover Rotisserie Chicken Good in the Fridge? 5 Proven Tips

Leftover rotisserie chicken is a convenient and tasty meal option, but the question is How long is leftover rotisserie chicken good in the fridge? In this article, we’ll explore everything you need to know about storing, reheating, and identifying spoiled chicken. From proper storage tips to expert guidelines, you’ll find practical advice to make the most of your leftovers without risking your health. Let’s dive into the nitty-gritty of keeping your rotisserie chicken fresh and flavorful.

General Guidelines for Storing Leftover Rotisserie Chicken

Proper Storage Techniques

 Rotisserie Chicken Stored in Airtight Container to answer How long is leftover rotisserie chicken good in the fridge
Airtight containers help keep leftover rotisserie chicken fresh and safe to eat.

Storing leftover rotisserie chicken properly is the first and most crucial step in ensuring it stays safe and delicious to eat. Improper storage can lead to bacteria growth, foodborne illnesses, and loss of quality, so attention to detail is essential. To maintain freshness and retain its juicy texture, immediately transfer the chicken to an airtight container or tightly wrap it in aluminum foil or plastic wrap. Airtight storage not only prevents exposure to air, which can dry out the chicken, but also minimizes the chances of absorbing odors from other foods in your fridge. This extra layer of protection is key to keeping the flavors intact.

Timing is equally important. You should aim to refrigerate the chicken within two hours of cooking or purchasing. This time window significantly reduces the risk of bacterial growth, especially from harmful pathogens like Salmonella or Listeria, which thrive in the “danger zone” between 40°F (4°C) and 140°F (60°C). If the room temperature is unusually warm, such as during a summer picnic or BBQ, the safe window narrows to just one hour, making prompt refrigeration even more critical.

For those planning to use their leftover rotisserie chicken later in the week, dividing it into smaller portions before storing can be a game-changer. This ensures quicker cooling and makes reheating more convenient. Remember to place the container in the coldest part of the refrigerator, ideally on a lower shelf or in the back, where the temperature remains consistently cool. If you anticipate not using the chicken within three to four days, freezing it is a smart option. Properly frozen chicken can last up to four months, retaining both its flavor and texture when thawed correctly.

The general rule of thumb is that rotisserie chicken is safe to eat for up to 3-4 days when stored in the refrigerator at or below 40°F (4°C). If you freeze it, the chicken can last for up to 4 months without significant quality loss. Beyond these timeframes, the chicken may start to spoil or lose its flavor.

Factors That Affect Longevity in the Fridge

Several factors influence how long leftover rotisserie chicken remains good in the fridge:

  • Temperature fluctuations: Frequent opening of the fridge can cause temperature changes, accelerating spoilage.
  • Original quality: If the chicken was fresh and well-cooked, it’s likely to last longer.
  • Storage conditions: Airtight containers and proper refrigeration play a critical role in extending shelf life.

By following these storage practices will help you confidently answer the question, “How long is leftover rotisserie chicken good in the fridge?”

Identifying Signs of Spoiled Chicken

Spoiled vs. Fresh Rotisserie Chicken Comparison
Compare fresh rotisserie chicken with spoiled chicken to identify key spoilage signs.

Common Indicators: Smell, Texture, and Color Changes

One of the biggest concerns with leftovers is determining if they’re still safe to eat. When it comes to rotisserie chicken, you’ll want to use your senses as your first line of defense. Spoiled chicken often emits a sour or unpleasant odor, which is one of the clearest signs that it’s no longer good. A fresh rotisserie chicken will have a mild, savory aroma. If the smell seems off rancid, sour, or even sweet in an unnatural way—don’t take any chances. It’s always better to discard questionable chicken than to risk foodborne illness.

Pay attention to the texture as well. Fresh chicken should feel firm and slightly moist, but if it’s slimy, sticky, or tacky to the touch, that’s a clear red flag. The slimy texture often results from bacterial growth, which makes the chicken unsafe to eat. When in doubt, use this simple rule: chicken should never feel slippery or overly greasy after it’s been stored.

Additionally, check for any discoloration. Freshly cooked chicken will have a golden-brown or light beige hue, but spoiled chicken can turn gray, green, or even develop black spots. These color changes signal that the chicken is decomposing due to bacterial or fungal activity. Visible mold—often appearing as fuzzy green, blue, or white patches—is another surefire indicator that the chicken has gone bad. If you see mold or unusual discoloration, it’s time to toss the chicken immediately.

Health Risks Associated with Consuming Spoiled Chicken

Eating spoiled chicken can lead to severe health issues. The bacteria that develop on rotten chicken, such as Salmonella or E. coli, can cause food poisoning, leading to symptoms like nausea, vomiting, diarrhea, and abdominal pain. Don’t let the temptation to avoid waste outweigh the potential health risks—if you’re in doubt, throw it out.

For more tips on how to use rotisserie chicken safely, you might want to explore creative recipes for leftover rotisserie chicken.

Expert Recommendations on Leftover Rotisserie Chicken Safety

Insights from Food Safety Experts

Food safety experts recommend adhering to the “two-hour rule” when storing cooked chicken. After two hours at room temperature, bacteria can grow rapidly, making the chicken unsafe to eat. If you’re planning to keep the leftovers, refrigerate them promptly in an airtight container. This simple step can prevent contamination and extend the freshness of your chicken.

For longer storage, freezing is your best bet. Experts agree that freezing chicken in tightly sealed bags or containers can preserve its quality for up to four months. When it’s time to thaw, use the refrigerator or microwave—never leave it on the counter.

USDA Guidelines for Refrigerated Chicken

The USDA provides clear guidelines for keeping cooked chicken safe in the fridge. According to their recommendations, cooked poultry, including rotisserie chicken, should be consumed within 3-4 days if refrigerated. These guidelines are designed to minimize the risk of foodborne illnesses caused by bacterial growth.

Incorporating these expert-backed practices will help you confidently answer the question, “How long is leftover rotisserie chicken good in the fridge?”

When you’re ready to reheat your chicken for a quick meal, you can also refer to step-by-step reheating tips to retain its flavor and texture.

How to Reheat Rotisserie Chicken Safely

Best Methods for Reheating

Reheating leftover rotisserie chicken might seem simple, but doing it correctly ensures it stays safe and tasty. The microwave is the quickest option, but be sure to cover the chicken with a microwave-safe lid to lock in moisture. Heat in short bursts, checking frequently to prevent drying out the meat.

If you prefer the oven, preheat to 350°F (175°C), wrap the chicken in foil to retain its juices, and heat for 15-20 minutes. This method evenly warms the chicken without overcooking it. For smaller portions, the stovetop works wonders—just toss the chicken in a skillet with a splash of broth or water to maintain its tenderness.

Want to get creative? Use leftover rotisserie chicken in soups or casseroles. Check out this spicy chicken soup recipe for an easy way to repurpose your leftovers.

Tips for Retaining Taste and Texture

To keep your reheated rotisserie chicken as delicious as day one, avoid overheating. Overcooking can lead to dry, rubbery meat. Always test the internal temperature—it should reach 165°F (74°C) to ensure safety without compromising quality.

When reheating a large amount, reheat only what you plan to eat immediately. Repeated reheating can degrade the flavor and texture over time.

FAQs About Leftover Rotisserie Chicken

Can I Eat Rotisserie Chicken After 5 Days?

While some may push the limits, experts strongly advise against consuming refrigerated rotisserie chicken beyond 4 days. After this point, the risk of harmful bacterial growth increases significantly. If you’re unsure, always err on the side of caution.

How Do I Know If Rotisserie Chicken Has Gone Bad?

Spoiled chicken gives off a sour odor, develops a slimy texture, or changes color. If you notice any of these signs, discard the chicken immediately. It’s better to be safe than sorry!

How Long Can a Costco Rotisserie Chicken Last in the Refrigerator?

Costco rotisserie chickens follow the same storage guidelines as others: 3-4 days in the fridge. However, their larger size may require dividing them into smaller portions for more effective cooling and storage.

Can You Refrigerate and Reheat Rotisserie Chicken?

Yes, you can refrigerate and reheat rotisserie chicken safely as long as you follow proper storage practices. Use airtight containers, refrigerate promptly, and always heat it to an internal temperature of 165°F (74°C) to kill any bacteria.

Can Rotisserie Chicken Be Left Out Overnight?

No, rotisserie chicken should not be left out overnight. Food left at room temperature for more than two hours (or one hour in warm conditions) can become unsafe to eat due to bacterial growth. Always refrigerate or freeze leftover chicken promptly.

For more delicious chicken recipes and ideas, explore our collection of chicken-based dishes. You’ll find creative ways to use up those leftovers while keeping things exciting!

Conclusion and Final Tips

Recap: Key Takeaways on Rotisserie Chicken Safety

By now, you should have a clear answer to the question, “How long is leftover rotisserie chicken good in the fridge?” Sticking to the recommended 3-4 day rule ensures that your leftovers stay safe to eat. Proper storage techniques—like using airtight containers and refrigerating promptly are essential for maintaining freshness.

Final Tips for Maximizing Shelf Life

To get the most out of your rotisserie chicken, plan your meals ahead. Divide the chicken into smaller portions and freeze any extras you won’t eat within a few days. When reheating, avoid overcooking to preserve both flavor and texture. And remember, always trust your senses when checking for spoilage.

For more recipes and storage tips, explore our leftover rotisserie chicken recipes. Whether it’s a hearty soup or a creative chicken dish, there are endless ways to enjoy your chicken while staying safe.

Common Myths About Rotisserie Chicken Storage

Myth 1: Rotisserie Chicken Can Be Left at Room Temperature Overnight

One of the most common misconceptions is that cooked chicken is fine to eat after sitting out all night. This is not true. According to food safety experts, leaving rotisserie chicken at room temperature for more than two hours creates the perfect environment for bacteria like Salmonella and Staphylococcus aureus to thrive. Always refrigerate your chicken promptly to ensure it stays safe to eat.

Myth 2: Freezing Chicken Kills All Bacteria

While freezing halts bacterial growth, it doesn’t kill the bacteria already present. If your rotisserie chicken wasn’t stored correctly before freezing, it could still be unsafe to eat once thawed. Freezing works best when the chicken is stored within two hours of cooking and in airtight containers or freezer bags. This preserves its quality and safety.

Myth 3: Smell Is the Only Reliable Sign of Spoilage

While a bad smell is a strong indicator of spoilage, it’s not the only one. Changes in texture and color, like a slimy feel or a greenish tint, can also mean the chicken is no longer safe to eat. So, use all your senses when assessing your leftovers.

To avoid any doubts about how long is leftover rotisserie chicken good in the fridge, follow best practices for storage and reheating.

Creative Uses for Leftover Rotisserie Chicken

Transforming Leftovers Into New Dishes

Got leftover chicken that needs a second life? Rotisserie chicken is incredibly versatile, making it a great base for countless recipes. Chop it up for salads, shred it for tacos, or mix it into pasta dishes. These options not only reduce food waste but also make meal prep quick and easy.

For a cozy dinner, try a classic chicken pot pie or a creamy chicken Alfredo. Leftover chicken also works beautifully in soups, like this spicy chicken soup recipe, which adds warmth to chilly nights.

Storing and Preparing for Future Use

If you’ve got more chicken than you can use in a few days, freezing is the way to go. Divide the meat into meal-sized portions and store them in freezer-safe bags. Label the bags with the date for easy tracking, and use within four months for the best quality.