5 Irresistible Cheesy Garlic Chicken Wraps for Busy Days

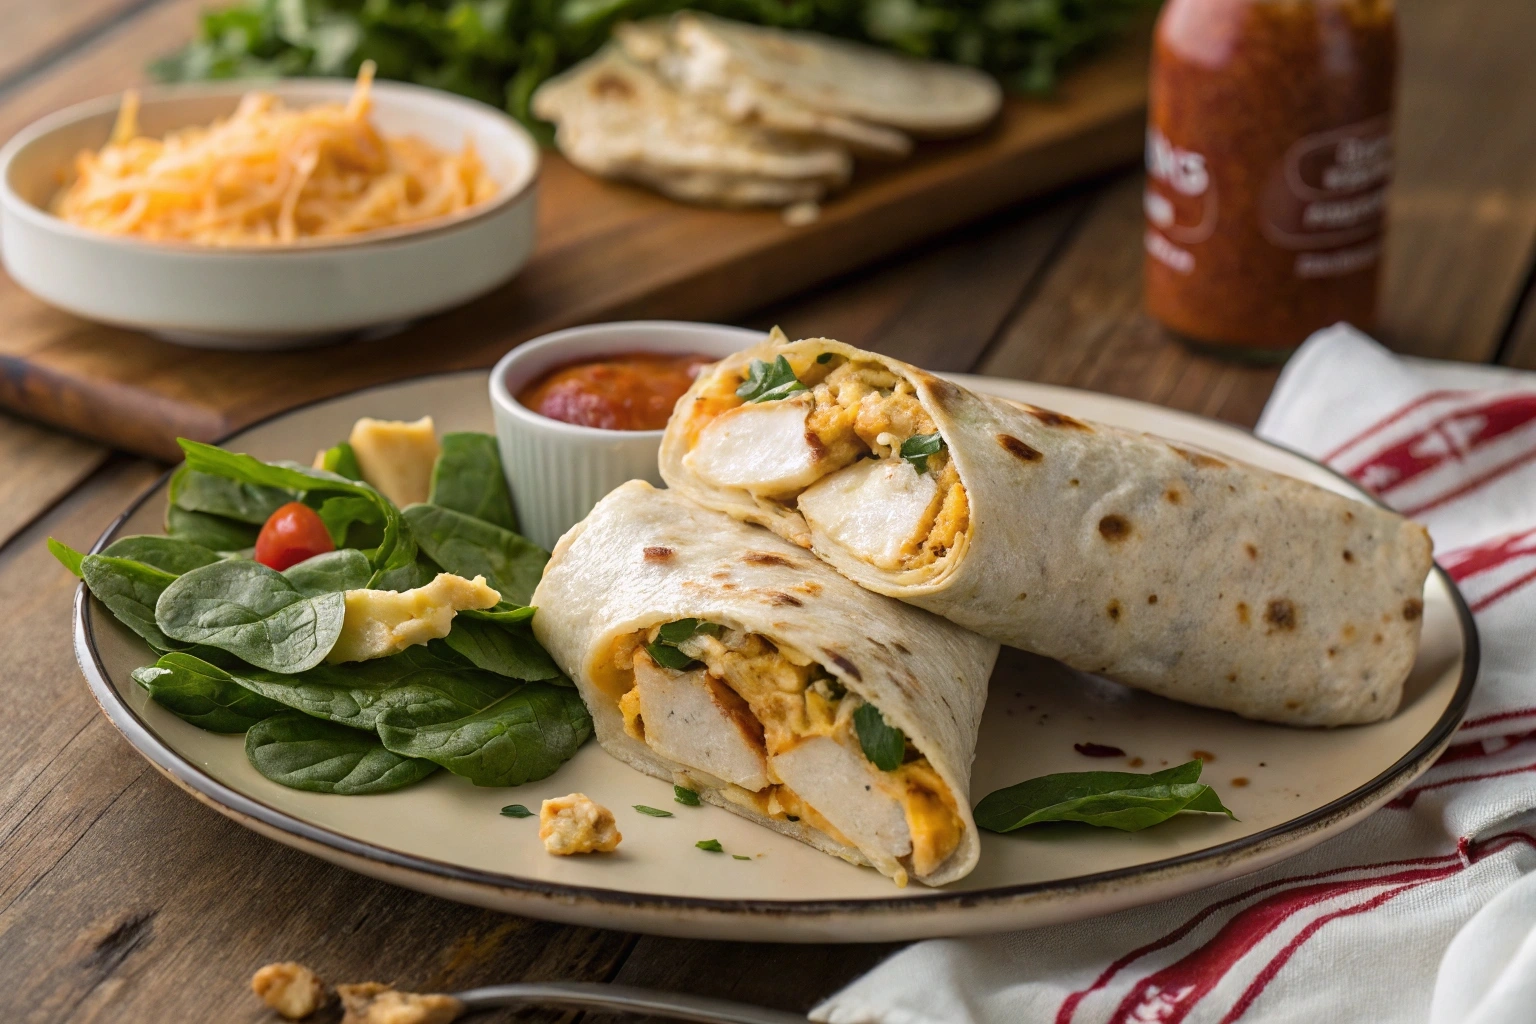
Life’s too short for boring meals, don’t you think? That’s why these cheesy garlic chicken wraps are about to become your new favorite recipe. Picture this: tender, juicy chicken infused with savory garlic, melted cheese oozing from every bite, all wrapped up in a warm tortilla. Whether you need a quick lunch, a family-friendly dinner, or a grab-and-go snack, these wraps have you covered.

The best part? They’re ridiculously easy to make, perfect for those hectic days when you want something fast but flavorful. Add your favorite toppings, pair with a dipping sauce, and you’ve got a meal that feels fancy but takes just minutes to whip up. Ready to give your taste buds a treat? Let’s dive in!

What Are Cheesy Garlic Chicken Wraps?

A Quick Introduction to Cheesy Garlic Chicken Wraps

Cheesy garlic chicken wraps are the perfect solution for anyone craving a quick and satisfying meal. These wraps combine tender, juicy chicken, melted cheese, and bold garlic flavors, all wrapped up in a soft tortilla. Whether you’re looking for a grab-and-go lunch, an easy dinner, or a dish to impress at a casual get-together, these wraps deliver every time.

What makes them so special? They’re versatile, delicious, and customizable. You can keep it simple with just the core ingredients or load them up with veggies, sauces, and extra cheese. No matter how you make them, these wraps are guaranteed to hit the spot!

Why Cheesy Garlic Chicken Wraps Are a Crowd-Pleaser

It’s no surprise that cheesy garlic chicken wraps are loved by everyone. They strike the perfect balance between indulgence and practicality. The rich, creamy cheese pairs perfectly with the savory garlic and tender chicken, making them a hit with kids and adults alike.

But what really sets them apart is their versatility. You can enjoy them hot or cold, as a full meal or a snack. Plus, they’re super easy to adapt for different preferences—add buffalo sauce for spice lovers, or swap in whole-grain tortillas for a healthier twist.

The Essential Ingredients Behind Their Flavor

The magic of cheesy garlic chicken wraps lies in their simple yet flavorful ingredients. Here’s what you’ll need to create them:

 Ingredients for Cheesy Garlic Chicken Wraps on White Surface
All ingredients ready to make cheesy garlic chicken wraps
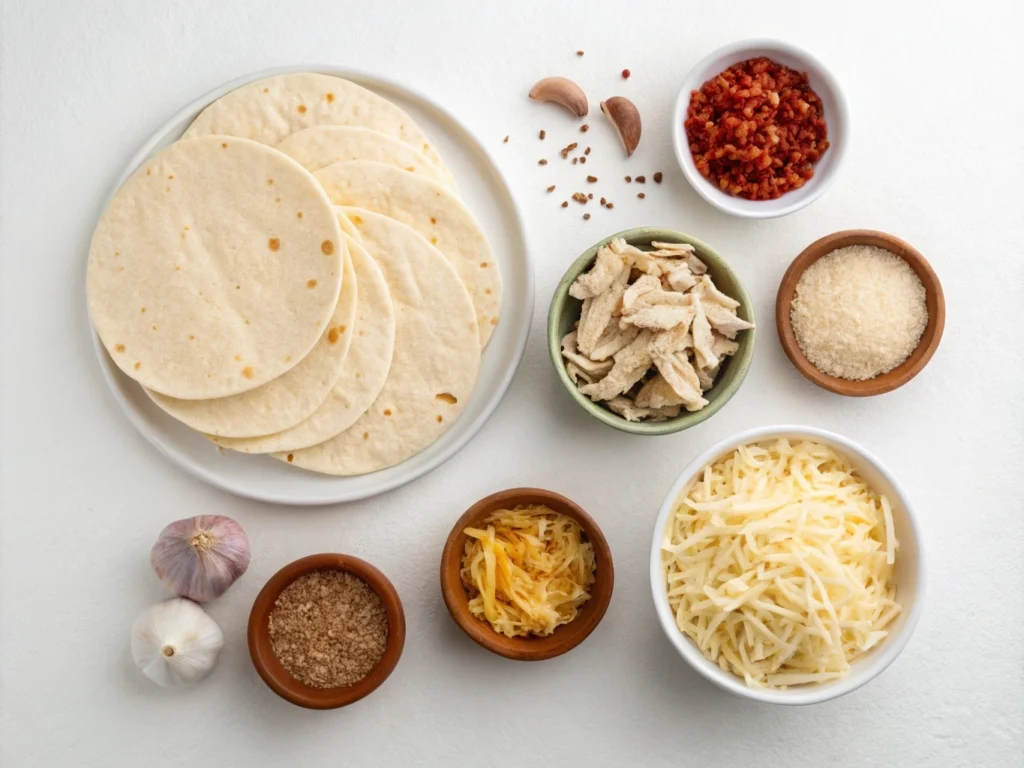
  • Chicken: Grilled, shredded, or even leftover chicken works beautifully.
  • Cheese: Opt for gooey varieties like mozzarella or sharp cheddar for bold flavor.
  • Garlic: Fresh minced garlic or garlic powder enhances the dish’s savory profile.
  • Tortillas: Flour tortillas are soft and pliable, but whole wheat or low-carb options are great too.
  • Optional Add-Ins: Diced tomatoes, spinach, or even a drizzle of ranch dressing for an extra kick.

These ingredients come together to create a wrap that’s both comforting and satisfying.

How Cheesy Garlic Chicken Wraps Save Time in the Kitchen

When you’re short on time, cheesy garlic chicken wraps are a lifesaver. With just a handful of ingredients and minimal prep, you can have a delicious meal on the table in under 30 minutes.

Compared to more complicated dishes, these wraps require only basic cooking skills, making them ideal for busy families or beginner cooks. Plus, they’re a great way to use up leftovers, like rotisserie chicken or extra veggies from the fridge.

For a full guide on quick meals, check out this helpful article on time-saving cooking tips from Food Network.

How to Make Cheesy Garlic Chicken Wraps at Home

Step 1: Gather the Ingredients

The first step to creating the perfect cheesy garlic chicken wraps is gathering your ingredients. Here’s what you’ll need:

  • Chicken: Grilled, shredded, or rotisserie chicken works best.
  • Cheese: Use mozzarella, cheddar, or even a blend for that gooey texture.
  • Garlic: Fresh minced garlic or garlic powder adds bold flavor.
  • Tortillas: Soft flour tortillas are a classic choice, but whole wheat or gluten-free options work too.
  • Seasonings: Salt, pepper, and a pinch of paprika or Italian herbs.
  • Optional Add-Ins: Diced tomatoes, baby spinach, or a drizzle of ranch dressing.

Having everything ready before you start cooking makes the process smooth and stress-free.

Step 2: Prepare the Garlic Chicken Filling

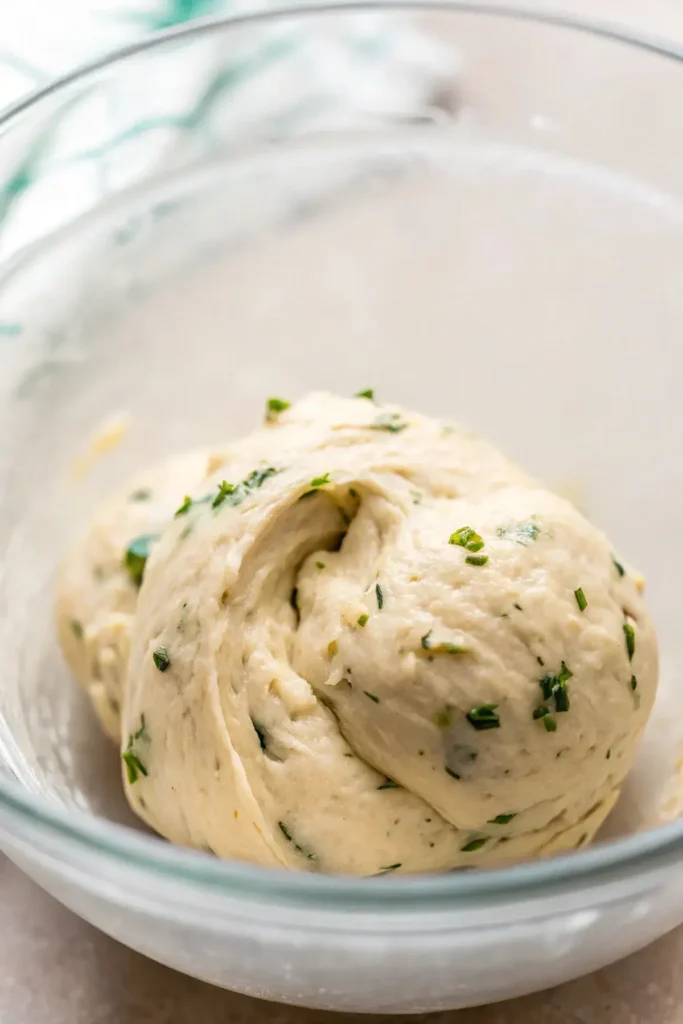
To create a flavorful filling for your cheesy garlic chicken wraps, follow these simple steps:

  1. Heat a skillet over medium heat and add a tablespoon of olive oil.
  2. Sauté minced garlic until fragrant, being careful not to burn it.
  3. Add the chicken and season with salt, pepper, and your chosen spices (paprika or Italian herbs).
  4. Stir in a handful of shredded cheese and mix until the chicken is evenly coated and the cheese is melted.

This step creates a savory, cheesy filling that’s bursting with garlic flavor—perfect for wraps!

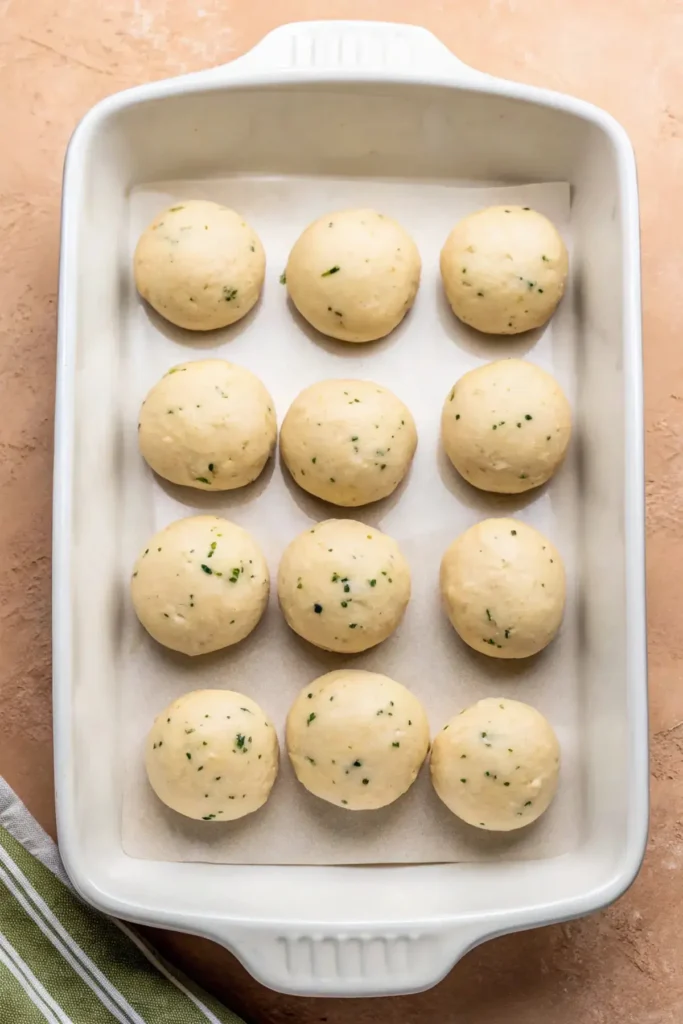
Step 3: Assemble the Wraps

Now it’s time to bring your cheesy garlic chicken wraps to life. Here’s how to assemble them:

  1. Lay a tortilla flat on a clean surface.
  2. Spoon the garlic chicken mixture onto the center of the tortilla.
  3. Add any optional toppings, such as spinach, tomatoes, or a drizzle of ranch dressing.
  4. Fold the sides of the tortilla inward, then roll it tightly from one end to the other.

For extra flair, you can sprinkle a little cheese on the outside of the wrap before toasting.

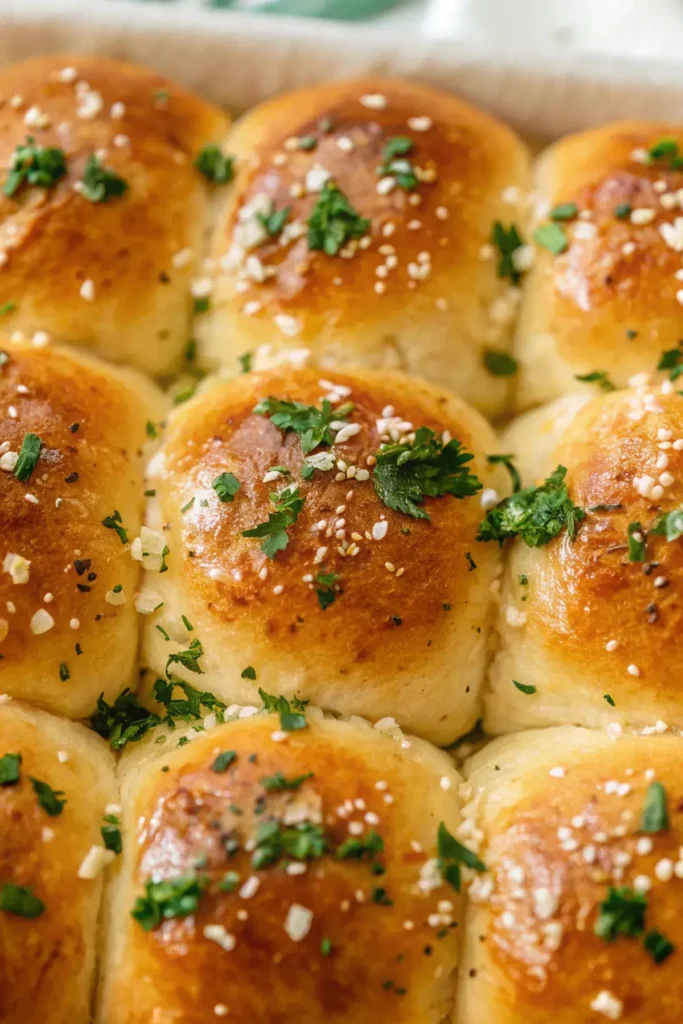
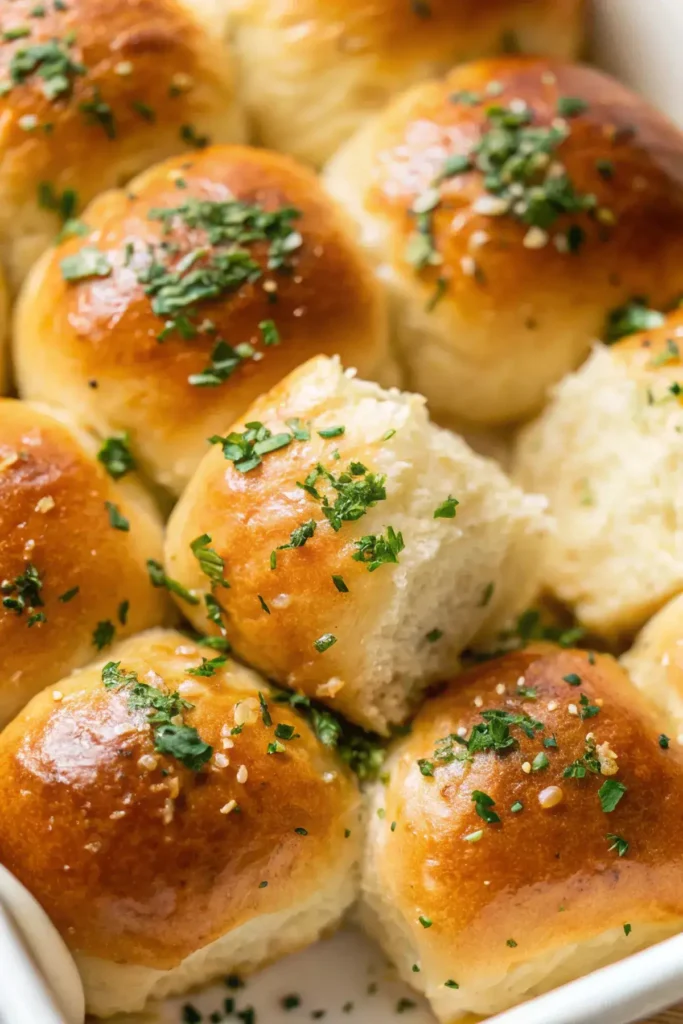
Step 4: Toast and Serve

To take your wraps to the next level, toast them until they’re golden and crispy. You can do this in a skillet, a sandwich press, or even the oven. Here’s how:

  1. Heat a dry skillet over medium heat.
  2. Place the wrap seam-side down and toast for 2–3 minutes per side, or until the tortilla is crispy and the cheese inside is fully melted.
  3. Slice the wrap diagonally for easier handling and a professional look.

Serve your wraps immediately with a side of your favorite dipping sauce, such as garlic aioli, ranch, or sriracha mayo.

Delicious Variations of Cheesy Garlic Chicken Wraps

Four Cheesy Garlic Chicken Wrap Variations on a Platter
platter showcasing four creative ways to enjoy cheesy garlic chicken wraps

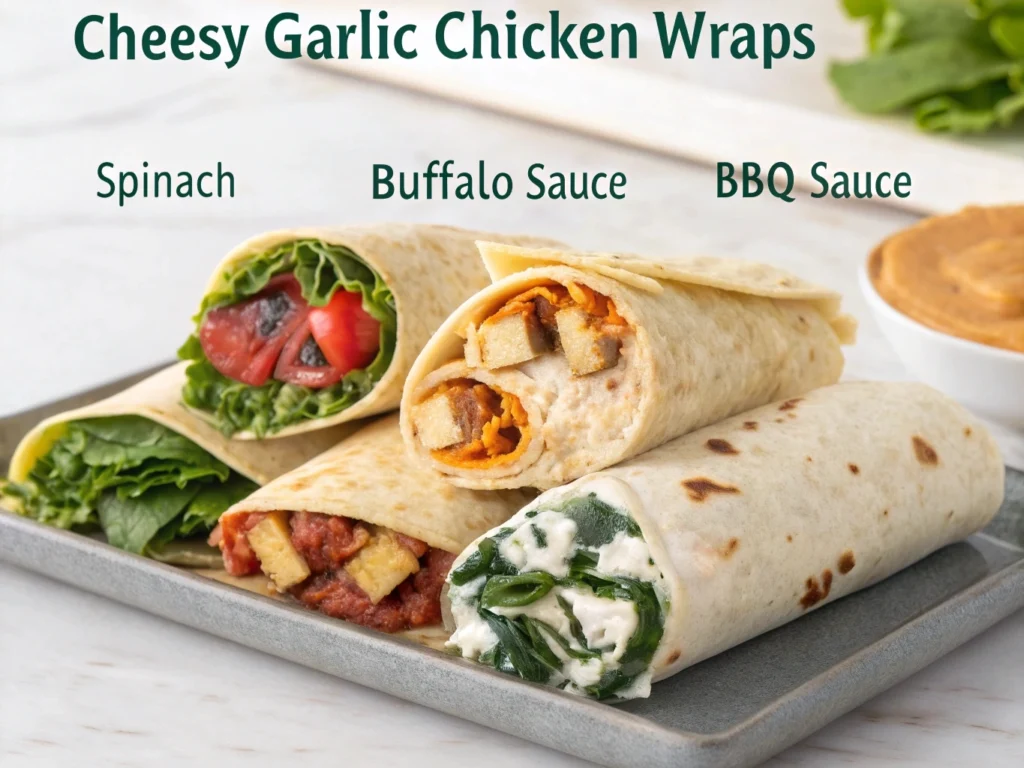
Cheesy Garlic Chicken Wraps with Spinach and Mushrooms

For a healthier twist, add fresh spinach and sautéed mushrooms to your cheesy garlic chicken wraps. The earthy flavor of mushrooms pairs beautifully with the savory garlic and creamy cheese, while spinach adds a pop of color and extra nutrients.

To prepare, sauté mushrooms with garlic in a splash of olive oil until tender. Layer the spinach and mushrooms over the garlic chicken mixture before wrapping. This variation is perfect for those who want a balanced yet indulgent meal.

Buffalo-Style Cheesy Garlic Chicken Wraps

Craving something spicy? Transform your cheesy garlic chicken wraps into a bold buffalo-style version. Toss the cooked chicken in your favorite buffalo sauce before assembling the wraps.

For an extra creamy touch, add ranch or blue cheese dressing inside the tortilla. The combination of tangy buffalo sauce, melted cheese, and garlic creates a flavor explosion that’s hard to resist. This variation is ideal for game nights or casual gatherings.

Cheesy Garlic BBQ Chicken Wraps

If you love sweet and smoky flavors, this variation is a must-try. Mix barbecue sauce into the chicken filling before adding it to the wraps. The smoky sweetness of the BBQ sauce perfectly complements the rich garlic and cheese.

For extra crunch, include a handful of coleslaw or crispy fried onions as a topping. These cheesy garlic chicken wraps are sure to impress at picnics, potlucks, or family dinners.

Vegetarian Cheesy Garlic Wraps with Roasted Veggies

Who says cheesy garlic chicken wraps can’t be vegetarian? Swap the chicken for roasted veggies like bell peppers, zucchini, and eggplant. The roasted veggies bring a smoky flavor and hearty texture that pairs beautifully with garlic and cheese.

Simply roast your veggies with olive oil, garlic, salt, and pepper until tender. Layer them in the tortilla with cheese and any additional toppings you like. This version is perfect for vegetarians or anyone looking to cut back on meat without sacrificing flavor.

Best Pairings and Serving Ideas for Cheesy Garlic Chicken Wraps

Cheesy Garlic Chicken Wraps with Sides on a Dinner Table
A dinner spread featuring cheesy garlic chicken wraps and side dishes

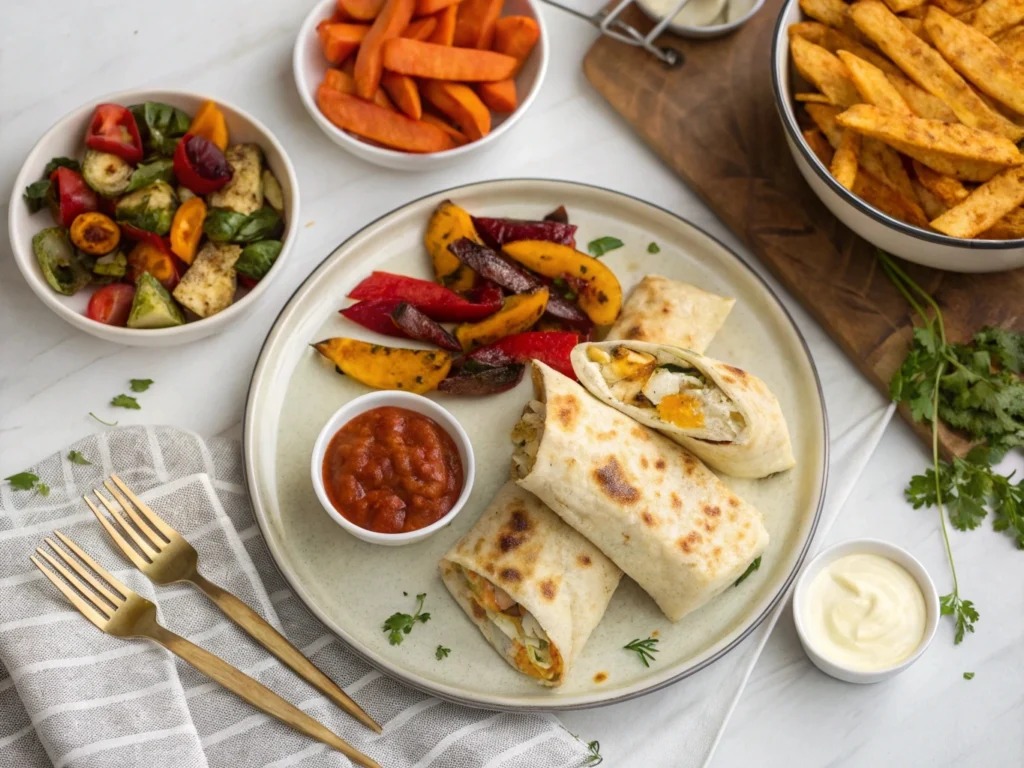
Side Dishes to Complete the Meal

Pairing your cheesy garlic chicken wraps with the right sides can turn a simple meal into a feast. Crispy sweet potato fries or a light Caesar salad are classic choices that balance the rich, garlicky flavors of the wraps.

For a healthier option, try roasted vegetables like broccoli or asparagus. Their natural sweetness and slight crunch perfectly complement the creamy cheese and tender chicken. If you’re feeling indulgent, serve with a side of mac and cheese or creamy mashed potatoes for an extra comforting meal.

Dipping Sauces to Elevate Flavor

Adding a flavorful dipping sauce takes your cheesy garlic chicken wraps to the next level. Garlic aioli or ranch dressing enhances the wraps’ savory profile, while sriracha mayo adds a spicy kick.

For a tangy contrast, consider marinara or a zesty lemon-herb yogurt dip. These sauces not only boost flavor but also make the wraps even more enjoyable for dipping enthusiasts.

Beverage Pairings for Every Occasion

Beverages can make or break a meal, and cheesy garlic chicken wraps are no exception. For a casual lunch, pair your wraps with iced tea or sparkling water infused with fresh citrus.

If you’re serving them for dinner, light white wines like Sauvignon Blanc or crisp beers such as lagers work wonderfully. Prefer non-alcoholic options? Freshly squeezed lemonade or a cucumber-mint cooler offers refreshing flavors that balance the wraps’ richness.

Tips for Storing and Reheating Leftovers

If you have leftover cheesy garlic chicken wraps, don’t worry—they’re easy to store and reheat. Wrap each one tightly in aluminum foil or place them in an airtight container. Store them in the refrigerator for up to three days.

To reheat, use an oven or skillet to maintain their crispy texture. Avoid microwaving, as it can make the tortillas soggy. For added freshness, consider adding a sprinkle of cheese or a few fresh veggies before serving.

FAQs

How do you make chicken wraps not soggy?

To prevent your cheesy garlic chicken wraps from becoming soggy, it’s essential to avoid excess moisture. Pat the chicken dry before cooking and don’t overdo it with wet ingredients like sauces or dressings. Instead, use small amounts of creamy elements like garlic aioli or ranch.

Additionally, layer the ingredients strategically—start with cheese or leafy greens as a base to create a barrier between the tortilla and moist fillings. Toasting the wraps in a skillet or oven also helps maintain a crispy texture, even if they sit for a while.

What goes well with chicken wraps?

Cheesy garlic chicken wraps pair beautifully with a variety of sides and sauces. For a lighter option, serve them with a fresh salad, roasted veggies, or a fruit bowl. If you’re craving something hearty, try pairing the wraps with sweet potato fries, creamy coleslaw, or even a small bowl of soup.

For dipping sauces, garlic aioli, spicy sriracha mayo, or tangy marinara are excellent choices that elevate the flavor profile of the wraps. These combinations create a balanced and satisfying meal.

Are chicken wraps healthy?

Yes, chicken wraps, including cheesy garlic chicken wraps, can be healthy depending on how they’re prepared. By using grilled or baked chicken, whole-grain tortillas, and fresh vegetables, you can create a nutritious and well-rounded meal.

To reduce calories and fat, opt for low-fat cheese and lighter dressings. Additionally, incorporating nutrient-rich add-ins like spinach, avocado, or bell peppers boosts the wrap’s health benefits. The beauty of chicken wraps lies in their flexibility, allowing you to tailor them to your dietary needs without sacrificing flavor.

How to assemble a chicken wrap?

Assembling cheesy garlic chicken wraps is simple and ensures a mess-free meal:

  1. Lay the tortilla flat on a clean surface.
  2. Spread a thin layer of sauce or dressing evenly across the center of the tortilla.
  3. Add a portion of the cheesy garlic chicken filling, followed by your choice of toppings like shredded lettuce, diced tomatoes, or avocado slices.
  4. Fold in the sides of the tortilla, then roll it tightly from one end to the other to secure the filling.

For an extra touch, toast the wrap in a skillet or grill press to seal the edges and add crispiness.

Conclusion

Cheesy garlic chicken wraps are a game-changer when it comes to quick, flavorful meals. Whether you’re looking for a fast lunch, a satisfying dinner, or a crowd-pleasing snack, these wraps have something for everyone. They’re easy to make, endlessly customizable, and pair perfectly with your favorite sides and sauces.

Now it’s your turn to bring this versatile dish to life in your kitchen. Experiment with flavors, customize the ingredients, and create your own spin on these irresistible wraps. Don’t forget to share your success and check out more quick and delicious recipes on our site.

How to Make Perfect Breakfast Sausage Crescent Rolls in 15 Minutes

Who says mornings have to be rushed and uninspired? With these Breakfast Sausage Crescent Rolls, you’ll have a delicious, golden-brown treat that’s as easy to make as it is to enjoy. These little pockets of joy combine flaky crescent roll dough with savory sausage for a combination that’s nothing short of irresistible. Need more? Toss in some gooey cheese or sprinkle in your favorite herbs for a personalized twist. Perfect for feeding a hungry family or impressing friends at brunch, these rolls will quickly become your breakfast MVP. Ready in just 15 minutes, they’re ideal for busy weekdays or lazy weekend mornings. Let’s roll into the recipe and get baking!

What Are Breakfast Sausage Crescent Rolls?

A Quick Overview of Breakfast Sausage Crescent Rolls

Breakfast Sausage Crescent Rolls are a simple yet irresistible combination of flaky crescent roll dough and savory breakfast sausage. These bite-sized treats are easy to prepare, making them a go-to option for busy mornings or relaxed weekends. What makes them so special? It’s the perfect balance of buttery pastry and juicy, seasoned sausage in every bite. You can even add a touch of cheese or herbs to make them your own! Whether you’re feeding a crowd or just indulging in a quick breakfast, these rolls deliver satisfaction without the fuss.

Why These Rolls Are a Breakfast Game-Changer

If you’re tired of the same old cereal or toast routine, Breakfast Sausage Crescent Rolls are here to save the day. Their versatility is unmatched—you can serve them plain for a quick snack or dress them up for a holiday brunch. Unlike more elaborate breakfast dishes, these rolls require just a few basic ingredients and minimal prep time. Ready in just 15 minutes, they’re a lifesaver for mornings when time is short but flavor is non-negotiable. Plus, they’re portable, so you can take them on the go or pack them in a lunchbox.

How Crescent Rolls Pair Perfectly with Breakfast Sausage

There’s something magical about the way buttery crescent rolls complement savory breakfast sausage. The soft, flaky texture of the dough wraps around the sausage, creating a satisfying bite every time. Want to enhance the flavor even more? Add shredded cheddar cheese for a creamy, melty surprise. For an extra twist, sprinkle in some garlic powder or fresh parsley before baking. The result is a dish that feels indulgent yet simple, perfect for anyone who loves combining textures and flavors.

Origins and Popularity of Breakfast Sausage Crescent Rolls

While crescent rolls originated as a French pastry, they’ve become a staple in American kitchens, especially for quick and easy recipes. Combining crescent rolls with breakfast sausage likely started as a way to create a satisfying meal with minimal effort. Over time, this dish has gained popularity as a family favorite, particularly during busy mornings or festive occasions. Today, Breakfast Sausage Crescent Rolls are a beloved breakfast option, appreciated for their taste, convenience, and ability to bring people together at the table.

Ingredients and Tools You’ll Need

Essential Ingredients for Breakfast Sausage Crescent Rolls

To make these Breakfast Sausage Crescent Rolls, you’ll need just a handful of ingredients, most of which you probably already have on hand:

Ingredients for Breakfast Sausage Crescent Rolls on Wooden Surface
Crescent roll dough, sausages, cheese, and herbs ready for preparation
  • Crescent roll dough: A can of store-bought dough (like Pillsbury) is convenient and gives that perfect flaky texture.
  • Breakfast sausage: Pre-cooked sausages work best to save time. Choose pork, chicken, or turkey based on your preference.
  • Optional additions: Shredded cheddar cheese, mozzarella, or even cream cheese for a creamy twist.
  • Seasoning options: Garlic powder, paprika, or fresh herbs like parsley can elevate the flavor.

Having these simple staples means you can whip up a batch of rolls whenever the craving strikes!

Handy Tools for Easy Preparation

Creating Breakfast Sausage Crescent Rolls doesn’t require fancy gadgets—just a few basic tools will do:

  1. Baking sheet: A standard sheet pan lined with parchment paper ensures even baking and easy cleanup.
  2. Silicone baking mat: A reusable option that keeps the rolls from sticking.
  3. Basting brush: Perfect for applying melted butter or egg wash for a golden finish.
  4. Sharp knife or pizza cutter: If you want to trim the dough for custom-sized rolls.

These tools make the process smooth and enjoyable, even if you’re not a seasoned cook.

Ingredient Substitutions and Variations

Don’t have all the ingredients on hand? No problem! Here are some easy swaps:

  • Crescent roll dough alternative: Puff pastry or homemade biscuit dough can work in a pinch.
  • Sausage substitutes: Try vegetarian or vegan sausage for a plant-based option.
  • Cheese options: Experiment with Swiss, pepper jack, or even a sprinkle of Parmesan for added flavor.
  • Healthier twists: Use whole-grain crescent rolls or low-fat cheese to make this dish lighter.

Experimenting with variations is a fun way to make these Breakfast Sausage Crescent Rolls uniquely yours!

Where to Buy High-Quality Ingredients

For the best results, choose high-quality ingredients. Look for:

  • Crescent roll dough: Found in the refrigerated section of most grocery stores. Brands like Pillsbury are reliable.
  • Breakfast sausage: Local butcher shops often have fresh, flavorful options. Alternatively, major retailers like ‘Whole Foods’ offer organic and grass-fed choices.
  • Cheese: Opt for freshly shredded cheese rather than pre-packaged varieties for better melting.

Shopping smartly ensures your Breakfast Sausage Crescent Rolls turn out as delicious as possible!

Step-by-Step Instructions for Perfect Breakfast Sausage Crescent Rolls

Rolling Sausage into Crescent Dough for Breakfast Rolls
Step-by-step preparation of Breakfast Sausage Crescent Rolls

Preparing Your Ingredients and Workspace

Before you dive into making these Breakfast Sausage Crescent Rolls, take a moment to prep everything. Start by preheating your oven to 375°F (190°C). Line a baking sheet with parchment paper or use a silicone mat to prevent sticking. Make sure your crescent roll dough is chilled—this makes it easier to handle. If your sausages aren’t pre-cooked, brown them in a skillet over medium heat until fully cooked, then set them aside to cool slightly.

Having everything ready ensures the assembly process is smooth and stress-free.

Rolling and Stuffing the Crescent Rolls

Now comes the fun part—assembling your Breakfast Sausage Crescent Rolls! Follow these simple steps:

  1. Open the can of crescent roll dough and carefully unroll it onto a clean surface.
  2. Separate the dough along the perforations to create individual triangles.
  3. Place a sausage at the wide end of each triangle. For extra flavor, sprinkle shredded cheese or a pinch of garlic powder over the sausage.
  4. Roll the dough tightly around the sausage, starting at the wide end and working toward the pointed tip.

Don’t worry if they’re not perfect once they bake, the flaky layers will hide any imperfections.

Baking Your Breakfast Sausage Crescent Rolls

Once your rolls are assembled, place them seam-side down on the prepared baking sheet. If you’d like a golden, glossy finish, brush the tops with a little melted butter or an egg wash. Bake for 10–12 minutes, or until the rolls are puffed and golden brown.

Keep an eye on them as they bake every oven is slightly different, and you don’t want to risk overbaking. The aroma of buttery pastry and sizzling sausage will let you know they’re almost ready!

Tips for Perfect Results Every Time

To make sure your Breakfast Sausage Crescent Rolls turn out just right, here are a few helpful tips:

  • Keep the dough cold: Warm dough can become sticky and hard to work with. If it softens too much, pop it back in the fridge for a few minutes.
  • Use pre-cooked sausages: This saves time and ensures the sausage is fully cooked by the time the dough is done.
  • Customize to your taste: Add a sprinkle of herbs, cheese, or even diced veggies to elevate the flavor.
  • Let them cool slightly: Freshly baked rolls will be very hot inside, so let them sit for a minute or two before serving.

For more delicious breakfast recipes, check out our article on Perfect Denver Omelette with Cheese & Potatoes

Delicious Variations of Breakfast Sausage Crescent Rolls

Cheesy Breakfast Sausage Crescent Rolls

For those who love a cheesy surprise, this variation takes your Breakfast Sausage Crescent Rolls to the next level. Before rolling the sausage in the dough, add a generous sprinkle of shredded cheddar or mozzarella cheese. As the rolls bake, the cheese melts into gooey perfection, creating an irresistible flavor combination. For an extra kick, try pepper jack cheese—it adds a hint of spice without overwhelming the dish.

Cheesy rolls pair perfectly with ketchup, honey mustard, or a dollop of sour cream for dipping.

Sweet and Savory Breakfast Sausage Crescent Rolls

If you’re a fan of sweet and savory flavors, this variation is a must-try. Drizzle a little honey or maple syrup over the sausage before rolling it in the dough. The sweetness caramelizes as the rolls bake, creating a delightful contrast to the savory sausage.

For a fun twist, sprinkle cinnamon or nutmeg on the dough before adding the sausage. These rolls are especially popular during the holiday season, offering a unique flavor that feels both indulgent and festive.

Veggie-Stuffed Breakfast Sausage Crescent Rolls

Looking for a way to add some extra nutrients to your breakfast? Veggie-stuffed Breakfast Sausage Crescent Rolls are a fantastic option. Dice up sautéed spinach, bell peppers, or mushrooms, and layer them on the dough before rolling.

Not only do the veggies add vibrant color, but they also enhance the flavor and texture of the rolls. If you want to get creative, consider adding a sprinkle of feta or goat cheese along with the veggies for a Mediterranean-inspired twist.

Mini Breakfast Sausage Crescent Rolls for Snacks

Sometimes, smaller bites are more fun—and practical! To make mini Breakfast Sausage Crescent Rolls, cut the crescent roll dough into smaller triangles and use cocktail sausages instead of full-sized ones.

These bite-sized versions are perfect for serving at parties, as appetizers, or for packing in lunchboxes. Plus, they bake even faster—usually in about 8–10 minutes. Serve them with a side of marinara or barbecue sauce for dipping, and watch them disappear in minutes!

Pairing Ideas for Breakfast Sausage Crescent Rolls

Breakfast Sausage Crescent Rolls Served with Eggs and Fruit
A complete breakfast with sausage crescent rolls, eggs, and fresh fruit

Serve with Fresh Fruit or Smoothies

For a balanced breakfast, pair your Breakfast Sausage Crescent Rolls with a side of fresh fruit. The natural sweetness of strawberries, blueberries, or orange slices complements the savory rolls beautifully. Alternatively, whip up a quick smoothie using ingredients like bananas, spinach, and almond milk for a refreshing, nutrient-packed drink.

This combination not only enhances the flavor profile of your meal but also adds a healthy boost to start your day right.

Dipping Sauces for Extra Flavor

Take your Breakfast Sausage Crescent Rolls to the next level by serving them with dipping sauces. Honey mustard and ranch are classic choices, offering tangy and creamy flavors. For a more adventurous twist, try a drizzle of sriracha mayo or a savory marinara sauce.

Dipping sauces are especially fun if you’re serving these rolls at a party or brunch, as they let everyone customize their bite.

Pair with Scrambled Eggs and Bacon

If you’re hosting a hearty breakfast or brunch, serve these Breakfast Sausage Crescent Rolls alongside scrambled eggs and crispy bacon. The combination of flaky pastry, creamy eggs, and crunchy bacon creates a complete and satisfying meal.

For a healthier option, swap the bacon for turkey strips or a side of sautéed vegetables like spinach or zucchini.

Coffee, Tea, or Juice Pairings

Beverages play an important role in enhancing any meal, and Breakfast Sausage Crescent Rolls are no exception. For a cozy vibe, serve them with a hot cup of coffee or spiced chai tea. If you prefer a lighter drink, fresh orange or apple juice is a great choice.

This pairing ensures that your breakfast feels cohesive and flavorful, no matter the occasion.

FAQs

What is the difference between a crescent roll and a croissant?

Though they may look similar, crescent rolls and croissants are quite different. Crescent rolls are made with a simpler dough, typically pre-made and found in cans for easy use. They have a soft, flaky texture but lack the intricate layers of a croissant.

On the other hand, croissants are made with a laminated dough, which involves folding and layering butter into the dough multiple times. This process gives croissants their signature airy, flaky, and buttery texture. For recipes like Breakfast Sausage Crescent Rolls, crescent dough is ideal because it’s quick, convenient, and versatile.

Is there a difference between breakfast sausage and regular sausage?

Yes, there’s a difference! Breakfast sausage is usually made with pork and seasoned with spices like sage, black pepper, and a touch of sweetness (like maple syrup). These flavors are mild and complement breakfast dishes perfectly.

Regular sausage, however, can vary widely in seasoning and meat type (pork, chicken, beef, or even plant-based options). It’s often spicier or bolder, depending on its intended use. For Breakfast Sausage Crescent Rolls, breakfast sausage is the preferred choice because its subtle flavors pair well with the buttery dough.

Can you have a sausage roll for breakfast?

Absolutely! Sausage rolls are a versatile meal option and are perfect for breakfast. Whether you enjoy a classic sausage roll or opt for a variation like Breakfast Sausage Crescent Rolls, they’re filling, flavorful, and easy to prepare.

Pair them with fresh fruit, scrambled eggs, or even a smoothie for a complete breakfast. Their portability also makes them an excellent choice for busy mornings or on-the-go snacks.

What do you eat sausage rolls with?

Breakfast Sausage Crescent Rolls are incredibly versatile and pair well with a variety of sides and dips. For breakfast, you can serve them with scrambled eggs, crispy bacon, or sautéed vegetables. If you’re enjoying them as a snack or appetizer, try dipping them in honey mustard, marinara, or ranch dressing.

To add a healthy twist, consider serving them with a side salad or fresh fruit. No matter what you choose, these rolls adapt easily to different meals and occasions.

Conclusion

Breakfast Sausage Crescent Rolls are the ultimate combination of convenience and flavor. With their buttery, flaky texture and savory sausage filling, they’re a hit for any occasion—whether you’re hosting brunch, prepping for a busy weekday morning, or simply craving a comforting snack.

From the simplicity of their ingredients to the endless variations you can try, these rolls are as versatile as they are delicious. You’ve learned how to make them step by step, explored unique twists like cheesy or veggie-stuffed versions, and discovered how to pair them with the perfect sides and dips.

The Perfect Garlic Bread Rolls Recipe: 10 Easy Hacks

Who can resist the aroma of freshly baked bread wafting through the kitchen? These garlic bread rolls are the ultimate comfort food, blending the soft, fluffy texture of classic dinner rolls with the bold, buttery flavor of garlic. Whether you’re hosting a dinner party, craving a cozy snack, or looking to wow your family, this recipe has you covered.

What makes this garlic bread rolls recipe special? It’s not just easy to follow it’s packed with tips to make your rolls bakery-quality every time. From a perfectly golden crust to a melt-in-your-mouth center, these rolls promise to be the star of your table. So grab your apron, roll up your sleeves, and let’s dive into a recipe that’s as delightful to make as it is to eat.

Ingredients for Perfect garlic bread rolls recipe

Essential Ingredients

To achieve the best garlic bread rolls, you need a few essential ingredients that work together to create their soft, buttery texture and irresistible flavor. Here’s what you’ll need:

Ingredients for garlic bread rolls recipe neatly arranged on a marble countertop.
Essential ingredients for making soft and flavorful garlic bread rolls.
  • Flour: Use bread flour for a fluffier texture. It contains more protein than all-purpose flour, which helps create a chewy, light roll.
  • Yeast: Instant yeast is a time-saver, as it doesn’t require pre-activation. However, if you only have active dry yeast, simply dissolve it in warm water with a pinch of sugar before adding it to the dough.
  • Garlic Butter: A mixture of melted butter and fresh garlic is the key to these rolls’ bold, savory taste. For added depth, you can roast the garlic beforehand.
  • Milk and Eggs: These ingredients make the dough tender and soft, adding richness to each bite.

These ingredients are pantry staples, making this garlic bread rolls recipe both convenient and practical.

Ingredient Substitutions and Variations

One of the best things about this garlic bread rolls recipe is its adaptability. Whether you’re dealing with dietary restrictions or just want to experiment, here are some easy substitutions:

  • Flour Alternatives: For a gluten-free option, use a high-quality gluten-free baking flour blend. Just ensure it’s one that includes xanthan gum for structure.
  • Vegan Option: Replace milk with almond or oat milk and use vegan butter to make these rolls dairy-free.
  • Cheesy Twist: Mix shredded mozzarella or Parmesan cheese into the dough for a cheesy garlic roll variation.

These substitutions won’t compromise the flavor, so feel free to customize your rolls to suit your needs.

Pro Tips for Ingredient Selection

The quality of your ingredients can make or break your garlic bread rolls recipe. Here are some tips to help you pick the best ones:

  • Choose Fresh Garlic: Fresh garlic cloves provide a bolder, more vibrant flavor compared to pre-minced options. Look for firm, unblemished bulbs.
  • High-Quality Butter: Opt for unsalted butter to control the saltiness of the rolls, and make sure it’s rich and creamy. European-style butter is an excellent choice for its higher fat content.
  • Check Your Yeast: Before using, confirm your yeast is still active by testing it in warm water with a bit of sugar. If it doesn’t foam after 5 minutes, it’s time to replace it.

For more tips on selecting the best ingredients, check out this helpful guide on baking essentials.

Tips for Preparing Garlic Butter

The garlic butter is the star of this garlic bread rolls recipe, so preparing it correctly is crucial. Here’s how to get it right every time:

  1. Melt Butter Slowly: Use low heat to melt your butter, as overheating can separate the fat and water.
  2. Infuse with Garlic: Add finely minced or grated garlic to the melted butter and let it simmer for 2–3 minutes. This step ensures the garlic’s aroma and flavor infuse deeply.
  3. Optional Add-Ins: For an elevated twist, mix in chopped fresh parsley, a pinch of paprika, or a sprinkle of Parmesan cheese.

Step-by-Step Instructions for Garlic Bread Rolls

kneading dough for garlic bread rolls on a floured surface.
the dough is a crucial step for making soft, fluffy garlic bread rolls.

Preparing the Dough

Creating the dough is the foundation of any great garlic bread rolls recipe. Start by gathering your ingredients and following these steps:

  1. Activate the Yeast: In a large bowl, mix warm milk, sugar, and yeast. Allow it to rest for about 5 minutes until it becomes frothy. This ensures the yeast is active and ready to help your dough rise.
  2. Combine Ingredients: Add eggs, melted butter, and a pinch of salt to the yeast mixture. Gradually incorporate bread flour, stirring as you go, until the dough starts to form.
  3. Knead the Dough: Use your hands or a stand mixer to knead the dough for 8–10 minutes until it’s smooth and elastic. If the dough feels too sticky, add a bit more flour, but avoid overloading it.

This careful preparation sets the stage for soft, fluffy rolls bursting with garlicky goodness.

First Rise: Let the Dough Rest

After kneading, it’s time to let the dough rise. Place it in a lightly oiled bowl and cover with a damp kitchen towel. Let it sit in a warm spot for 1–2 hours or until it doubles in size.

Pro Tip: If your kitchen is cold, preheat your oven to 200°F (93°C) for a few minutes, turn it off, and place the bowl inside. The gentle warmth helps the dough rise faster.

Allowing the dough to rest properly ensures your garlic bread rolls recipe will have that soft, airy texture everyone loves.

Shaping and Adding Garlic Butter

Once the dough has risen, it’s time to shape it into rolls and infuse them with garlic butter magic:

  1. Divide the Dough: Punch down the dough to release air bubbles and divide it into 12–16 equal pieces. Roll each piece into a ball.
  2. Prepare Garlic Butter: Melt butter and mix in finely minced garlic, parsley, and a pinch of salt. Brush this mixture generously over each dough ball.
  3. Arrange in a Baking Dish: Place the rolls in a greased baking pan, leaving a bit of space between each one to allow room for expansion.

Adding the garlic butter before baking infuses every layer with rich, garlicky flavor that enhances the final result.

Baking the Rolls to Perfection

  1. Second Rise: Cover the rolls with a kitchen towel and let them rise again for 30–40 minutes until puffy.
  2. Preheat the Oven: While the rolls are rising, preheat your oven to 375°F (190°C).
  3. Bake Until Golden: Bake the rolls for 20–25 minutes or until they’re golden brown and your kitchen smells heavenly.

For an extra touch of indulgence, brush the hot rolls with another layer of garlic butter straight out of the oven. Serve warm and enjoy their soft, buttery perfection.

Pair these rolls with a hearty dish like this Garlic Parmesan Chicken and Potatoes for a comforting and complete meal.

4 Easy Hacks for Perfect garlic bread rolls recipe

Comparison of perfectly risen dough and overproofed dough for garlic bread rolls.
Understanding the difference between properly risen dough and overproofed dough helps avoid common bread-making mistakes.

Hack 1: Use a Stand Mixer for Effortless Kneading

Kneading dough can be a tiring process, especially if you’re making multiple batches. To simplify your garlic bread rolls recipe, use a stand mixer with a dough hook attachment. Not only does it save time, but it also ensures consistent mixing and kneading, which is crucial for creating soft, fluffy rolls.

Pro Tip: Mix on medium speed for 8–10 minutes. The dough should pull away from the sides of the bowl but remain slightly sticky.

Hack 2: Always Proof Your Yeast

One common mistake when making bread is using yeast that’s no longer active. To avoid this, always proof your yeast, even if you’re using instant yeast. Proofing involves dissolving the yeast in warm water with a pinch of sugar and waiting for it to foam.

Why It Matters: If your yeast doesn’t foam, it’s likely inactive and won’t allow your dough to rise properly. Skipping this step can result in dense rolls, which is the last thing you want for your garlic bread rolls recipe.

Hack 3: Garlic Butter Infusion

The secret to irresistibly flavorful rolls lies in the garlic butter. Instead of simply brushing melted butter on top, try warming the butter with crushed garlic cloves for 2–3 minutes. This infusion process extracts every bit of garlicky goodness, which enhances the overall taste.

Bonus Tip: Add a sprinkle of fresh parsley or rosemary to the butter for a hint of herbal freshness.

Hack 4: Use a Pizza Stone for Even Baking

Ever wondered how bakeries achieve perfectly golden rolls with a crisp base? A pizza stone could be the answer! Placing your baking tray on a preheated pizza stone ensures even heat distribution, which helps the rolls bake uniformly.

Pro Tip: Preheat the pizza stone along with your oven to 375°F (190°C). Place the rolls directly on the baking tray over the stone for the best results.

Looking for more garlic-flavored dishes? Check out our recipe for Chicken Scampi with Garlic Parmesan Rice. Pair it with these rolls for a meal bursting with garlic goodness!

Common Mistakes to Avoid When Making Garlic Bread Rolls

flavorful garlic bread rolls.
Soft, buttery garlic bread rolls ready to impress at any meal.

Overproofing the Dough

Proofing is essential for light, fluffy rolls, but overproofing can ruin even the best garlic bread rolls recipe. When dough is left to rise too long, it can collapse and lose its structure. This leads to dense, unevenly baked rolls.

How to Avoid It: Keep an eye on your dough during the proofing stages. Typically, the dough should double in size but not triple. If it’s ready, pressing a finger gently into the dough will leave a slight indentation that springs back slowly.

Using Too Much Flour

Adding too much flour is a common mistake that results in dry, heavy rolls. It’s tempting to add extra flour when the dough feels sticky, but this can compromise the soft texture we all love in a great garlic bread rolls recipe.

Pro Tip: Instead of adding more flour, lightly flour your hands or work surface when shaping the dough. The dough should feel tacky but not stick excessively.

Skipping Garlic Butter Layers

A proper garlic bread rolls recipe relies on the rich flavor of garlic butter. Skipping layers of butter can result in bland rolls that don’t live up to their potential. Brushing the rolls with butter before and after baking not only enhances flavor but also gives them a golden, glossy finish.

Bonus Tip: For an extra burst of flavor, sprinkle Parmesan cheese or crushed garlic on top before baking.

Baking at the Wrong Temperature

Baking rolls at an incorrect temperature can cause undercooked centers or burnt tops. Following the recommended oven settings ensures even baking and the perfect balance of soft insides and golden crusts.

Solution: Preheat your oven to 375°F (190°C) and bake for 20–25 minutes. To prevent over-browning, you can loosely cover the rolls with foil during the last few minutes of baking.

Serving Suggestions for garlic bread rolls recipe

garlic bread rolls glistening with melted butter
Perfect Garlic Bread Rolls – Golden and Buttery

Pairing Ideas

These warm, buttery rolls are a versatile addition to any meal. Whether you’re hosting a dinner party or preparing a casual family dinner, this garlic bread rolls recipe shines as the perfect side dish.

  • Soups and Stews: Pair the rolls with hearty options like creamy tomato soup, chicken noodle soup, or beef stew. The soft texture of the rolls is ideal for soaking up rich broths.
  • Italian Dishes: Serve them alongside classics such as spaghetti Bolognese, lasagna, or chicken Alfredo. Their garlicky flavor complements the bold sauces beautifully.
  • Appetizer Platters: Slice the rolls and serve them with dips like spinach artichoke dip or marinara sauce for a crowd-pleasing snack.

By pairing thoughtfully, you’ll enhance the flavors of both the rolls and the main dishes.

Storage and Reheating Tips

Proper storage is key to maintaining the soft, fluffy texture of your rolls. Follow these simple tips to keep them fresh:

  • Short-Term Storage: Store leftover rolls in an airtight container at room temperature for up to 2 days.
  • Freezing: Wrap the rolls individually in plastic wrap and place them in a freezer-safe bag. They can be frozen for up to 2 months.

When reheating, avoid microwaving, as it can make the rolls rubbery. Instead:

  • Warm them in an oven preheated to 350°F (175°C) for 5–10 minutes.
  • Brush with a little extra garlic butter to restore their freshly baked flavor.

Variations to Try

If you’re feeling adventurous, this garlic bread rolls recipe can be adapted in numerous ways to suit your taste preferences:

  • Cheesy Garlic Rolls: Add shredded mozzarella or Parmesan cheese on top before baking.
  • Herbed Rolls: Mix dried herbs like rosemary, thyme, or oregano into the dough for added flavor.
  • Spicy Rolls: Sprinkle red chili flakes on the rolls for a hint of heat.

Experimenting with these variations keeps the recipe fresh and exciting every time you make it.

Hosting Tips for garlic bread rolls recipe

If you’re serving these rolls for a special gathering, a few small touches can elevate the presentation:

  • Serve Warm: Keep the rolls in a bread basket lined with a clean towel to retain their warmth.
  • Add a Side of Butter: Offer a ramekin of garlic butter or herbed butter for guests to spread on their rolls.
  • Create a Themed Table: Pair the rolls with matching dishes and table settings for a cohesive dining experience.

These hosting tips ensure your garlic bread rolls recipe is not only delicious but also memorable for your guests.

Looking to complement your rolls with more flavorful dishes? Try our Buffalo Chicken Sliders with Cream Cheese for an irresistible pairing that’s sure to impress.

FAQs about Garlic Bread Rolls recipe

Is garlic salt or garlic powder better for garlic bread?

Garlic powder is generally better for making garlic bread because it blends more smoothly into butter and spreads evenly across the rolls. Garlic salt, while flavorful, can make the bread overly salty if not carefully measured. If you’re following this garlic bread rolls recipe, opt for garlic powder to ensure a balanced and consistent flavor.

How do you make Bobby Flay garlic bread?

Bobby Flay’s garlic bread is famous for its rich flavor and crispy texture. His version involves combining roasted garlic, unsalted butter, parsley, Parmesan cheese, and olive oil. He spreads this mixture onto slices of crusty bread and broils them until golden. You can adapt his approach to your garlic bread rolls recipe by using the same mixture and brushing it generously over the rolls before and after baking.

Why are my homemade dinner rolls hard?

Hard dinner rolls can result from using too much flour, over-kneading, or under-proofing the dough. For this garlic bread rolls recipe, ensure the dough remains slightly sticky during preparation, and knead it just until smooth and elastic. Allowing the dough to rise adequately—without overproofing—helps create soft, fluffy rolls. Additionally, bake at the correct temperature to avoid drying them out.

What is the best combination for garlic bread?

The best pairing for garlic bread is a hearty main course or a complementary dip. For example, serve these garlic bread rolls alongside creamy tomato soup, spaghetti Bolognese, or roasted chicken. You can also pair them with marinara sauce or garlic aioli as a dipping option. This versatility makes garlic bread a hit for nearly any occasion.

Conclusion

Congratulations you’re now equipped with everything you need to master the perfect garlic bread rolls recipe! From selecting high-quality ingredients and preparing a flawless dough to infusing your rolls with garlicky butter and baking them to golden perfection, this recipe covers all the essentials.

Now it’s time to put your new skills to the test. Grab your apron, roll up your sleeves, and create a batch of garlic bread rolls that will leave everyone asking for seconds. Don’t forget to explore more delicious recipes on the blog for even more mealtime inspiration!