How to Make Perfect Buffalo Chicken Sliders with Cream Cheese in 5 Steps

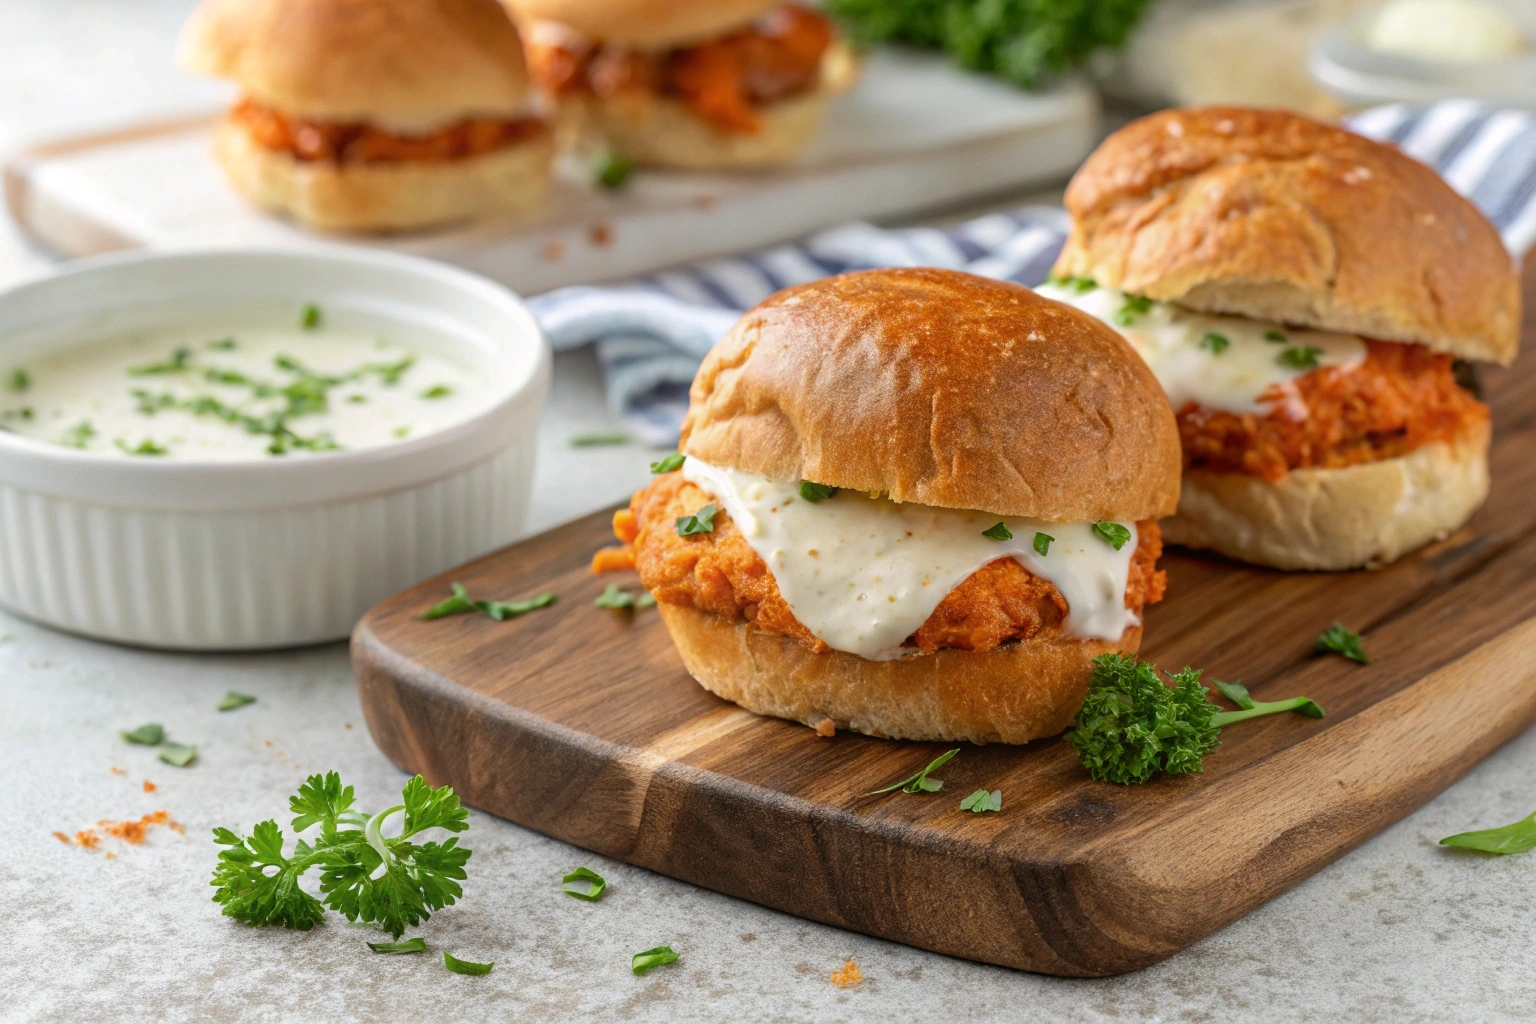
Imagine biting into a warm, fluffy slider bursting with creamy, tangy, and spicy goodness sounds irresistible, doesn’t it? These Buffalo Chicken Sliders with Cream Cheese take your favorite game-day snack to a whole new level. With the bold heat of buffalo sauce balanced by velvety cream cheese and melty cheddar, each bite is a flavor explosion. Whether you’re hosting a party or just treating yourself, this recipe promises to wow your taste buds in just five easy steps. Ready to discover the secret behind these drool-worthy sliders? Let’s dive in!

Why You’ll Love These Buffalo Chicken Sliders

 Buffalo chicken sliders with cream cheese served on a plate with celery sticks.
Perfectly baked buffalo chicken sliders served with fresh celery sticks.

Perfect for Parties, Game Days, or Quick Dinners

There’s nothing quite like buffalo chicken sliders with cream cheese to steal the show at any gathering. These bite-sized beauties are a game-day favorite, whether you’re hosting a Super Bowl party or just a casual weekend get-together with friends. Thanks to their manageable size and bold flavor, they’re perfect for mingling or munching on the go. Even better, they’re quick and easy to make, making them a lifesaver when you need a last-minute dinner or snack. If you’ve been searching for a recipe that strikes the perfect balance between convenience and wow factor, this is it!

Balanced Creaminess with a Kick of Spice

The beauty of buffalo chicken sliders with cream cheese lies in their flavor harmony. The heat from the buffalo sauce is perfectly offset by the creamy, velvety texture of cream cheese, creating an irresistible combination in every bite. This contrast elevates the sliders beyond your average spicy dish. For an extra layer of indulgence, melted cheddar or Monterey Jack adds a gooey richness that ties everything together. The result? Sliders that are bold, creamy, and absolutely unforgettable.

Made with Simple, Everyday Ingredients

One of the best things about buffalo chicken sliders with cream cheese is that they’re made with ingredients you probably already have in your kitchen. Shredded chicken, a staple for weeknight meals, forms the base of the recipe. Add in a generous helping of cream cheese and a few dashes of buffalo sauce like Frank’s RedHot for that signature tangy heat. All you need are some Hawaiian rolls and cheese to complete the sliders. If you don’t have a favorite buffalo sauce yet, Food Network’s Buffalo Sauce Recipe is an easy homemade option that pairs beautifully with these sliders.

Versatility to Suit Any Occasion

Whether you’re preparing a platter for a potluck or just whipping up a quick dinner, these sliders adapt to your needs. Hosting a party? Serve them alongside celery sticks and ranch dressing for the ultimate snack spread. Craving something lighter? Swap out the rolls for lettuce wraps and turn them into a low-carb treat. You can even make them ahead of time, storing the filling in the fridge until you’re ready to assemble. Their versatility ensures they’ll fit seamlessly into any meal plan or event.

Ingredients You’ll Need for Buffalo Chicken Sliders

Ingredients for buffalo chicken sliders with cream cheese on a marble surface.
All the ingredients needed to make delicious buffalo chicken sliders with cream cheese.

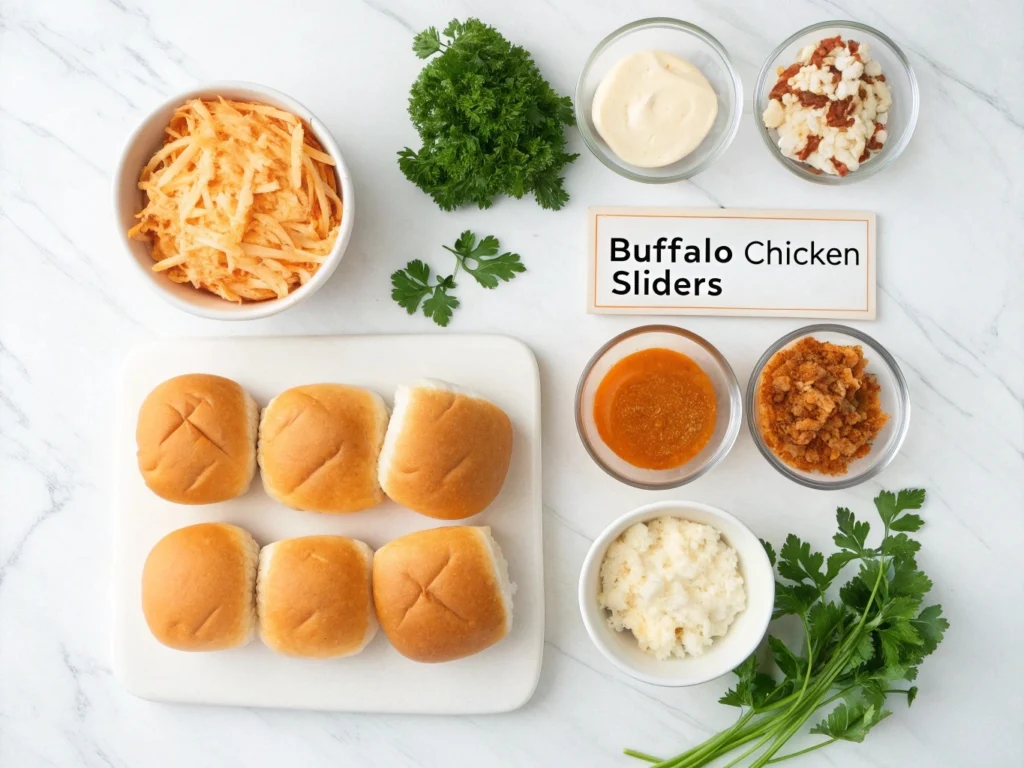
The Main Ingredients

To make buffalo chicken sliders with cream cheese, you’ll need just a handful of everyday ingredients that pack a punch of flavor. The main stars of this dish are:

  • Shredded Chicken: This forms the base of the sliders. Rotisserie chicken is an excellent shortcut, but you can also cook and shred your own.
  • Buffalo Sauce: For that signature spicy kick, Frank’s RedHot sauce is a popular choice, but feel free to use your favorite brand.
  • Cream Cheese: The creamy element that balances the heat, giving these sliders their irresistible texture.

This trio creates a flavor foundation that’s bold, creamy, and unforgettable.

Slider-Specific Items

To bring everything together, you’ll also need a few slider essentials:

  • Hawaiian Rolls: Their soft, slightly sweet texture pairs perfectly with the spicy chicken filling.
  • Cheese: Cheddar, Monterey Jack, or even mozzarella work wonderfully to add gooey richness.
  • Butter: Brushed over the top for a golden, glossy finish when baked.

These simple additions take your buffalo chicken sliders with cream cheese to the next level, creating a complete flavor-packed bite.

Optional Add-Ons for Extra Flavor

If you want to elevate your sliders, consider adding:

  • Blue Cheese Crumbles: A tangy topping that enhances the buffalo flavor.
  • Celery and Carrots: For crunch and a fresh contrast.
  • Dipping Sauces: Ranch or blue cheese dressing on the side is a must for many fans of buffalo chicken.

These optional ingredients give you the flexibility to customize the dish to your taste.

Ingredient Substitutions

If you’re missing any ingredients or want to tweak the recipe, here are some easy swaps:

  • Use ground chicken or turkey instead of shredded chicken for a slightly different texture.
  • Swap cream cheese with Greek yogurt for a lighter option while maintaining creaminess.
  • Replace Hawaiian rolls with slider buns, potato rolls, or even lettuce wraps for a low-carb variation.

For more creative chicken-based recipes, check out this Chicken Fajita Marinade Recipe on Quick Meals Recipes!

Step-by-Step Instructions to Make Buffalo Chicken Sliders

Assembling buffalo chicken sliders with cream cheese in a baking dish.
Layering buffalo chicken and cream cheese filling on slider buns, topped with cheese.

Step 1 – Prepare the Chicken Filling

The first step in making buffalo chicken sliders with cream cheese is creating the delicious chicken filling. Start by shredding cooked chicken—rotisserie chicken works best for ease and flavor. In a mixing bowl, combine the shredded chicken with softened cream cheese and buffalo sauce. Use a spoon or spatula to ensure the ingredients are evenly mixed.

For an extra kick, you can add a sprinkle of garlic powder or onion powder. If you prefer a milder version, simply reduce the buffalo sauce and add more cream cheese. The result should be a creamy, spicy, and perfectly seasoned filling.

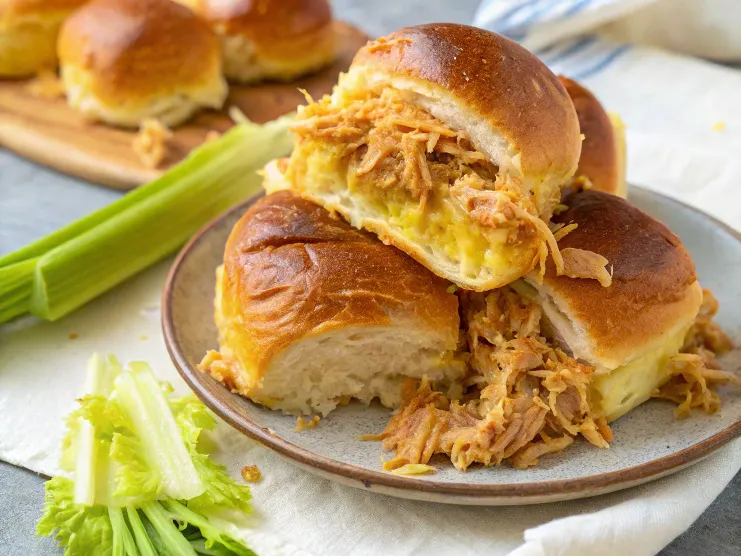
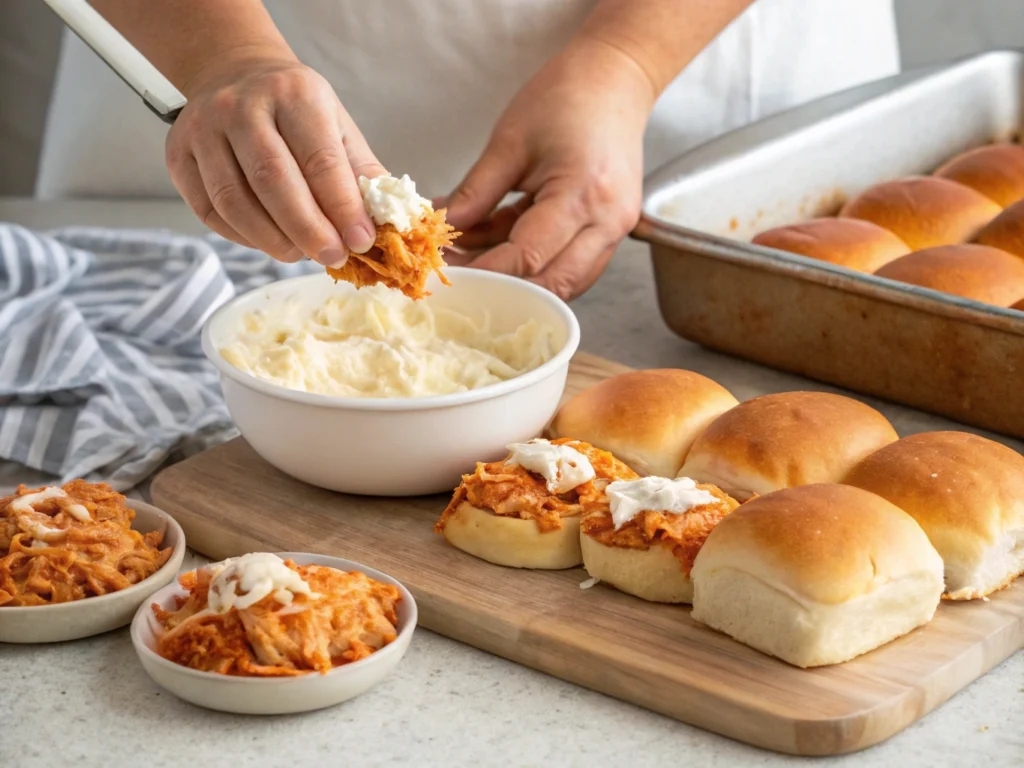
Step 2 – Assemble the Sliders

Next, it’s time to assemble your buffalo chicken sliders with cream cheese. Begin by slicing your Hawaiian rolls in half horizontally, keeping the rolls intact as a single sheet for easier assembly. Place the bottom halves on a lined baking sheet or in a casserole dish.

Spread the chicken mixture evenly over the rolls, ensuring each roll gets a generous amount. Top the chicken with shredded cheese, such as cheddar or Monterey Jack, to create a gooey layer of melted goodness. Then, place the top halves of the rolls back on, sandwiching the filling inside.

Step 3 – Bake to Perfection

The key to perfect buffalo chicken sliders with cream cheese is baking them until the cheese is melted and the rolls are golden. Preheat your oven to 350°F (175°C). Before placing the sliders in the oven, brush the tops of the rolls with melted butter for an extra glossy finish.

For added flavor, mix some garlic powder and parsley into the butter before brushing. Bake the sliders for 15–20 minutes, or until the tops are lightly toasted and the cheese is bubbling. This step not only enhances the flavors but also ensures the sliders are warm and satisfying.

Step 4 – Add Garnishes and Serve

Once out of the oven, let the sliders cool for a minute or two before serving. To elevate their presentation and taste, consider adding garnishes. A sprinkle of fresh parsley or green onions can brighten the dish, while a few crumbles of blue cheese give it an extra tangy twist.

For dipping, serve the sliders with ranch or blue cheese dressing on the side. These dressings perfectly complement the spicy buffalo flavor and make the dish even more crowd-pleasing. Whether it’s a party appetizer or a casual dinner, these sliders are sure to impress.

For more chicken-inspired recipes, check out our guide on Chicken and Dressing Recipe for a comforting classic!

Tips and Tricks for the Best Buffalo Chicken Sliders

Make-Ahead Options for Busy Days

One of the best things about buffalo chicken sliders with cream cheese is how easily you can prepare parts of the recipe ahead of time. If you know you’ll be short on time, prepare the chicken filling a day or two in advance. Store it in an airtight container in the fridge, then assemble and bake the sliders when you’re ready to serve.

Another time-saving tip is to shred your chicken in bulk and freeze it in portions. This way, you’ll always have shredded chicken on hand for quick meals. When hosting a party, assembling the sliders ahead of time and refrigerating them (unbaked) can save you last-minute stress. Just pop them in the oven before guests arrive!

Ingredient Substitutions to Customize the Recipe

It’s easy to make buffalo chicken sliders with cream cheese your own by tweaking the ingredients. For a healthier option, try swapping cream cheese with Greek yogurt or a light cream cheese alternative. If you’re avoiding bread, use lettuce wraps instead of Hawaiian rolls for a low-carb version.

For those who love experimenting, try using smoked chicken or turkey instead of plain shredded chicken for a new flavor profile. Cheese lovers can substitute mozzarella or pepper jack for a slightly different twist. These adjustments keep the recipe flexible and fun.

How to Avoid Soggy Sliders

One common issue with sliders is soggy rolls, but there are easy ways to prevent this. First, consider lightly toasting the bottom halves of your rolls before adding the filling. This creates a barrier that helps keep the bread from soaking up too much moisture.

Second, don’t overdo the buffalo sauce in the chicken mixture. While the sauce is essential for flavor, too much can make the filling watery. If you want extra sauce on the side, serve it as a dip instead of adding it directly to the sliders.

Lastly, baking the sliders uncovered for the last 5 minutes allows the tops to crisp up without drying out the filling. This small step can make a big difference in texture and presentation.

Serving Suggestions to Elevate Your Sliders

 Served buffalo chicken sliders with cream cheese, ranch, and celery sticks.
Plated buffalo chicken sliders served with ranch, celery sticks, and a cold drink.

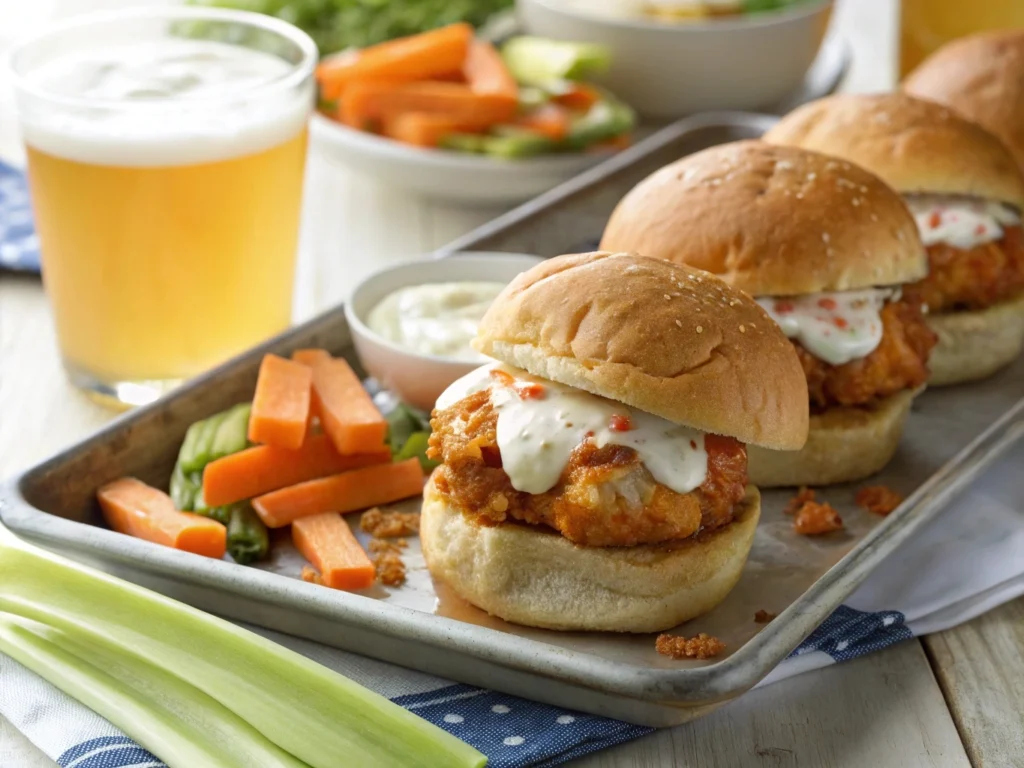
To make your buffalo chicken sliders with cream cheese even more memorable, serve them with complementary sides and garnishes. A tray of celery sticks and carrot sticks is a classic pairing that adds crunch and freshness.

For dipping, ranch dressing or blue cheese dressing is a must-have. If you’re looking to balance the heat of the buffalo sauce, offer a side of coleslaw for a cool and creamy contrast.

For drinks, serve with iced tea, soda, or even a cold beer to complete the meal. And if you’re hosting a crowd, consider making a variety platter with sliders, wings, and other party favorites. This turns a simple dish into the star of any gathering!

Variations of Buffalo Chicken Sliders to Try

Slow Cooker Buffalo Chicken Sliders

For a hands-off approach, try making buffalo chicken sliders with cream cheese in a slow cooker. Combine the shredded chicken, buffalo sauce, and cream cheese in your slow cooker and cook on low for 4–6 hours or high for 2–3 hours. The result is an extra tender and flavorful filling that practically melts in your mouth.

To assemble, simply spread the slow-cooked mixture onto the rolls, top with cheese, and bake until warm and gooey. This method is ideal for busy days when you want maximum flavor with minimal effort.

Spicy Ranch Buffalo Sliders

For those who love a zesty twist, add ranch seasoning to the chicken filling. Mix a packet of ranch dressing mix into the cream cheese before combining it with the shredded chicken and buffalo sauce. This addition not only boosts the flavor but also adds a cool, tangy element that complements the spicy sauce.

For an extra kick, drizzle a little spicy ranch dressing over the top before serving. These sliders are perfect for fans of bold and tangy flavors!

Low-Carb Buffalo Sliders

If you’re following a low-carb or keto diet, you don’t have to miss out on the deliciousness of buffalo chicken sliders with cream cheese. Swap the Hawaiian rolls for crisp lettuce wraps or use keto-friendly bread alternatives.

Another great option is to serve the chicken mixture as a dip with celery sticks and carrot sticks for dipping. This variation is both healthy and satisfying, making it perfect for anyone who wants to cut carbs without sacrificing flavor.

BBQ Buffalo Chicken Sliders

For a smoky twist, mix a tablespoon or two of BBQ sauce into the buffalo sauce before combining it with the chicken and cream cheese. This combination adds a layer of sweetness and depth that pairs beautifully with the spicy heat.

Top the sliders with sliced pickles or coleslaw for a Southern-inspired take on the classic recipe. These BBQ buffalo sliders are guaranteed to be a hit at summer cookouts or tailgating parties.

FAQs About Buffalo Chicken Sliders

Q1: How to cook buffalo in the oven?

Cooking buffalo-flavored dishes, like buffalo chicken sliders with cream cheese, in the oven is simple and ensures a perfectly baked finish. To prepare the sliders, assemble them by layering shredded buffalo chicken, cream cheese, and shredded cheese between soft slider buns. Then, place them in a preheated oven at 350°F (175°C) and bake for 15–20 minutes. For a crispy top, brush the rolls with melted butter before baking. This method keeps the chicken warm, the cheese melted, and the bread toasted to perfection.

If you’re cooking a buffalo chicken casserole or dip, follow similar steps—combine all ingredients, spread them in an oven-safe dish, and bake until bubbly.

Q2: What is buffalo chicken dip made of?

Buffalo chicken dip is made from a creamy, spicy blend of shredded chicken, cream cheese, buffalo sauce, ranch or blue cheese dressing, and shredded cheese (usually cheddar or Monterey Jack). These ingredients are mixed together and baked until hot and gooey.

This dip’s rich, tangy flavor profile is what inspired recipes like buffalo chicken sliders with cream cheese. The sliders take the same irresistible flavors of the dip and layer them into bite-sized sandwiches, perfect for parties or family dinners.

Q3: Slider bun vs burger bun?

Slider buns and burger buns serve different purposes but can sometimes be interchangeable. Slider buns are smaller, softer, and designed for handheld, bite-sized sandwiches like buffalo chicken sliders with cream cheese. Their petite size makes them perfect for party platters or appetizers.

Burger buns, on the other hand, are larger and sturdier, ideal for full-sized sandwiches. If you don’t have slider buns, you can cut burger buns into smaller portions or use Hawaiian rolls as an excellent substitute.

The most popular dipping sauces for buffalo wings—and dishes like buffalo chicken sliders with cream cheese—are ranch dressing and blue cheese dressing. Ranch dressing is the top choice for its cool, creamy, and slightly tangy flavor that balances the spicy heat of buffalo sauce.

Blue cheese dressing, while not as universally loved, has a sharp and tangy flavor that complements the bold taste of buffalo sauce perfectly. Both options work equally well as dipping sauces or drizzled over sliders for an extra burst of flavor.

Conclusion

If you’re craving a crowd-pleasing recipe that’s easy to make and bursting with bold flavor, buffalo chicken sliders with cream cheese are the perfect solution. These sliders combine the spicy kick of buffalo sauce with the creamy richness of cream cheese, all nestled between soft, golden slider buns.

From versatile variations like low-carb lettuce wraps to time-saving tips for make-ahead preparation, these sliders are as flexible as they are delicious. Whether you’re serving them for game day, a party, or a family dinner, they’re guaranteed to be a hit.

So, gather your ingredients, follow the simple steps outlined in this guide, and get ready to impress your family and friends. Don’t forget to experiment with fun variations and dipping sauces to make this recipe truly your own.

6 Genius Ways to Upgrade Your Chicken Scampi with Garlic Parmesan Rice

What if your weeknight dinner could feel like a restaurant-worthy indulgence, without the hefty price tag or hours in the kitchen? Enter chicken scampi with garlic parmesan rice a dish that combines tender, juicy chicken with creamy, garlicky rice infused with the savory punch of parmesan.

Perfecting the Basics of Chicken Scampi and Garlic Parmesan Rice

Understanding the Classic Chicken Scampi Recipe

Chicken scampi with garlic parmesan rice starts with mastering the essentials. At its core, chicken scampi is all about balance—tender chicken pieces bathed in a buttery garlic sauce, brightened with a splash of lemon and the subtle tang of white wine. The key to achieving restaurant-level flavor lies in the simplicity of fresh ingredients.

For example, freshly minced garlic creates a bold, aromatic base, while high-quality olive oil enhances the sauce’s richness. By combining these simple elements, you’ll create a dish that’s both comforting and elegant. Transitioning to the rice, the creamy parmesan flavor acts as the perfect partner, soaking up every bit of that delicious scampi sauce.

Crafting Garlic Parmesan Rice That Shines

Fresh garlic, grated parmesan, raw chicken, and rice on a wooden board.
Essential ingredients for creating chicken scampi with garlic parmesan rice.

A perfect garlic parmesan rice is more than just a side dish—it’s the backbone of this meal. To get it just right, start by toasting the rice in a bit of butter. This simple step adds a subtle nuttiness, elevating the dish from basic to brilliant.

When cooking, opt for chicken broth instead of water. This trick infuses the rice with a savory depth of flavor that pairs beautifully with the scampi. As the final touch, stir in freshly grated parmesan cheese and a splash of cream. The result? A creamy, dreamy bed of rice that complements the zesty, garlicky chicken scampi effortlessly.

For more details on selecting the right type of rice for creamy dishes, check out this resource on rice varieties.

Essential Tools for the Best Results

Great tools make great dishes! When preparing chicken scampi with garlic parmesan rice, a few essential tools can make all the difference:

  • Heavy-bottomed skillet: Distributes heat evenly, ensuring perfectly seared chicken and no burnt garlic.
  • Microplane grater: Ideal for finely grating parmesan cheese or zesting lemon without clumps.
  • Rice cooker or sturdy pot: Guarantees fluffy, evenly cooked rice every time.

Investing in these kitchen staples simplifies the process, making it easier to recreate this dish consistently.

Common Mistakes to Avoid

Even a classic dish like chicken scampi with garlic parmesan rice can go wrong without the right techniques. Here are a few pitfalls to watch out for:

  • Overcooking the chicken: Dry chicken can ruin the dish. To avoid this, cook chicken breasts or thighs only until they’re golden and just cooked through.
  • Burning the garlic: Garlic burns quickly, turning bitter. To prevent this, sauté it over medium heat and add liquid (like wine or broth) as soon as it becomes fragrant.
  • Under-seasoning: Always taste and adjust seasoning at each stage, particularly when balancing the rich scampi sauce with the mild parmesan rice.

Genius Way #1: Experiment with Bold Flavors

Chicken sautéing in garlic butter sauce with chili flakes and parsley.
Chicken cooked in garlic butter sauce, garnished with chili flakes and parsley for bold flavor.

Adding Heat with Chili Flakes or Cajun Seasoning

Spice can take chicken scampi with garlic parmesan rice to a whole new level. Adding a pinch of chili flakes or a dash of Cajun seasoning creates a delightful contrast to the creamy rice and buttery scampi sauce. For a mild kick, try smoked paprika or a pinch of cayenne pepper instead. These simple additions add warmth and depth without overpowering the dish.

Experiment by sprinkling spice into the scampi sauce as it simmers, allowing the heat to infuse evenly. For families with varying spice preferences, serve spicy seasonings on the side as a customizable garnish.

Incorporating Fresh Herbs

Fresh herbs can completely transform the flavor profile of your chicken scampi with garlic parmesan rice. Tossing in chopped parsley, basil, or thyme not only enhances the aroma but also adds vibrant color to the dish.

For example, fresh basil complements the garlic and parmesan beautifully, while parsley provides a hint of earthiness. Add herbs just before serving to retain their bright, fresh flavor. This little tweak makes the dish feel light and sophisticated, perfect for impressing guests.

Using Citrus for a Tangy Twist

Lemon juice is a classic addition to chicken scampi, but you can elevate it further by exploring other citrus options like lime or orange. A drizzle of fresh juice brightens the entire dish, cutting through the richness of the garlic butter sauce and creamy parmesan rice.

To go the extra mile, grate some citrus zest into the sauce for an aromatic finish. This small step adds an unexpected yet delightful layer of complexity. Citrus lovers might even garnish the dish with thin lemon slices for a visually appealing touch.

Enhancing Umami with Anchovy Paste or Capers

For those who love bold, savory flavors, anchovy paste or capers are game-changers. Just a teaspoon of anchovy paste blended into the sauce boosts the umami, making every bite of chicken scampi with garlic parmesan rice irresistibly rich.

Capers, on the other hand, introduce a salty, briny note that pairs well with the garlic and parmesan. Sprinkle them sparingly to avoid overwhelming the dish, and let their tangy punch surprise your taste buds.

Genius Way #3: Get Creative with the Sauce

Add a Splash of White Wine or Broth

The sauce is the heart of chicken scampi with garlic parmesan rice, and adding a splash of white wine or chicken broth can elevate its flavor. White wine introduces a tangy depth and a hint of acidity that balances the creamy parmesan rice, while chicken broth offers a rich and savory base for those who prefer a non-alcoholic option.

For the best results, use a dry white wine like Sauvignon Blanc, as its crisp notes blend seamlessly with the garlic and butter. On the other hand, if you’re using broth, ensure it’s low-sodium so you can control the saltiness of the dish.

Infuse the Sauce with Garlic Butter

Garlic butter is an easy yet luxurious way to enhance the scampi sauce. Start by melting unsalted butter and gently sautéing minced garlic until it’s aromatic. The rich, velvety texture of garlic butter not only coats the chicken but also seeps into the rice, making every bite of your chicken scampi with garlic parmesan rice indulgent and flavorful.

For an extra layer of flavor, mix in a pinch of Italian seasoning or fresh thyme while preparing the garlic butter. This step ensures that the sauce is both fragrant and perfectly seasoned.

Incorporate a Cheese Blend

While parmesan is a staple in this dish, combining it with other cheeses can add complexity. A mix of parmesan, asiago, and mozzarella brings creamy, nutty, and stretchy elements to the sauce, transforming your chicken scampi with garlic parmesan rice into a gourmet experience.

Grate the cheeses finely so they melt smoothly into the sauce. Stir them in gradually over low heat to prevent clumps, ensuring a silky texture. This cheese blend not only enhances the sauce but also creates a luscious finish for the garlic parmesan rice.

Use Sun-Dried Tomatoes for a Sweet and Tangy Touch

Sun-dried tomatoes add a sweet and tangy contrast to the buttery richness of the scampi sauce. Chop them finely and stir them into the sauce as it simmers. Their slightly chewy texture also provides a delightful contrast to the tender chicken and creamy rice.

These tomatoes work particularly well if you’re aiming for a Mediterranean twist on the classic chicken scampi with garlic parmesan rice. For added depth, try using oil-packed sun-dried tomatoes, which infuse the dish with even more flavor.

For more delicious ideas to transform your favorite meals, check out our article on Quick Dinner Upgrades.

Genius Way #4: Elevate the Rice

Creamy garlic parmesan rice being stirred with a wooden spoon.
Garlic parmesan rice being prepared with fresh parmesan and herbs.

Use Arborio Rice for Creaminess

To take your chicken scampi with garlic parmesan rice to the next level, consider swapping traditional long-grain rice for Arborio rice. Known for its creamy texture, Arborio rice creates a luxurious base that perfectly complements the bold flavors of the scampi sauce.

Begin by toasting the Arborio rice in butter, just as you would for risotto, and cook it slowly with chicken broth for added depth. Stirring frequently helps release the starches, resulting in a rich and velvety texture. This small change makes the dish feel like a restaurant-quality indulgence.

Add Vegetables for Color and Texture

Incorporating vegetables not only brightens the dish but also adds a pleasing variety of textures. Peas, for example, bring a pop of green and a hint of sweetness that balances the savory scampi sauce. Similarly, roasted red peppers lend a smoky flavor and vibrant color to your chicken scampi with garlic parmesan rice.

Spinach is another excellent option—it wilts beautifully into the rice, enhancing its creamy consistency without overpowering the dish. For an extra burst of freshness, consider stirring in cherry tomatoes right before serving.

Toast the Rice Before Cooking

One simple yet often overlooked technique for elevating garlic parmesan rice is to toast the rice before adding any liquid. This step enhances the nutty, aromatic qualities of the rice, giving it a distinct depth of flavor that pairs beautifully with the zesty, garlicky chicken scampi.

Toasting is easy: heat a small amount of butter or olive oil in your pan, then sauté the rice until it’s lightly golden. This method works particularly well with basmati or jasmine rice, ensuring each grain stays fluffy and flavorful.

Experiment with Broths and Infusions

While water is a standard choice for cooking rice, using chicken broth or vegetable stock can infuse your garlic parmesan rice with savory notes that complement the scampi sauce. For a creative twist, you could even add a splash of coconut milk for a touch of creaminess and subtle sweetness.

Additionally, try infusing the broth with herbs like bay leaves, thyme, or rosemary as it heats. This step adds aromatic undertones that tie the rice and scampi flavors together seamlessly. The result is a dish that feels both elevated and comforting.

Genius Way #5: Presentation Matters

Plating Like a Pro

A dining table with plated chicken scampi and garlic parmesan rice
Chicken scampi with garlic parmesan rice plated elegantly with garnishes and wine

The way you present your chicken scampi with garlic parmesan rice can make a big difference in how it’s received. Use shallow bowls for this dish, as they allow the creamy rice to pool beneath the chicken, showcasing the luscious sauce. Arrange the chicken pieces neatly on top, leaving enough room for garnishes.

To create a restaurant-style look, use a ring mold to shape the rice into a neat circle before placing the chicken on top. This extra step elevates the presentation, making it feel special for a dinner party or a cozy family meal.

Garnish with Style

A well-chosen garnish not only enhances flavor but also adds a touch of elegance. Fresh herbs like parsley or basil provide a burst of color and a fresh aroma. For a finishing flourish, sprinkle freshly grated parmesan over the dish, letting it melt into the warm garlic parmesan rice.

Lemon wedges on the side add a pop of brightness and allow guests to customize their plates. Alternatively, drizzle a small amount of olive oil or balsamic reduction for a polished look and an extra layer of flavor.

Pair with the Perfect Sides

While chicken scampi with garlic parmesan rice is satisfying on its own, pairing it with complementary sides can create a complete dining experience. A crisp Caesar salad, for instance, provides a refreshing contrast to the creamy rice.

Garlic bread is another classic option, ideal for soaking up any extra sauce. For a lighter side, roasted vegetables like asparagus or zucchini add both flavor and texture. These accompaniments ensure your meal feels well-rounded and satisfying.

Lighting and Table Settings for Ambiance

To make your dish even more appealing, consider how it’s presented at the table. Soft, warm lighting highlights the golden tones of the garlic parmesan rice and the rich sauce on the chicken. Use simple, clean plates to let the colors of the food stand out.

Set the table with a few candles or a simple floral centerpiece to create an inviting atmosphere. These small touches enhance the overall dining experience, turning an ordinary meal into a memorable occasion.

FAQs About Chicken Scampi with Garlic Parmesan Rice

What is a substitute for white wine in chicken scampi?

If you don’t have white wine on hand or prefer not to use alcohol, there are several great substitutes. Chicken broth is one of the best options, as it adds a savory depth to the scampi sauce. For a hint of acidity, you can mix chicken broth with a tablespoon of lemon juice or apple cider vinegar. Other alternatives include vegetable broth or a splash of white grape juice diluted with water. These substitutions maintain the bright and flavorful profile of chicken scampi with garlic parmesan rice.

Why is it called chicken scampi?

The term “scampi” originally referred to a type of small, edible crustacean, similar to shrimp, commonly prepared in Italy with garlic, butter, and wine. Over time, the preparation method became synonymous with the name. Today, “scampi” describes a cooking style characterized by sautéing meat or seafood in a rich garlic butter sauce. In the case of chicken scampi with garlic parmesan rice, this traditional technique is applied to chicken, resulting in a flavorful and satisfying dish.

What can I use in place of wine for shrimp scampi?

Just like with chicken scampi, you can replace wine in shrimp scampi with chicken broth, vegetable broth, or a mixture of lemon juice and water. For a slightly sweeter alternative, try white grape juice or even diluted apple juice. These substitutes ensure the scampi sauce retains its signature tanginess and pairs beautifully with creamy garlic parmesan rice.

Can I skip white wine in a recipe?

Yes, you can absolutely skip white wine in a recipe without compromising flavor. Instead, use chicken or vegetable broth with a touch of acidity from lemon juice or vinegar. For chicken scampi with garlic parmesan rice, this adjustment maintains the sauce’s richness while adding a bright, zesty note. Skipping the wine also makes the recipe more family-friendly and accessible to all.

Conclusion

You’ve just explored six genius ways to upgrade your chicken scampi with garlic parmesan rice, transforming it from a simple dinner into a memorable culinary masterpiece. From experimenting with bold flavors and enhancing the sauce to perfecting the rice and elevating the presentation, these tips ensure your dish is as visually stunning as it is delicious.

Whether you’re cooking for a special occasion or a cozy family meal, these creative ideas will help you master the art of chicken scampi with garlic parmesan rice. Don’t forget to add your personal touch—be it a unique garnish, a surprising ingredient, or a beautifully set table. Now, it’s time to grab your apron, gather your ingredients, and enjoy the satisfaction of creating a dish that’s sure to impress.

Why 9 Out Of 10 People Love Instant Pot Marry Me Chicken Pasta

What if one dish could steal the show, win hearts, and make any dinner feel like a romantic occasion? Say hello to Instant Pot Marry Me Chicken Pasta a creamy, flavorful masterpiece that’s as effortless as it is irresistible. With tender chicken, sun-dried tomatoes, and a velvety Parmesan sauce, this recipe promises to deliver restaurant-quality magic right from your Instant Pot.

1. What Is Marry Me Chicken Pasta?

The Story Behind the Name

Have you ever tasted something so good that you wanted to drop everything and shout, “Marry me”? That’s the playful story behind Marry Me Chicken Pasta! It’s said that this dish is so irresistibly creamy and flavorful that it’s sparked more than a few proposals. While the story may be lighthearted, the flavors are anything but—combining tender chicken, a rich Parmesan sauce, and tangy sun-dried tomatoes, this meal truly feels like love on a plate.

What makes Instant Pot Marry Me Chicken Pasta even more enticing is how it transforms this show-stopping dish into a quick, easy recipe. With your Instant Pot, you can whip up this restaurant-worthy meal in under 30 minutes without sacrificing its signature depth of flavor.

Why It’s a Hit Among Instant Pot Users

The Instant Pot is a game-changer for busy home cooks, and this recipe proves it. Traditionally, a dish like Marry Me Chicken Pasta would require juggling multiple pots and pans. However, the Instant Pot makes everything simpler by combining sautéing, pressure cooking, and simmering all in one device.

For fans of Instant Pot Marry Me Chicken Pasta, the appeal lies in its versatility. Whether you’re cooking for a cozy dinner for two or feeding a hungry family, this one-pot wonder scales effortlessly. And with minimal cleanup afterward, it’s no surprise why it’s a favorite for weeknight meals and special occasions alike.

The Essential Ingredients

Ingredients for Instant Pot Marry Me Chicken Pasta arranged on a countertop.
Essential ingredients for preparing Instant Pot Marry Me Chicken Pasta.

At the heart of Instant Pot Marry Me Chicken Pasta are a few key ingredients that make this dish truly shine:

  • Chicken: Boneless, skinless chicken breasts or thighs work best, ensuring tender, juicy bites.
  • Pasta: Short varieties like penne or rigatoni hold the sauce perfectly, delivering a creamy bite every time.
  • Sun-Dried Tomatoes: These gems add a sweet, tangy flavor that balances the richness of the dish.
  • Parmesan Cheese: Freshly grated Parmesan creates a velvety, luxurious sauce.
  • Heavy Cream: This ingredient provides the creamy base that ties all the flavors together.

Ingredient Substitutions

While the original recipe is a crowd-pleaser, it’s always helpful to have options. Here are some great substitutions for Instant Pot Marry Me Chicken Pasta:

  • Dairy-Free: Swap heavy cream with coconut milk or a dairy-free cream alternative.
  • Vegetarian Version: Replace chicken with chickpeas, tofu, or a medley of roasted vegetables.
  • Gluten-Free: Use your favorite gluten-free pasta for a dish that everyone can enjoy.

These substitutions ensure that no matter your dietary needs, you can enjoy the comforting flavors of this recipe. Plus, they allow you to experiment with different variations, keeping the dish exciting and new.

2. Key Ingredients for the Perfect Instant Pot Marry Me Chicken Pasta

Family-style table with Instant Pot Marry Me Chicken Pasta and side dishes.
A cozy dinner setup featuring Instant Pot Marry Me Chicken Pasta and side dishes.

The Essential Ingredients

To make the most irresistible Instant Pot Marry Me Chicken Pasta, you’ll need a combination of staple items and a few standout ingredients that take this dish to the next level. Each element plays an important role in creating the perfect balance of creamy, savory, and tangy flavors.

  • Chicken: Opt for boneless, skinless chicken breasts or thighs. They cook quickly and remain juicy under pressure, making them ideal for Instant Pot recipes.
  • Pasta: Short pasta like penne or rigatoni works best because it holds the sauce well and cooks evenly in the Instant Pot.
  • Sun-Dried Tomatoes: These add a tangy sweetness that cuts through the richness of the sauce. Look for oil-packed ones for added depth of flavor.
  • Heavy Cream and Parmesan Cheese: Together, these ingredients create the dish’s luxurious, creamy texture. Freshly grated Parmesan is recommended for the best results.
  • Seasonings: Garlic, Italian seasoning, and a pinch of red pepper flakes bring the whole dish to life.

Ingredient Substitutions

One of the best things about Instant Pot Marry Me Chicken Pasta is its adaptability. Whether you have dietary restrictions or just want to switch things up, here are some substitution ideas:

  • For a lighter sauce: Replace heavy cream with half-and-half or evaporated milk.
  • Gluten-free option: Use gluten-free pasta; just adjust the cooking time slightly as it tends to cook faster in an Instant Pot.
  • Dairy-free alternative: Swap Parmesan and cream with plant-based versions. Nutritional yeast can also add a cheesy flavor.
  • Vegetarian twist: Replace chicken with chickpeas or sautéed mushrooms for a hearty, plant-based version.

These substitutions allow you to enjoy this dish no matter your preferences or dietary needs, ensuring Instant Pot Marry Me Chicken Pasta stays a household favorite.

Flavor-Boosting Additions

While the classic recipe is already bursting with flavor, there are several ways to enhance it further:

  1. Fresh Herbs: Add chopped basil or parsley right before serving for a pop of freshness.
  2. Vegetables: Toss in baby spinach, roasted red peppers, or zucchini for added nutrients and color.
  3. Spices: If you love heat, sprinkle in extra red pepper flakes or even a dash of cayenne.
  4. Protein Variations: Swap chicken for shrimp or sausage for a different flavor profile.

Experimenting with these additions keeps your Instant Pot Marry Me Chicken Pasta exciting every time you make it.

Tips for Selecting the Best Ingredients

Selecting high-quality ingredients is key to achieving that “wow” factor. Here are a few tips to keep in mind:

  • Chicken: Look for organic or free-range chicken to ensure tender and flavorful meat.
  • Parmesan Cheese: Skip the pre-grated variety and go for a wedge of Parmesan to grate fresh—it melts better and tastes richer.
  • Pasta: Choose a brand known for al dente results, as Instant Pot cooking can make some pastas mushy.
  • Sun-Dried Tomatoes: Opt for those packed in oil with herbs to enhance the overall flavor of the sauce.

3. How to Make Instant Pot Marry Me Chicken Pasta

Step-by-Step Instructions

Making Instant Pot Marry Me Chicken Pasta is surprisingly simple and doesn’t require any advanced cooking skills. Follow these easy steps to create a creamy, flavorful meal in less than 30 minutes:

Instant Pot showing sautéed chicken and sun-dried tomatoes with broth being stirred.
Cooking chicken and sun-dried tomatoes in the Instant Pot.
  1. Prepare the Ingredients: Gather everything you need—chicken, pasta, sun-dried tomatoes, garlic, cream, Parmesan, and seasonings. Chop the sun-dried tomatoes and grate the cheese to save time later.
  2. Sauté the Chicken: Set the Instant Pot to sauté mode. Add a splash of olive oil and brown the chicken on both sides. This step locks in flavor, but don’t worry if the chicken isn’t fully cooked—it will finish during pressure cooking.
  3. Layer the Ingredients: Add pasta, sun-dried tomatoes, garlic, and seasonings. Pour in chicken broth or water, ensuring the pasta is just submerged but not over-stirred to avoid sticking.
  4. Pressure Cook: Seal the lid and cook on high pressure for about 5 minutes (adjust the time based on your pasta type). Use a quick release to prevent overcooking.
  5. Finish the Sauce: Stir in the heavy cream and freshly grated Parmesan while the pasta is still hot. This will create a velvety, luscious sauce that clings perfectly to the pasta.

By following these steps, you’ll have a restaurant-quality dish ready to impress anyone who takes a bite!

Common Troubleshooting Tips

Even the best recipes can encounter minor hiccups. Here are a few tips to keep your Instant Pot Marry Me Chicken Pasta foolproof:

  • Sauce Too Thin? Add a slurry of cornstarch and water, simmering on sauté mode until it thickens.
  • Pasta Too Firm? Simply close the lid and let the residual heat soften it for another minute or two.
  • Chicken Not Cooked Through? Slice it and stir it back into the hot pasta—it will finish cooking in no time.
  • Stuck Pasta: To prevent sticking, avoid stirring the pasta after layering it with liquids.

Remember, practice makes perfect, and small adjustments can ensure a flawless dish every time!

Tools and Equipment

Having the right tools can make all the difference. Here’s what you’ll need for Instant Pot Marry Me Chicken Pasta:

  • Instant Pot: A 6-quart or 8-quart model works best.
  • Tongs: Essential for flipping and handling the chicken without tearing it.
  • Measuring Cups and Spoons: Accuracy is key for achieving a balanced sauce.
  • Cheese Grater: Freshly grated Parmesan melts better and gives a richer taste.

While these tools are standard for most home kitchens, investing in quality versions ensures hassle-free cooking and consistent results.

Helpful Cooking Tips for Beginners

If you’re new to cooking with an Instant Pot, here are some beginner-friendly tips to keep your experience stress-free:

  1. De-glaze the Pot: After sautéing the chicken, add a splash of broth to scrape up any brown bits. This step prevents a “burn” warning and adds extra flavor to the dish.
  2. Follow the Layering Order: Always add liquids last and avoid stirring. This ensures the pasta cooks evenly without clumping.
  3. Quick Release Carefully: Use a kitchen towel to shield your hand from the steam when releasing pressure.
  4. Prep Ahead: Chop your ingredients and measure spices beforehand to save time and stay organized.

For additional beginner tips, check out our article on Easy Dinner Ideas for Two, which includes other foolproof recipes.

4. Why This Recipe Is a Crowd-Pleaser

Rich and Creamy Texture

One of the biggest reasons Instant Pot Marry Me Chicken Pasta is so beloved is its incredibly rich and creamy texture. The combination of heavy cream and freshly grated Parmesan cheese creates a velvety sauce that perfectly coats each piece of pasta and chicken.

The magic lies in the Instant Pot’s ability to cook everything together, allowing the flavors to meld seamlessly. Unlike stovetop versions, the pressure cooking process intensifies the sauce’s depth, giving it a luxurious feel without requiring hours of simmering.

If you enjoy dishes like Alfredo or carbonara, you’ll find this pasta even more indulgent thanks to its tangy sun-dried tomatoes and tender chicken. It’s a comforting yet sophisticated recipe that satisfies every craving!

Perfect for Any Occasion

Instant Pot Marry Me Chicken Pasta isn’t just a meal; it’s an experience. Whether you’re preparing a romantic date-night dinner, hosting a cozy family gathering, or needing a quick but impressive weeknight meal, this dish fits the bill.

What makes it stand out is its versatility. You can dress it up with elegant garnishes like fresh basil and shaved Parmesan, or keep it simple and let the creamy flavors speak for themselves. No matter the occasion, this recipe is guaranteed to make everyone at the table feel special.

Kid-Friendly and Customizable

One of the many reasons families adore Instant Pot Marry Me Chicken Pasta is how easily it appeals to kids. The creamy, cheesy sauce is a crowd-pleaser for picky eaters, and the pasta shape can be switched to fun options like bowties or shells to keep things exciting.

If you need to cater to dietary preferences, the recipe is highly adaptable. For example, you can swap out the chicken for ground turkey or even tofu for a vegetarian twist. Adding vegetables like spinach, peas, or bell peppers not only boosts nutrition but also makes the dish more colorful and vibrant—perfect for kids and adults alike.

A Proven Winner for Meal Prepping

Another reason this dish earns high marks is its suitability for meal prepping. Instant Pot Marry Me Chicken Pasta stores well in the refrigerator, making it a fantastic option for make-ahead lunches or dinners.

To keep the creamy sauce fresh and silky, store the pasta in an airtight container and reheat with a splash of milk or chicken broth to restore its original consistency. Unlike many pasta dishes that dry out when reheated, this one retains its rich flavor and texture beautifully.

If you enjoy recipes that save you time without compromising on taste, this pasta is a perfect addition to your rotation. Pair it with side salads or roasted veggies for a complete and balanced meal.

5. Tips for Serving and Pairing Instant Pot Marry Me Chicken Pasta

Side Dish Suggestions

Pairing your Instant Pot Marry Me Chicken Pasta with the right side dishes can elevate your meal to the next level. Here are some crowd-pleasing options:

  1. Garlic Bread: The buttery, garlicky goodness of warm bread perfectly complements the creamy sauce. Use it to mop up any extra sauce left on your plate!
  2. Caesar Salad: Crisp romaine lettuce, tangy Caesar dressing, and crunchy croutons provide a refreshing contrast to the rich pasta.
  3. Roasted Vegetables: A side of roasted asparagus, zucchini, or Brussels sprouts balances the meal with earthy, caramelized flavors.
  4. Caprese Salad: Mozzarella, tomatoes, and basil with a drizzle of balsamic glaze add a light and tangy touch.

These sides ensure your Instant Pot Marry Me Chicken Pasta shines as the centerpiece while offering a variety of flavors and textures.

Storage and Reheating Tips

One of the many advantages of Instant Pot Marry Me Chicken Pasta is how well it stores for later. Follow these tips to keep your leftovers just as delicious:

  • Refrigeration: Place the pasta in an airtight container and store it in the refrigerator for up to three days.
  • Reheating: To prevent the sauce from drying out, reheat it gently on the stove or in the microwave with a splash of milk, chicken broth, or cream. Stir frequently to ensure even heating.
  • Freezing: For longer storage, freeze the pasta in individual portions. When reheating from frozen, thaw overnight in the fridge and heat as described above.

These methods preserve the creamy texture and rich flavors, making this dish a reliable option for meal prep or leftovers.

Make It Your Own

Customizing Instant Pot Marry Me Chicken Pasta is not only easy but also a fun way to experiment in the kitchen. Consider these ideas:

  • Add a Protein Twist: Swap chicken with shrimp, scallops, or even sausage for a unique flavor profile.
  • Vegetable Boost: Stir in spinach, kale, or roasted bell peppers to add nutrients and color.
  • Spice It Up: A pinch of cayenne pepper or a drizzle of spicy chili oil can give the dish a fiery kick.
  • Cheese Variations: Try adding shredded mozzarella or a sprinkle of Pecorino Romano for a different cheesy depth.

These variations ensure that no two servings of your Instant Pot Marry Me Chicken Pasta are ever the same, keeping it exciting for both the cook and the diners.

Serving Tips for Maximum Enjoyment

 A plated serving of Instant Pot Marry Me Chicken Pasta with fresh garnishes.
A delicious serving of Instant Pot Marry Me Chicken Pasta garnished with basil and Parmesan.

To make the most of your Instant Pot Marry Me Chicken Pasta, consider these serving tips:

  1. Garnish Generously: Sprinkle freshly chopped basil or parsley and a touch of grated Parmesan on top for a professional finish.
  2. Serve Immediately: For the best texture, serve the pasta right after mixing the sauce with the cooked ingredients.
  3. Warm Plates: Warming your serving plates beforehand keeps the pasta hotter for longer, enhancing the dining experience.
  4. Pair with Wine: A crisp white wine, such as Sauvignon Blanc or Chardonnay, balances the dish’s creamy richness beautifully.

These small touches turn a delicious dinner into a memorable event, ensuring that every bite of Instant Pot Marry Me Chicken Pasta feels special.

FAQs

In Tuscany, pappardelle is one of the most popular pasta types. This wide, flat pasta is perfect for holding rich sauces, such as those made with wild boar or hearty ragù. While Instant Pot Marry Me Chicken Pasta typically uses shorter pasta like penne or rigatoni, you could experiment with pappardelle for a rustic twist inspired by Tuscan cuisine. Its broad surface would beautifully complement the creamy sauce.

What is the best way to clean an Instant Pot?

The best way to clean your Instant Pot is to break it down into its individual parts:

  1. Inner Pot: Wash it with warm soapy water or place it in the dishwasher. For stubborn stains, use a mix of baking soda and vinegar.
  2. Sealing Ring: Remove and soak the ring in warm, soapy water. If it retains food odors, soak it in a vinegar-water solution.
  3. Lid: Wash the lid thoroughly under running water, paying close attention to the steam release valve.
  4. Exterior: Wipe down the outer housing with a damp cloth. Never submerge the base in water.

Regular maintenance keeps your Instant Pot performing its best, ensuring flawless dishes like Instant Pot Marry Me Chicken Pasta.

What sides to eat with Tuscan chicken?

Tuscan chicken, with its creamy and savory flavors, pairs beautifully with a variety of sides. Here are a few ideas:

  • Garlic Mashed Potatoes: The creamy texture complements the rich sauce.
  • Grilled Asparagus: Its slightly charred flavor balances the chicken’s creaminess.
  • Fresh Bread: A crusty baguette or focaccia is perfect for soaking up the sauce.
  • Simple Green Salad: A light salad with vinaigrette adds a refreshing contrast.

These sides also pair wonderfully with Instant Pot Marry Me Chicken Pasta, making them versatile options for your table.

How do you clean the inside of an Instant Pot?

Cleaning the inside of your Instant Pot is simple and essential for maintaining its performance:

  • For the Inner Pot: Remove it and clean with warm soapy water or a non-abrasive sponge. If food has stuck to the bottom, soak it with hot water and dish soap for a few minutes before scrubbing gently.
  • Steam Release Valve: Check and clean this part regularly to ensure safety and proper functionality.
  • Burnt Residue: If you encounter burnt-on residue, a paste made of baking soda and water can work wonders. Gently scrub, then rinse thoroughly.

Proper cleaning ensures your Instant Pot remains in excellent condition, ready to whip up dishes like Instant Pot Marry Me Chicken Pasta effortlessly.

Conclusion

There’s a reason why Instant Pot Marry Me Chicken Pasta has captured the hearts (and stomachs) of so many it’s quick, easy, and packed with irresistible flavor. With its tender chicken, creamy Parmesan sauce, and tangy sun-dried tomatoes, this recipe truly feels like a restaurant-quality meal that you can make in under 30 minutes.

From learning how to make it step-by-step to customizing it with different proteins or veggies, you now have all the tools to master this dish. Whether you’re serving it for a cozy dinner or meal-prepping for the week, it’s sure to impress every time.

So, grab your Instant Pot, gather your ingredients, and get ready to fall in love with Instant Pot Marry Me Chicken Pasta. Don’t forget to experiment with sides or share your own twists on this beloved recipe.