How To Make shrimp garlic recipe -butter In 15 Minutes

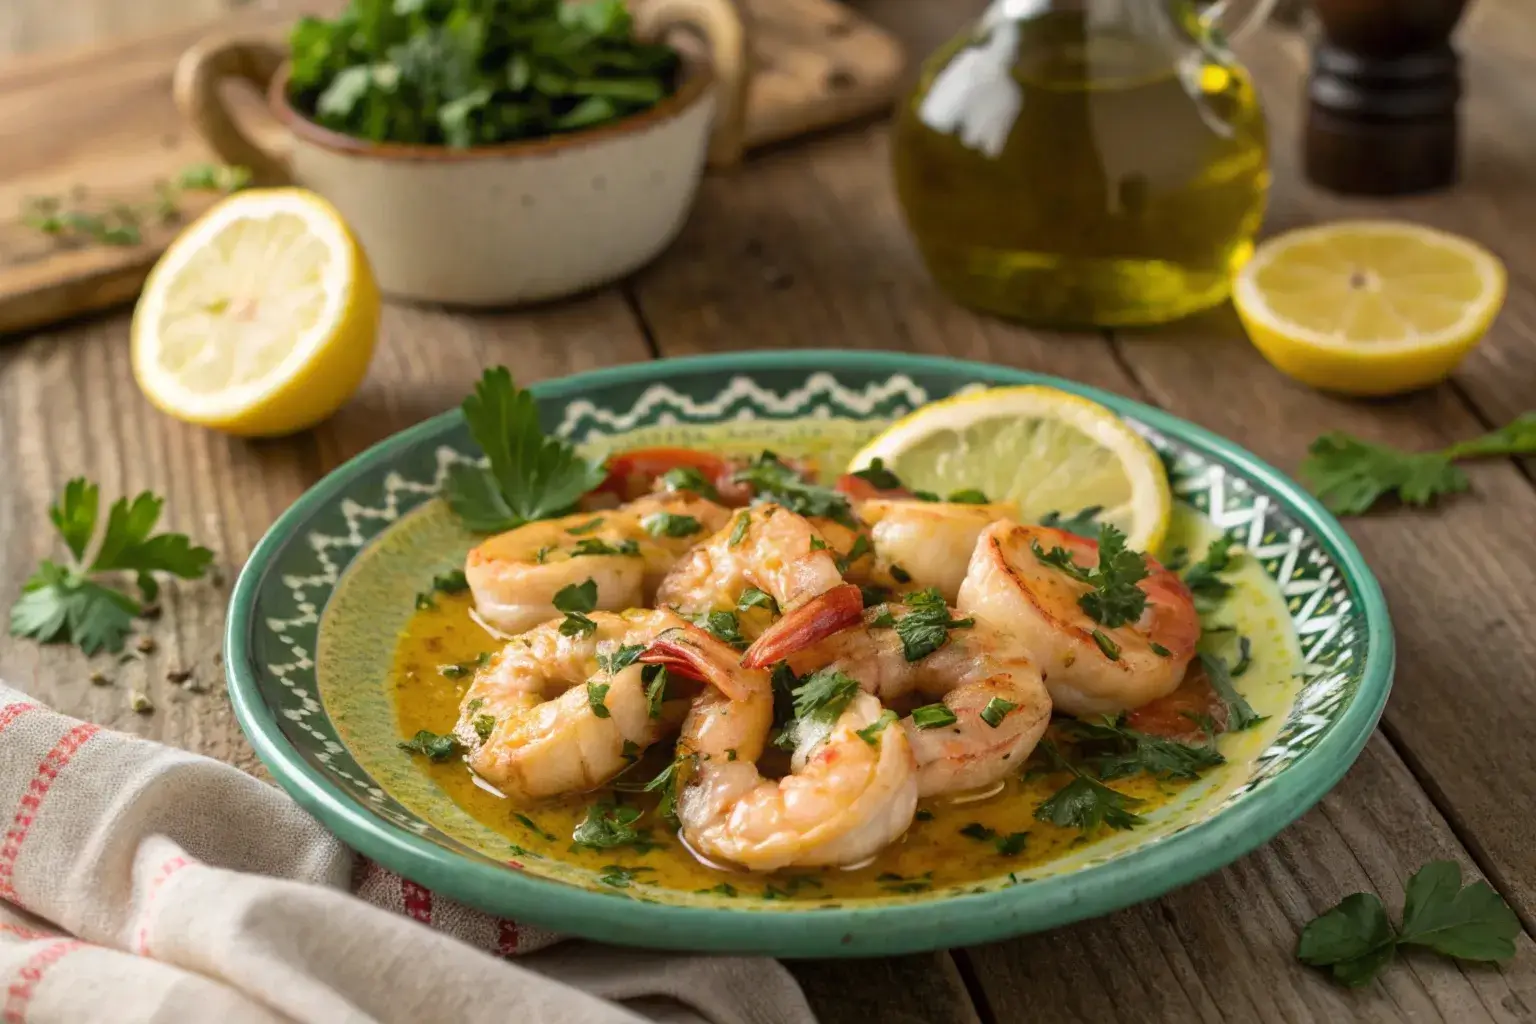
If you think butter is the secret to delicious shrimp dishes, think again! This shrimp garlic recipe -butter proves that you can achieve incredible flavor and richness without it. Picture this: tender shrimp, sizzling in a fragrant mix of garlic and olive oil, with hints of fresh lemon and herbs to brighten every bite. It’s a simple yet sophisticated recipe that’s ready in minutes, perfect for those evenings when time is tight but you still want something special. Plus, it’s healthier and completely dairy-free, making it a go-to for anyone with dietary restrictions. So, whether you’re serving it with crusty bread, tossing it into pasta, or eating it straight from the skillet, one thing’s for sure you’re in for a treat!

Why Choose a Butter-Free Shrimp Garlic Recipe?

The Health Benefits of Cooking Without Butter

Choosing to make a shrimp garlic recipe -butter isn’t just a tasty choice it’s also a healthier one. By skipping butter, you reduce saturated fats and calories without sacrificing flavor. Olive oil, often used as a substitute, is rich in healthy fats that support heart health. For those looking to maintain a balanced diet, this butter-free version is a no-brainer.

On the other hand, butter-free cooking also caters to dietary needs. If you’re lactose intolerant or following a dairy-free lifestyle, this recipe fits perfectly into your plan. Plus, garlic itself offers numerous health benefits, such as boosting immunity and improving heart health. Therefore, this recipe is a win-win for flavor and nutrition.

Flavor Profiles: How Garlic and Shrimp Shine Without Butter

One might wonder if removing butter will compromise the dish’s flavor. The answer? Not at all! A shrimp garlic recipe -butter relies on the rich, aromatic qualities of garlic and olive oil to bring the dish to life. As garlic caramelizes in olive oil, it develops a sweet, nutty flavor that pairs perfectly with the natural sweetness of shrimp.

In addition, using fresh herbs like parsley or thyme enhances the dish’s overall flavor. For a zesty twist, a squeeze of fresh lemon juice brightens up the shrimp, balancing its richness. These layers of flavor show that butter isn’t necessary to create a memorable dish it’s all about choosing complementary ingredients.

A Quick and Easy Dinner Solution for Busy Days

Let’s face it: weeknight dinners need to be quick and hassle-free. That’s where this shrimp garlic recipe -butter truly shines. With just a handful of ingredients and a single skillet, you can create a restaurant-quality meal in under 15 minutes. It’s perfect for those evenings when you’re short on time but still want something satisfying.

The best part? This dish is versatile. You can serve it over pasta, rice, or even a bed of roasted vegetables for a complete meal. For inspiration, check out this guide to pairing shrimp with side dishes. Whether it’s a last-minute dinner for two or a family feast, this recipe is your go-to solution.

A Versatile Recipe for Every Occasion

What makes a shrimp garlic recipe -butter so special is its adaptability. Hosting a dinner party? Serve this dish as an appetizer alongside crusty bread for dipping. Need a protein-packed lunch? Toss it into a salad with your favorite greens and a tangy vinaigrette. The possibilities are endless.

In addition, this recipe is a great way to experiment with flavors. Add a pinch of red pepper flakes for some heat, or sprinkle grated Parmesan on top for extra indulgence. The beauty of this dish lies in its simplicity you can make it your own while keeping it light and delicious.

Essential Ingredients for a Delicious Shrimp Garlic Recipe -Butter

Must-Have Ingredients for Butter-Free Garlic Shrimp

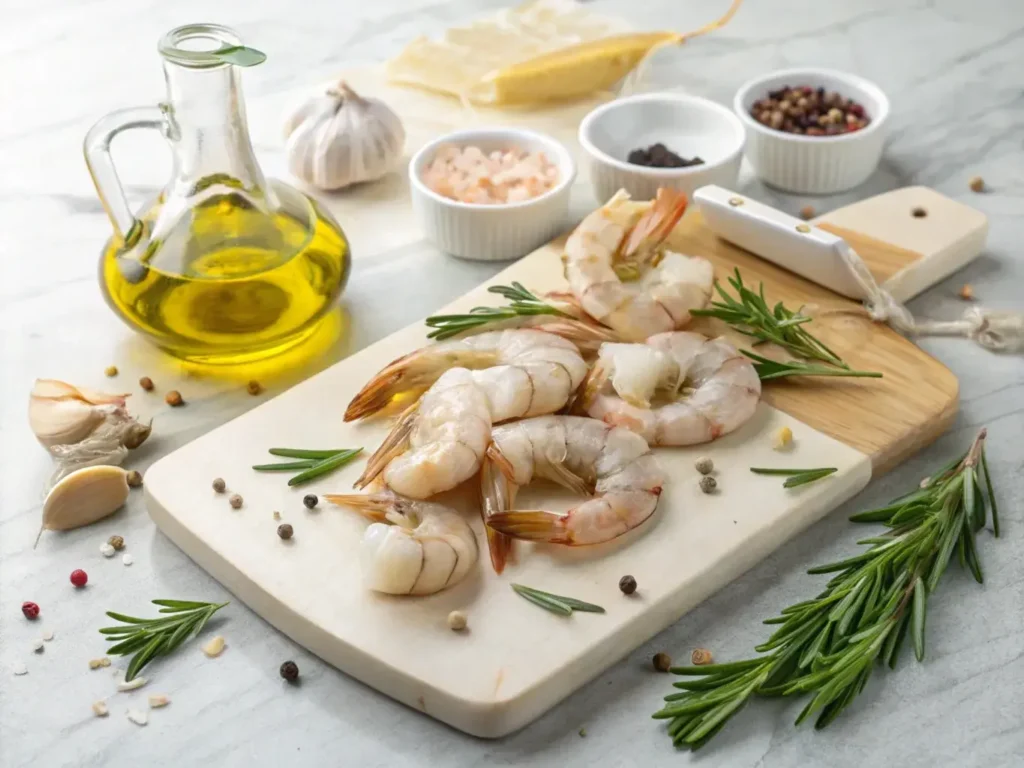
For a shrimp garlic recipe -butter, quality ingredients make all the difference. Here’s what you’ll need:

  1. Shrimp: Use fresh or frozen shrimp, peeled and deveined for convenience. Medium to large shrimp work best, as they cook quickly while staying juicy.
  2. Garlic: Freshly minced garlic is key to this recipe. It infuses the dish with a rich, aromatic flavor.
  3. Olive Oil: A healthier and equally flavorful alternative to butter, olive oil helps sauté the garlic and shrimp beautifully.
  4. Lemon Juice: A splash of fresh lemon juice adds brightness, enhancing the shrimp’s natural sweetness.
  5. Herbs and Spices: Parsley, red pepper flakes, salt, and black pepper round out the dish with layers of flavor.

When choosing your ingredients, opt for wild-caught shrimp if possible, as they often have a better texture and taste compared to farmed options.

Add-Ins to Elevate Your Shrimp Garlic Dish

While the base ingredients are delicious on their own, adding a few extras can elevate this shrimp garlic recipe -butter to a whole new level:

  • Chili Flakes: For those who enjoy a spicy kick, a pinch of chili flakes is a simple yet effective addition.
  • Paprika: Smoked or sweet paprika can introduce a subtle depth to the dish.
  • Vegetables: Sautéed zucchini, cherry tomatoes, or asparagus pair wonderfully with the shrimp and garlic.

Adding a few of these optional ingredients lets you tailor the dish to your taste preferences or what you have on hand in your pantry.

Ingredient Substitutions for a Custom Twist

What if you’re out of certain ingredients? No worries! Here are some simple swaps for your shrimp garlic recipe -butter:

  • Replace olive oil with avocado oil for a neutral flavor and high smoke point.
  • Use lime juice instead of lemon juice for a tangy variation.
  • If garlic cloves aren’t available, substitute with garlic powder, though fresh garlic is always preferred for authenticity.

These substitutions make the recipe adaptable, ensuring you can enjoy it even if you’re missing a key ingredient.

How to Select the Best Ingredients for Garlic Shrimp

Selecting the best ingredients ensures your dish shines. For shrimp, look for a firm texture, a translucent appearance, and no fishy odor. Frozen shrimp are also great, especially when they’re flash-frozen immediately after being caught.

For garlic, avoid pre-minced options in jars as they lack the same punchy flavor. Fresh garlic cloves, when minced at home, release essential oils that make this dish truly irresistible. Lastly, use extra virgin olive oil for the best taste, and fresh herbs whenever possible they make a noticeable difference!

Step-by-Step Guide to Cooking a Shrimp Garlic Recipe -Butter

Preparing Your Ingredients

Preparing fresh shrimp, garlic, and olive oil for a butter-free recipe.
Fresh ingredients for a shrimp garlic recipe without butter.

Before you dive into cooking, it’s essential to have everything ready. Proper preparation ensures that your shrimp garlic recipe -butter comes together smoothly:

  1. Clean the Shrimp: Start by peeling and deveining the shrimp. If you’re using frozen shrimp, thaw them under cold water and pat them dry with a paper towel.
  2. Mince the Garlic: Freshly minced garlic works best for this recipe. Its strong aroma and rich flavor elevate the dish.
  3. Measure the Ingredients: Have all your seasonings, olive oil, and lemon juice measured and ready to go. This makes the cooking process faster and more efficient.

By preparing ahead, you’ll ensure that your dish is cooked perfectly and remains stress-free.

The Cooking Process: From Pan to Plate in Minutes

Shrimp sautéed with garlic in a skillet with olive oil.
Shrimp sizzling in a garlic and olive oil mixture.

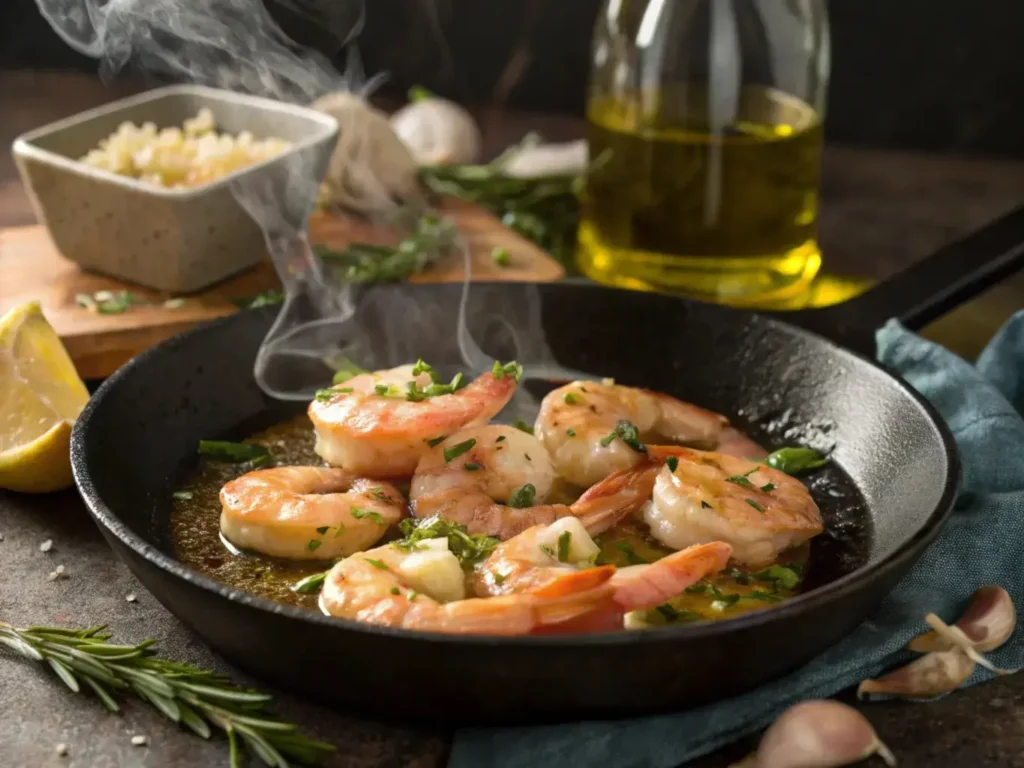
Cooking this shrimp garlic recipe -butter is straightforward and quick. Follow these steps:

  1. Heat the Olive Oil: In a large skillet, warm two tablespoons of olive oil over medium heat. Once it’s shimmering, add the minced garlic.
  2. Cook the Garlic: Stir the garlic constantly for 30 seconds until it becomes fragrant. Be careful not to let it burn, as this can make it bitter.
  3. Add the Shrimp: Place the shrimp into the pan in a single layer. Cook for 2-3 minutes per side until they turn pink and opaque.
  4. Season and Serve: Add salt, black pepper, and a splash of lemon juice to taste. Garnish with fresh parsley for added freshness.

This process takes just about 10 minutes, making it ideal for busy weeknights or last-minute meals.

Tips for Perfectly Sautéed Shrimp

Cooking shrimp can be tricky, but with these tips, you’ll achieve tender, flavorful results every time:

  • Use High Heat: High heat ensures the shrimp cook quickly, sealing in their juices and preventing them from becoming rubbery.
  • Don’t Overcrowd the Pan: Overcrowding traps steam, which can make the shrimp soggy instead of crispy on the outside. Cook in batches if necessary.
  • Flip Only Once: Resist the urge to stir constantly. Let the shrimp cook undisturbed for 2-3 minutes per side to develop a slight sear.

By keeping these tips in mind, your shrimp garlic recipe -butter will turn out perfectly every time.

Serving Suggestions for a Balanced Meal

shrimp garlic recipe -butter served over linguine with parsley and lemon.
A perfect pairing of garlic shrimp and linguine.

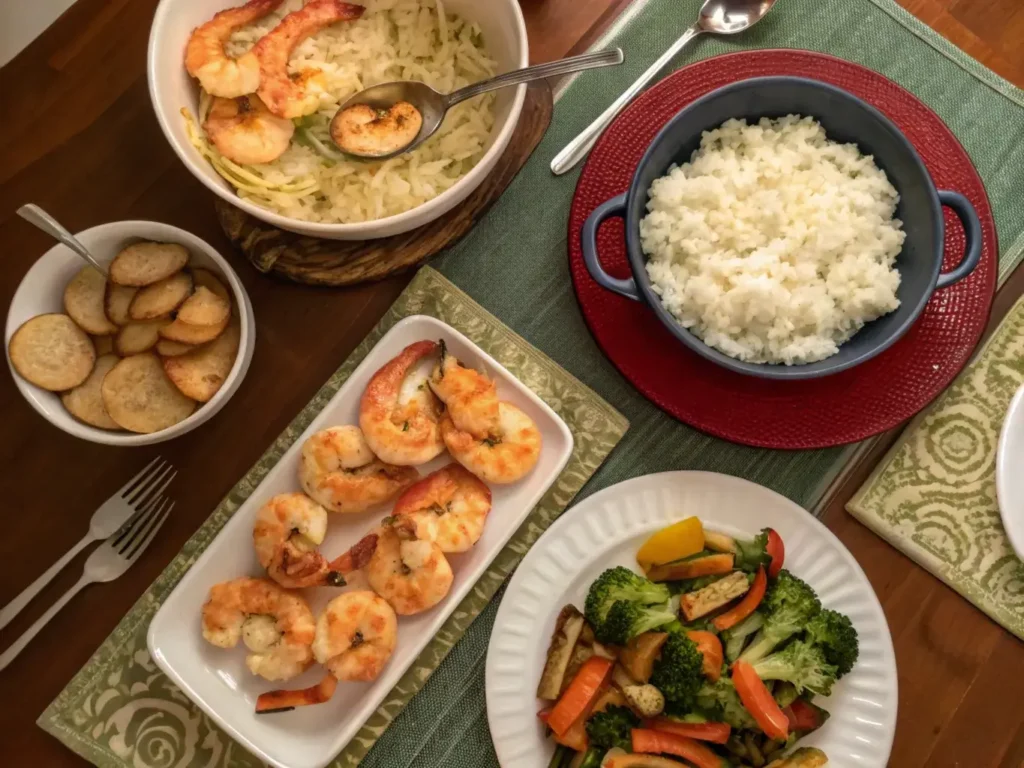
This shrimp garlic recipe -butter is versatile and pairs wonderfully with various side dishes. Here are some ideas:

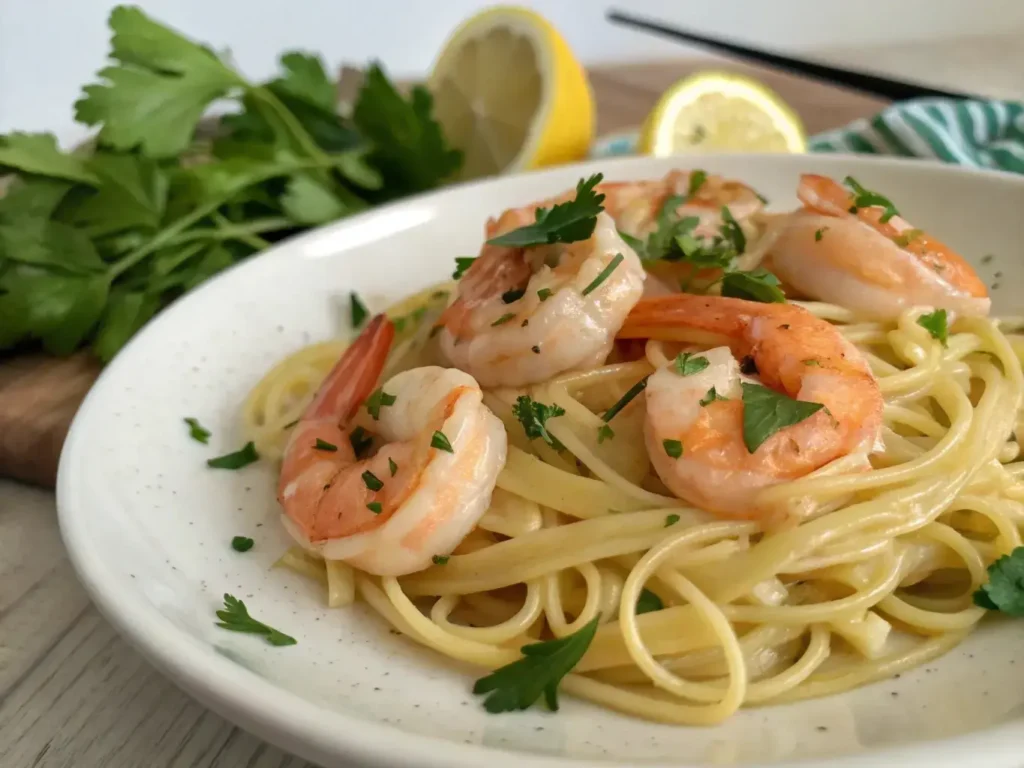
  1. Over Pasta: Toss the shrimp and garlic sauce with linguine or spaghetti for a hearty meal.
  2. With Rice: Serve the shrimp over steamed jasmine rice or cauliflower rice for a lighter option.
  3. As a Topping: Use the shrimp as a topping for a fresh salad with mixed greens, cherry tomatoes, and cucumbers.
  4. With Vegetables: Pair the dish with roasted asparagus or sautéed zucchini for a complete meal.

Why Olive Oil is the Ideal Substitute for Butter

Health Advantages of Olive Oil

When crafting a shrimp garlic recipe -butter, olive oil is the perfect substitute for butter. It’s not only a flavorful alternative but also a healthier one. Olive oil is packed with monounsaturated fats, which are known to support heart health and lower bad cholesterol levels. Unlike butter, it contains no saturated fats, making it a great choice for anyone aiming to maintain a balanced diet.

In addition, olive oil is rich in antioxidants, such as vitamin E, which protect your cells from damage. Therefore, replacing butter with olive oil in your cooking doesn’t just cut calories it adds nutritional value to your meals.

Flavor Compatibility with Shrimp and Garlic

One of the main reasons olive oil shines in a shrimp garlic recipe -butter is its ability to complement the natural flavors of shrimp and garlic. The mild, fruity notes of olive oil allow the garlic’s robust aroma and shrimp’s sweetness to take center stage.

In contrast, butter can sometimes overpower these delicate flavors with its richness. Olive oil, on the other hand, enhances the dish without masking its key ingredients. For an extra flavor boost, consider using extra virgin olive oil, which has a more pronounced taste and aroma.

Other Cooking Oils to Consider

While olive oil is a fantastic choice, other oils can work well in a shrimp garlic recipe -butter, depending on your preferences or what you have on hand:

  1. Avocado Oil: This oil has a neutral flavor and a high smoke point, making it perfect for sautéing shrimp.
  2. Coconut Oil: For a slightly sweet and tropical twist, coconut oil is a great option, though it may alter the dish’s flavor profile.
  3. Grapeseed Oil: Light and versatile, grapeseed oil is another excellent alternative that pairs nicely with garlic and shrimp.

When choosing a substitute, consider the flavor and health benefits each oil brings to your recipe. However, olive oil remains a top choice for its balance of flavor, nutrition, and versatility.

Tips for Cooking with Olive Oil

To get the most out of olive oil in your shrimp garlic recipe -butter, keep these tips in mind:

  • Use Medium Heat: Olive oil has a lower smoke point than some other oils, so cook over medium heat to avoid burning it.
  • Choose High-Quality Oil: Extra virgin olive oil offers the best flavor and health benefits. Look for cold-pressed varieties for maximum freshness.
  • Add Lemon Juice After Cooking: If your dish includes lemon juice, add it after removing the shrimp from the heat. This prevents the acidity from breaking down the oil and ensures a bright, fresh flavor.

By following these tips, you’ll ensure your dish is both flavorful and nutritious.

Common Mistakes to Avoid When Making Garlic Shrimp

Using Low-Quality Ingredients

When preparing a shrimp garlic recipe -butter, the quality of your ingredients matters more than you might think. Shrimp that’s not fresh or improperly frozen can result in a bland or rubbery texture. Similarly, using pre-minced garlic from a jar often leads to a less flavorful dish, as it lacks the punch of freshly minced garlic.

To avoid this, always opt for fresh or properly frozen shrimp and freshly minced garlic. If you’re unsure how to select quality shrimp, look for firm, translucent flesh and avoid any that have a strong fishy odor. These small steps ensure your dish is bursting with flavor.

Overcooking Shrimp

One of the most common pitfalls in a shrimp garlic recipe -butter is overcooking the shrimp. Shrimp cook remarkably quickly—just 2-3 minutes per side. When overcooked, they turn rubbery and lose their delicate, sweet flavor.

To avoid this, watch for visual cues. Shrimp are done when they turn opaque and pink with a slight curl. They should form a “C” shape rather than a tight spiral. Remember, it’s always better to slightly undercook shrimp and let them finish cooking in the residual heat of the pan.

Skipping the Garlic Prep

Garlic is the star of this dish, but improper preparation can lead to uneven cooking or a bitter taste. Burning garlic is a common mistake that can ruin your shrimp garlic recipe -butter. Garlic burns quickly, especially over high heat, and develops an unpleasant bitterness.

To prevent this, mince your garlic finely and stir it constantly when adding it to the hot oil. This ensures even cooking and releases the garlic’s aromatic oils, which infuse the shrimp with flavor.

Overloading the Pan

Cooking too many shrimp at once is another frequent error that can impact the dish’s quality. Overloading the pan causes the shrimp to steam instead of sear, resulting in a soggy texture rather than a crisp, flavorful exterior.

For the best results, cook the shrimp in batches if your skillet is small. This allows each piece to develop a nice sear, enhancing both texture and flavor. After all, part of what makes a shrimp garlic recipe -butter so delicious is its lightly caramelized surface.

FAQs

What goes well with garlic shrimp?

Family dinner table with garlic shrimp, rice, and vegetables.
A family-style dinner featuring garlic shrimp and complementary sides.

Garlic shrimp pairs beautifully with a variety of sides, making it a versatile dish. Popular options include:

  • Pasta: Toss your shrimp garlic recipe -butter with linguine or spaghetti for a hearty, satisfying meal. Add a drizzle of olive oil and sprinkle of Parmesan for extra flavor.
  • Rice: Steamed jasmine or basmati rice works wonderfully, as it absorbs the savory garlic and shrimp juices. For a low-carb option, try cauliflower rice.
  • Vegetables: Roasted asparagus, sautéed zucchini, or a fresh green salad make light and healthy pairings.
  • Bread: Crusty bread or garlic bread is perfect for soaking up the rich sauce.

These combinations allow you to tailor the dish to any occasion, from casual dinners to elegant gatherings.

What’s the tastiest way to cook shrimp?

The tastiest way to cook shrimp depends on the recipe, but for a shrimp garlic recipe -butter, sautéing is ideal. Cooking shrimp in a hot skillet with olive oil and garlic creates a lightly seared, flavorful coating while keeping the shrimp juicy and tender.

Other delicious methods include grilling or broiling, which add a smoky depth to the shrimp’s natural sweetness. Whatever cooking style you choose, ensure the shrimp are not overcooked—they only need a few minutes per side to become perfectly done.

What sauces go well with shrimp?

Shrimp is incredibly versatile and pairs well with a range of sauces, including:

  • Garlic Butter Sauce: For a more indulgent variation, use a butter-free alternative like olive oil garlic sauce in your shrimp garlic recipe -butter.
  • Lemon Herb Sauce: A zesty mix of lemon juice, olive oil, and fresh herbs like parsley or dill enhances shrimp’s natural flavors.
  • Creamy Alfredo Sauce: If you’re serving shrimp with pasta, this rich, cheesy sauce is a fantastic choice.
  • Spicy Aioli: For a kick, serve shrimp with a dipping sauce made of mayonnaise, garlic, and chili paste.

These sauces elevate shrimp dishes, offering diverse flavor profiles to suit any palate.

Why do you soak shrimp in milk before frying?

Soaking shrimp in milk before frying serves two purposes:

  1. Reduces Odor: Milk helps neutralize the strong, fishy smell that some shrimp may have, ensuring a milder, fresher flavor.
  2. Tenderizes the Meat: The enzymes in milk can soften the shrimp, making it juicier and more tender after cooking.

Although this step isn’t necessary for a shrimp garlic recipe -butter, it’s an excellent tip for other shrimp preparations, particularly fried or breaded versions.

Conclusion

By now, you’ve discovered that a shrimp garlic recipe -butter is not only delicious but also versatile, healthy, and quick to prepare. From choosing high-quality ingredients like fresh shrimp and olive oil to mastering the art of sautéing, this dish brings bold flavors without the need for butter. You’ve also learned how to avoid common cooking mistakes, like overcrowding the pan or overcooking the shrimp, ensuring a perfect dish every time.

Whether you’re serving it with pasta, rice, or roasted vegetables, this recipe fits seamlessly into any meal plan. Plus, with tips for pairing sauces and sides, you can easily customize it to suit your taste and occasion.

sausage balls without Bisquick recipe – Quick & Tasty!

Did you know you can make sausage balls without Bisquick and still achieve that perfectly fluffy, cheesy goodness? It’s true! This recipe takes the classic appetizer to the next level by ditching the mix and going all-natural. With just a handful of simple ingredients sausage, flour, baking powder, cheese, and a pinch of seasoning you can craft a dish that’s homemade and irresistibly delicious.

Perfect for any occasion, these sausage balls make a great addition to your breakfast spread, a quick snack, or a crowd-pleasing appetizer. Plus, you’ll love the flexibility to tweak the flavors to suit your taste buds. Whether you’re a fan of spicy sausage or sharp cheddar, this recipe adapts to your cravings. Ready to discover the secret to these savory delights? Let’s get cooking!

Why Make Sausage Balls Without Bisquick?

The Benefits of Going Bisquick-Free

When you choose a sausage balls without Bisquick recipe, you’re opting for fresh, wholesome ingredients that put you in control. Bisquick may be convenient, but it often includes additives and preservatives that some prefer to avoid. By making this dish from scratch, you’ll create a more natural, delicious result that’s just as easy to prepare.

Another benefit? Customization. Without pre-made mixes, you can adjust the recipe to suit your preferences. For instance, you can make it gluten-free by swapping out flour for almond or coconut flour. Plus, the flavor is richer and more authentic when you skip the shortcuts.

Homemade vs. Store-Bought

Homemade recipes, like this sausage balls without Bisquick recipe, offer unmatched flexibility. Store-bought mixes often limit you to a single flavor profile, while homemade recipes allow you to play with seasonings, cheeses, and even types of sausage. Want to add a hint of spice? Mix in cayenne or jalapeños. Prefer a milder taste? Stick with mild cheddar and breakfast sausage.

Furthermore, by making your own dough, you ensure a fresher, fluffier texture. Bisquick-based recipes can sometimes result in dense sausage balls due to the added chemicals in the mix. With this recipe, you’ll experience that perfect balance of crispy on the outside and tender on the inside.

Perfect Occasions for Sausage Balls Without Bisquick Recipe

Whether you’re hosting a holiday party, preparing a quick snack, or looking for an easy breakfast idea, these sausage balls fit the bill. The beauty of this sausage balls without Bisquick recipe is its versatility. They’re small, portable, and packed with flavor, making them ideal for gatherings or on-the-go munching.

Consider serving them as appetizers with a side of honey mustard or barbecue sauce. Or, include them in your brunch spread alongside fresh fruit and baked goods. They’re also a hit at tailgate parties, where finger foods reign supreme. Whatever the occasion, these sausage balls are sure to be a crowd-pleaser.

Why Customize Your Sausage Balls Without Bisquick Recipe?

Making sausage balls from scratch isn’t just about taste it’s about tailoring the recipe to meet your dietary needs. If you’re gluten-sensitive, a sausage balls without Bisquick recipe lets you swap in gluten-free flour without compromising flavor. Watching your carb intake? Almond flour is a great low-carb alternative.

In addition, you control the sodium, fat, and seasoning levels. Store-bought mixes often contain hidden salt and sugar, but with this recipe, you can adjust to your liking. For inspiration on how to create healthier recipes, visit Harvard’s Healthy Eating Plate, which outlines balanced meal planning.

The Perfect Sausage Balls Without Bisquick Recipe

Essential Ingredients

For this sausage balls without Bisquick recipe, you only need a handful of pantry staples to create something amazing. The primary ingredients include:

  • Ground sausage: Choose a flavorful variety, such as mild or spicy, depending on your taste preferences.
  • All-purpose flour: This serves as the base and replaces Bisquick for a homemade touch.
  • Baking powder: Essential for achieving that light, fluffy texture.
  • Shredded cheese: Cheddar is the classic choice, but feel free to experiment with mozzarella or pepper jack.
  • Milk: Helps bind the ingredients together for a moist, cohesive dough.
  • Optional seasonings: Add garlic powder, paprika, or a pinch of cayenne for extra flavor.

By using these simple ingredients, you avoid the preservatives often found in pre-made mixes, making your sausage balls healthier and fresher.

Step-by-Step Instructions

Rolling raw sausage balls onto a lined baking tray.
Rolling sausage balls from scratch and placing them on a prepared baking tray.

Creating these delicious sausage balls is straightforward and quick. Here’s how you can make them:

  1. Preheat the oven: Set it to 375°F (190°C) and line a baking sheet with parchment paper.
  2. Prepare the dry ingredients: In a large mixing bowl, combine the flour, baking powder, and any optional seasonings.
  3. Mix in the wet ingredients: Add the ground sausage, shredded cheese, and milk. Use your hands to gently combine everything until the mixture comes together. Be careful not to overmix, as this can result in dense sausage balls.
  4. Shape the dough: Roll the mixture into 1-inch balls and place them on the prepared baking sheet.
  5. Bake to perfection: Bake for 18–20 minutes or until the sausage balls are golden brown and cooked through.

These step-by-step instructions make this sausage balls without Bisquick recipe simple enough for even beginner cooks to follow.

Pro Tips for Success

To achieve the best results, keep these tips in mind:

  • Use freshly shredded cheese: Pre-shredded cheese often contains anti-caking agents that can affect texture. Shredding your own ensures a smoother, more flavorful result.
  • Chill the dough if needed: If your mixture feels too soft to shape, refrigerate it for 15 minutes to firm up.
  • Don’t overcrowd the baking sheet: Space the sausage balls evenly to allow proper airflow and even cooking.

For additional baking tips, check out King Arthur Baking’s guide for working with dough, ensuring consistent results every time.

What Makes This Recipe Stand Ou

Unlike traditional methods that rely on Bisquick, this recipe allows you to customize every detail. Want to reduce carbs? Swap all-purpose flour for almond flour. Need a gluten-free option? Coconut flour works beautifully with slight adjustments. Additionally, the absence of pre-made mixes ensures a fresher, more authentic taste.

Another standout feature is its versatility. These sausage balls pair perfectly with dips like ranch dressing or spicy mustard, making them ideal for parties, game days, or brunch spreads. With this sausage balls without Bisquick recipe, you’re not just making a dish you’re creating a culinary experience tailored to your preferences.

Customizing Your Sausage Balls Recipe

Flavor Variations

One of the best things about this sausage balls without Bisquick recipe is how easily you can adapt it to your preferences. For a spicy kick, consider using hot sausage or adding a pinch of cayenne pepper to the mix. You can also sprinkle in red pepper flakes for extra heat.

On the other hand, if you prefer a milder flavor, opt for breakfast sausage and stick to classic cheddar cheese. Herbs like parsley or chives can add a fresh, aromatic touch, while a dash of garlic powder enhances the savory notes. Don’t be afraid to experiment this recipe is as flexible as it is delicious!

Cheese Swaps

Cheese is a key ingredient in any great sausage ball recipe, and this one is no different. While sharp cheddar is the traditional choice, you can switch things up by trying pepper jack for a spicier profile or mozzarella for a creamier texture.

Another option is to mix two cheeses together. For example, combining cheddar and Gouda creates a rich, smoky flavor that pairs perfectly with sausage. Whatever you choose, always shred your cheese fresh—it melts better and blends more evenly with the other ingredients.

Dietary Modifications

This sausage balls without Bisquick recipe can be easily modified to suit various dietary needs. If you’re following a gluten-free diet, replace the all-purpose flour with a gluten-free blend. Almond flour also works well, especially if you’re aiming for a low-carb version. However, you may need to adjust the liquid slightly, as almond flour absorbs more moisture.

Vegetarian? You’re not left out! Substitute plant-based sausage, which is widely available in most grocery stores. Brands like Beyond Meat or Impossible Sausage offer excellent flavor and texture for this recipe. These small tweaks ensure that everyone at the table can enjoy this dish.

Serving Ideas

Sausage balls served with scrambled eggs and fresh fruit.
A balanced breakfast spread featuring sausage balls, scrambled eggs, and fresh fruit.

Sausage balls are as versatile as they are delicious, making them perfect for countless occasions. Serve them as a warm appetizer at parties with a side of honey mustard or barbecue sauce. Alternatively, pair them with scrambled eggs and fresh fruit for a hearty breakfast spread.

For game days, consider presenting them alongside other finger foods like sliders or veggie trays. If you’re hosting a holiday brunch, these sausage balls fit right in next to baked casseroles and pastries. Their portability and crowd-pleasing taste make them an effortless addition to any meal.

Common Mistakes to Avoid

Overmixing the Dough

One of the most common pitfalls when preparing a sausage balls without Bisquick recipe is overmixing the dough. While it might seem like a good idea to ensure everything is thoroughly combined, excessive mixing can make the texture dense and chewy instead of light and tender.

To avoid this, mix the ingredients just until they are evenly distributed. A few small pockets of flour or cheese are perfectly fine. Using your hands instead of a mixer can help you maintain better control over the consistency, ensuring the sausage balls remain soft and airy.

Using Lean Sausage

Choosing the right sausage is crucial for flavor and texture. Lean sausage, while lower in fat, can result in dry and less flavorful sausage balls. The fat in regular sausage not only adds moisture but also enhances the taste, giving you that irresistible savory bite.

If you’re trying to cut back on fat, consider using a combination of lean sausage and a small amount of regular sausage to maintain the right balance. However, skipping the fat altogether may compromise the quality of this sausage balls without Bisquick recipe. Always prioritize flavor and texture when selecting your ingredients.

Skipping Pre-Cooked Tests

Testing a small portion of the mixture before shaping all your sausage balls might feel unnecessary, but it’s a game-changer. This step allows you to adjust seasonings, ensuring the final batch is perfectly flavored.

To do this, simply cook a small piece of the dough in a skillet or microwave and taste it. If it needs more salt, spices, or cheese, now is the time to add them. This extra step guarantees a consistent and delicious batch, which is especially important for large gatherings or special events.

Baking on an Unlined Tray

Another mistake to avoid is baking directly on an unlined tray. Without a non-stick surface, the sausage balls may stick, making cleanup difficult and potentially ruining their shape. Instead, line your tray with parchment paper or use a silicone baking mat. These materials prevent sticking and promote even cooking, ensuring your sausage balls bake up golden brown and delicious.

Additionally, spacing the sausage balls evenly on the tray is important. Overcrowding can lead to uneven cooking, so leave enough room between each ball for air to circulate properly.

How to Store, Reheat, and Serve Sausage Balls

Storage Tips

 Sausage balls stored in a glass airtight container.
Sausage balls stored in a labeled container, ready for freezing or refrigeration.

Proper storage ensures your sausage balls without Bisquick recipe stays fresh and delicious, even if you make them ahead of time. Once cooled, place the sausage balls in an airtight container and refrigerate them. They will stay fresh for up to 4 days.

For longer storage, consider freezing. Arrange the cooked sausage balls on a baking sheet, freeze them until solid, and then transfer them to a freezer-safe bag. This prevents them from sticking together and allows you to grab only the amount you need later. Frozen sausage balls can last up to 3 months, making them a convenient make-ahead option for parties or busy mornings.

Reheating Instructions

Reheating your sausage balls without Bisquick recipe is quick and easy, and it ensures they taste just as good as when freshly baked. For the best results, use an oven or air fryer, which helps maintain their crispy exterior.

  1. Oven method: Preheat your oven to 350°F (175°C). Place the sausage balls on a baking sheet and warm them for 8–10 minutes, or until heated through.
  2. Air fryer method: Set your air fryer to 350°F and reheat for about 5 minutes.
  3. Microwave method: Although less ideal, you can microwave them on a microwave-safe plate for 30–40 seconds. Keep in mind this may result in a softer texture.

By reheating gently, you’ll preserve the cheesy, savory goodness of your sausage balls without drying them out.

Serving Ideas

Sausage balls are incredibly versatile and pair well with various side dishes and dips. Serve them warm with dipping sauces like ranch, spicy mustard, or barbecue sauce for added flavor. These sauces complement the savory richness of the sausage and cheese, making them a hit at any gathering.

For a balanced breakfast, pair them with scrambled eggs, fresh fruit, or a simple salad. If you’re planning a brunch spread, sausage balls fit right in alongside casseroles, pastries, and other finger foods. They’re also perfect as a game-day snack when served with chips and salsa or other crowd-pleasing appetizers.

Tips for Serving at Parties

To keep your sausage balls without Bisquick recipe warm during a party, use a slow cooker or warming tray. Set the slow cooker to its lowest setting, and line it with parchment paper to prevent sticking. This method allows guests to enjoy warm sausage balls throughout the event.

Additionally, consider adding toothpicks or small skewers to make them easy to grab, especially for buffet-style setups. Presenting them alongside colorful dips or garnished with fresh herbs adds an extra layer of visual appeal, ensuring your dish is both delicious and inviting.

Frequently Asked Questions

What can you use instead of Bisquick in sausage balls?

If you’re making a sausage balls without Bisquick recipe, you can easily replace Bisquick with a mix of common pantry staples. Combine all-purpose flour, baking powder, and a pinch of salt for a simple DIY substitute. These ingredients provide the same structure and rise as Bisquick, but without the preservatives and additives. If you’re gluten-free, use a gluten-free flour blend or almond flour for a healthier alternative. Adjust the liquid slightly to ensure the dough binds properly when using alternative flours.

Why are my sausage balls so dry?

Dry sausage balls can result from using lean sausage, too much flour, or overbaking. Regular sausage with higher fat content keeps the mixture moist and flavorful. To fix this issue, consider adding a splash of milk or shredded cheese to the dough for extra moisture. Additionally, be cautious not to overbake—remove the sausage balls as soon as they turn golden brown and are cooked through. These small adjustments will keep your sausage balls without Bisquick recipe tender and delicious.

What is the best way to keep sausage balls warm?

To keep your sausage balls warm for a party or gathering, use a slow cooker or warming tray. Set the slow cooker to its lowest heat setting and line it with parchment paper to prevent sticking. If you’re using a warming tray, cover it with aluminum foil to retain heat. This method ensures your sausage balls without Bisquick recipe stay warm and ready to serve without drying out or overcooking.

Should sausage balls be frozen before or after cooking?

You can freeze sausage balls either before or after cooking, depending on your preference. Freezing before cooking ensures a fresher taste when baked later. Simply shape the sausage balls, freeze them on a baking sheet until solid, and transfer them to a freezer-safe bag. When ready to bake, you can cook them straight from frozen just add a few extra minutes to the baking time.

If you freeze them after cooking, they’re ready to reheat and serve anytime. Allow them to cool completely, then store in an airtight container or freezer bag. Reheat in the oven or air fryer to bring back their crispy texture.

Conclusion

This guide has shown you everything you need to create the ultimate sausage balls without Bisquick recipe. By skipping pre-made mixes, you gain control over the ingredients, allowing you to create a dish that’s healthier, customizable, and packed with fresh flavor. Whether you’re hosting a party, preparing a family brunch, or looking for an easy snack, these sausage balls are versatile and crowd-pleasing.

We’ve explored the key ingredients, step-by-step instructions, and common mistakes to avoid, ensuring your sausage balls turn out perfectly every time. Plus, with tips for storage, reheating, and serving, you’re fully equipped to enjoy these cheesy, savory bites whenever the craving strikes.

Now it’s your turn! Grab your ingredients, follow the recipe, and let your creativity shine. For more delicious ideas and tips, check out our other quick and easy recipes. Happy cooking!

5 Simple Recipes from ”recipe justalittlebite” That Anyone Can Make

Let’s face it sometimes, you just want a recipe that’s quick, tasty, and doesn’t leave your kitchen looking like a tornado hit it. That’s where recipe justalittlebite shines! With its knack for creating easy-to-follow recipes that deliver maximum flavor with minimal fuss, this is your go-to guide for everything from cozy dinners to irresistible desserts. Imagine whipping up a creamy pasta dish in minutes or surprising your family with a no-bake treat they’ll rave about for days. Sound tempting? You’re not alone! These recipes are designed to fit your busy life while still making mealtime special. Ready to get started?

Quick and Easy Breakfast Recipes

Fluffy Pancakes from Recipe Justalittlebite

Fluffy pancakes with fresh berries and maple syrup.
These fluffy pancakes are topped with fresh berries and a drizzle of maple syrup.

Nothing beats waking up to the smell of fresh, fluffy pancakes! This recipe justalittlebite takes the classic pancake to the next level by adding a creative twist. Whether you mix in blueberries, chocolate chips, or a hint of cinnamon, these pancakes are a breeze to make and even easier to enjoy. To get that perfect fluffy texture, use a touch of baking powder and avoid overmixing the batter. For an added treat, drizzle with warm maple syrup or top with whipped cream. Breakfast has never been this delightful!

Avocado Toast with a Hint of Lemon

Avocado toast might seem simple, but the recipe justalittlebite version adds a zesty lemon kick to wake up your taste buds. Start with crusty bread toasted to golden perfection. Then, mash a ripe avocado with a squeeze of lemon juice, a pinch of salt, and a sprinkle of chili flakes for a spicy edge. It’s a quick, healthy breakfast that’s loaded with flavor and packed with nutrients. Pair it with a poached egg for a protein boost. For more avocado toast variations, check out this trusted guide from Bon Appétit.

Sweet and Savory Crepes by Recipe Justalittlebite

Crepes are the ultimate breakfast treat, and with recipe justalittlebite, they’re easier than ever to master. Whether you prefer sweet or savory fillings, this versatile dish can be customized to your cravings. Fill your crepes with Nutella and bananas for a dessert-like indulgence, or opt for smoked salmon and cream cheese for something savory. The key is achieving a thin, golden crepe, so be sure to swirl the batter evenly in the pan. With a bit of practice, you’ll be making these delicate delights like a pro!

Overnight Oats with Chia Seeds

Overnight oats are a lifesaver for busy mornings, and the recipe justalittlebite version includes chia seeds for an extra nutritional punch. Simply combine oats, milk (or your favorite non-dairy alternative), and chia seeds in a jar. Add a drizzle of honey or maple syrup for sweetness, and let it sit overnight in the fridge. The result? A creamy, ready-to-eat breakfast that’s perfect on the go. You can top it with fresh berries, nuts, or shredded coconut for added texture and flavor. It’s quick, satisfying, and endlessly customizable.

Satisfying Lunch Ideas with Recipe Justalittlebite Inspiration

Creamy Tomato Basil Soup from Recipe Justalittlebite

When it’s lunchtime, nothing hits the spot like a warm, comforting bowl of soup. This recipe justalittlebite version of tomato basil soup is not only creamy and rich but also incredibly easy to prepare. Using simple ingredients like ripe tomatoes, fresh basil, and a splash of cream, you can create a meal that feels gourmet without the hassle. To elevate the flavor, consider roasting the tomatoes first it adds a subtle sweetness that pairs perfectly with the creamy base. Serve with crusty bread or a classic grilled cheese for the ultimate lunch duo. For more soup recipes, check out Quick Meals Recipes’ collection of hearty soups.

Mediterranean Chickpea Salad

ive dishes from recipe justalittlebite showcasing breakfast, lunch, dinner, and dessert options on a beautifully set table.
A refreshing Mediterranean chickpea salad packed with flavor and nutrients.

If you’re looking for a light yet filling lunch, this Mediterranean recipe justalittlebite is perfect. Packed with protein-rich chickpeas, crunchy cucumbers, and juicy tomatoes, this salad is a celebration of fresh ingredients. Toss everything with a tangy lemon vinaigrette, and sprinkle some crumbled feta cheese and fresh herbs for a burst of flavor. What’s great about this recipe is its versatility—you can add grilled chicken or swap the chickpeas for black beans if you’re in the mood for variety. It’s ideal for meal prep, too, as the flavors intensify when left to marinate.

Classic Grilled Cheese with a Gourmet Twist

A grilled cheese sandwich may sound simple, but this recipe justalittlebite takes it up a notch with a gourmet twist. Start with thick slices of sourdough bread and layer on a blend of cheeses like sharp cheddar, creamy mozzarella, and tangy Gruyère. For an extra kick, add caramelized onions, crispy bacon, or a dollop of spicy mustard. The key to perfection is cooking it slowly on medium heat, ensuring the bread is golden and crisp while the cheese melts to gooey perfection. It’s comfort food reimagined with sophistication.

Light Veggie Wraps by Recipe Justalittlebite

Veggie wraps are a lifesaver when you need a quick, no-cook lunch option. This recipe justalittlebite features fresh, crunchy vegetables like shredded carrots, bell peppers, and leafy greens, all wrapped in a soft tortilla. To add more depth, spread a layer of hummus or tzatziki before piling on the veggies. These wraps are not only delicious but also highly adaptable—throw in some grilled chicken or tofu for added protein. Plus, they’re perfect for lunchboxes or on-the-go meals, making them a versatile favorite.

Easy Dinner Recipes That Impress

One-Pot Garlic Butter Pasta from Recipe Justalittlebite

When it comes to quick and comforting dinners, this recipe justalittlebite for one-pot garlic butter pasta is a must-try. Made with a handful of pantry staples like pasta, garlic, and butter, this dish is both flavorful and fuss-free. The magic lies in cooking the pasta directly in the sauce, allowing it to absorb all the buttery goodness. Sprinkle with freshly grated Parmesan and parsley for a gourmet touch. On the other hand, if you prefer a creamier version, add a splash of heavy cream toward the end. This recipe is perfect for those busy weeknights when you want something delicious without spending hours in the kitchen.

Sheet Pan Lemon Herb Chicken

Sheet pan recipes are a game changer, and this recipe justalittlebite for lemon herb chicken is no exception. Juicy chicken thighs are marinated in a zesty lemon and herb blend, then roasted alongside colorful vegetables like carrots and zucchini. The result? A perfectly balanced dinner that’s as beautiful as it is delicious. Plus, cleanup is a breeze since everything cooks on one pan! For extra flavor, try adding garlic cloves or a sprinkle of smoked paprika.

Classic Beef Stroganoff

Few dishes can compete with the comforting richness of beef stroganoff. This recipe justalittlebite simplifies the classic by using tender strips of beef, sautéed mushrooms, and a creamy sauce made with sour cream. Serve it over egg noodles or mashed potatoes for a hearty meal that feels like a warm hug on a plate. To make it even easier, you can substitute the beef with ground beef or use pre-sliced mushrooms. While this dish is indulgent, it’s surprisingly quick to prepare, making it perfect for busy evenings when you still crave something special.

Easy Vegetarian Stir-Fry

For a lighter but equally satisfying dinner, this recipe justalittlebite for vegetarian stir-fry is a great choice. Packed with vibrant veggies like bell peppers, broccoli, and snap peas, this dish is as colorful as it is nutritious. The sauce, a blend of soy sauce, ginger, and sesame oil, ties everything together beautifully. Serve it over steamed rice or noodles for a complete meal. For added protein, toss in some tofu or chickpeas. The best part? You can customize this recipe with whatever vegetables you have on hand, making it a versatile and budget-friendly option.

Sweet and Simple Desserts Anyone Can Make

No-Bake Oreo Cheesecake

A no-bake Oreo cheesecake garnished with whipped cream and crushed Oreos.
This no-bake Oreo cheesecake is rich, creamy, and easy to make.

When it comes to easy desserts, this recipe justalittlebite for no-bake Oreo cheesecake is unbeatable. With just a handful of ingredients, you can create a rich, creamy treat that’s perfect for any occasion. The crust, made from crushed Oreos, provides the perfect base for the velvety cream cheese filling. Simply refrigerate it for a few hours, and voilà—you have a dessert that looks like it took hours but came together in minutes. For an extra special touch, garnish with whipped cream and whole Oreo cookies. This dessert is a guaranteed crowd-pleaser and ideal for those who love chocolatey indulgence without the hassle of baking.

3-Ingredient Peanut Butter Cookies

Sometimes, less really is more, and this recipe justalittlebite proves it. With only three simple ingredients—peanut butter, sugar, and an egg—you can whip up delicious cookies in no time. The result is a soft, chewy cookie with just the right amount of sweetness. If you want to switch things up, consider adding a pinch of sea salt or a drizzle of melted chocolate on top. These cookies are perfect for last-minute cravings or when you need a quick snack to share. Plus, they’re gluten-free, making them a great option for everyone to enjoy.

Classic Vanilla Pudding by Recipe Justalittlebite

This recipe justalittlebite for classic vanilla pudding brings back the comforting flavors of childhood. Made with simple pantry staples like milk, sugar, cornstarch, and vanilla extract, it’s both easy and satisfying. The key to getting a silky-smooth texture is whisking continuously while the pudding thickens on the stove. Once it’s ready, chill it in the fridge before serving. For a bit of flair, top it with fresh berries, whipped cream, or a sprinkle of cinnamon. Whether served as a standalone dessert or used as a filling for pies, this pudding is a timeless favorite.

Refreshing Berry Sorbet from Recipe Justalittlebite

For a light and refreshing dessert, this recipe justalittlebite for berry sorbet is an excellent choice. Made with fresh or frozen berries, a touch of sugar, and a squeeze of lemon juice, this sorbet is bursting with natural flavor. Simply blend the ingredients together, freeze, and enjoy a fruity treat that’s both healthy and delicious. On a hot day, this dessert is a lifesaver, offering a cool and refreshing finish to any meal. For added variety, you can mix different berries or even incorporate a splash of orange juice for a citrus twist.

Snacks and Appetizers for Any Occasion

Cheesy Garlic Breadsticks

Whether you’re hosting a party or simply craving something savory, these cheesy garlic breadsticks are a must-try. This recipe justalittlebite starts with soft, pillowy breadsticks, brushed generously with garlic butter and topped with a blend of melted cheeses. Mozzarella adds that classic gooey stretch, while Parmesan delivers a sharp, nutty flavor. These breadsticks are perfect as a side dish or a standalone snack. For an extra touch, serve them with a side of marinara sauce for dipping. They’re so easy to make that you’ll wonder why you ever bought store-bought breadsticks!

Classic Deviled Eggs

Deviled eggs are a timeless appetizer, and this recipe justalittlebite makes them both easy and impressive. Start by hard-boiling eggs, then mix the yolks with mayo, mustard, and a pinch of paprika to create a creamy, flavorful filling. Pipe the mixture back into the egg whites for a polished look. You can also get creative by adding bacon bits, chives, or even a dash of hot sauce for a spicy kick. These deviled eggs are ideal for picnics, holiday gatherings, or whenever you need a quick, crowd-pleasing snack.

Homemade Guacamole with a Kic

Guacamole is a crowd favorite, and this recipe justalittlebite brings the perfect balance of creamy and zesty flavors. Start with ripe avocados, mash them with lime juice, and stir in diced tomatoes, onions, and a pinch of salt. The twist? Add a finely chopped jalapeño or a sprinkle of cayenne pepper for a spicy edge. Serve it with tortilla chips, or use it as a topping for tacos or burgers. This guacamole is fresh, flavorful, and takes just minutes to prepare. It’s a versatile dish that never fails to impress.

Crispy Sweet Potato Fries

For a healthier snack option, try this recipe justalittlebite for crispy sweet potato fries. These fries are baked, not fried, but they still deliver that irresistible crunch. The secret is coating them in a light layer of cornstarch before baking, which helps them crisp up beautifully. Season with a mix of salt, paprika, and garlic powder for a bold flavor. Sweet potato fries are perfect on their own, but they’re even better with a dipping sauce—try a spicy aioli or a honey mustard dip for extra flair. They’re great as an appetizer, side dish, or a guilt-free snack.

FAQs

Is it possible to use a different type of pasta for this recipe?

Absolutely! Most pasta types work well with this recipe justalittlebite, so you can easily swap the suggested pasta for your favorite. For example, fettuccine is great for Alfredo sauces, but penne or rigatoni can hold creamy sauces just as effectively. If you’re aiming for a lighter dish, try using angel hair pasta or zucchini noodles. Whole wheat or gluten-free pasta are also excellent alternatives for dietary preferences, allowing you to adapt the recipe to suit your needs without compromising flavor.

What’s the Best Way to Make Alfredo Sauce Without Heavy Cream?

If you don’t have heavy cream on hand, or you prefer a lighter option, you can still make a rich Alfredo sauce. This recipe justalittlebite suggests using whole milk or half-and-half combined with a tablespoon of flour or cornstarch to thicken the sauce. For an extra creamy texture, you could add a dollop of cream cheese. To enhance the flavor, include a generous amount of freshly grated Parmesan cheese and a pinch of nutmeg. This substitution ensures your sauce remains velvety and indulgent without the heaviness of cream.

How Can I Make Chicken Alfredo Ahead of Time?

Preparing Chicken Alfredo in advance is simple with a few adjustments. Cook the pasta and sauce separately, as pasta can absorb too much sauce if stored together. Toss the cooked pasta with a small amount of olive oil to prevent sticking. Store the sauce in an airtight container in the fridge, then reheat gently on the stove, adding a splash of milk to maintain its creaminess. Combine the pasta and sauce just before serving. This method ensures your recipe justalittlebite remains fresh and flavorful even when made ahead.

How Can I Scale This Recipe for Larger Groups?

Scaling this recipe justalittlebite to serve a crowd is easy. Simply double or triple the ingredients while maintaining the same cooking process. To ensure even cooking, use a larger pot or prepare the dish in batches. For Alfredo sauce, cook it in a wide pan to prevent uneven thickening. When serving, consider using a large platter to display the pasta and sauce beautifully. This approach makes it simple to feed a group while keeping the dish as delicious as the original.

Conclusion

From breakfast delights to hearty dinners and indulgent desserts, this journey through recipe justalittlebite proves that cooking can be both easy and enjoyable. Whether you’re whipping up a quick one-pot garlic butter pasta, crafting no-bake Oreo cheesecakes, or preparing a light and refreshing berry sorbet, these recipes offer something for every craving and occasion.

Throughout the article, we’ve explored how to adapt recipes, create lighter versions, and even prepare dishes in advance all while keeping flavor at the forefront. With the versatility of these dishes, you can confidently experiment in the kitchen and make them your own.

Now it’s your turn to bring these ideas to life! Whether you’re cooking for family, entertaining guests, or simply treating yourself, these recipes are guaranteed to impress. Dive into the recipe justalittlebite collection today and transform your meals with ease and creativity.

How To Make Authentic Pollo Loco Recipe: Easy Step-by-Step Guide

Craving something bold, flavorful, and irresistibly juicy? Look no further than this pollo loco recipe! This classic Mexican grilled chicken is famous for its zesty marinade infused with citrus, garlic, and vibrant spices. But here’s the best part you don’t need to visit a restaurant to enjoy it. You can create this mouthwatering dish right in your kitchen with just a few simple ingredients. Whether you’re planning a family dinner, hosting a barbecue, or just spicing up your weekly meal prep, pollo loco is sure to impress. So, grab your apron, fire up the grill, and let’s turn up the heat!

What is Pollo Loco?

The Origins of Pollo Loco

The story of pollo loco begins in Mexico, where this beloved grilled chicken recipe first became a staple of street food and family kitchens alike. Its name, which translates to “crazy chicken,” reflects the bold flavors and vibrant preparation that set it apart from other dishes. Traditionally, the recipe involves marinating chicken in a citrus-based blend, grilling it to perfection, and serving it with simple, flavorful sides. Over time, pollo loco recipe variations have spread across borders, becoming a favorite in many households worldwide. Whether you’ve tried it before or are new to the dish, its rich history adds even more flavor to this already irresistible meal.

What Makes Pollo Loco Special?

What truly makes pollo loco stand out is its marinade. A combination of fresh lime juice, garlic, cumin, and oregano creates a tangy, aromatic base that penetrates deep into the chicken. This marinade not only tenderizes the meat but also infuses it with layers of bold flavors. Moreover, grilling the marinated chicken over high heat creates a smoky char that’s impossible to replicate with other cooking methods. Another unique aspect of the pollo loco recipe is its versatility—you can serve it with rice, beans, or tortillas, making it suitable for both casual meals and festive gatherings. Its balance of simplicity and sophistication is what keeps people coming back for more.

Why is Homemade Pollo Loco Better?

While restaurant versions of pollo loco can be tempting, making it at home has undeniable advantages. First, you have complete control over the ingredients, allowing you to use fresh, high-quality chicken and adjust the spices to suit your taste. Additionally, homemade pollo loco recipes are often healthier, as you can avoid overly processed marinades or preservatives. Furthermore, the joy of grilling chicken in your own backyard (or even on a stovetop grill) adds an element of fun to the cooking process. If you’re looking for a budget-friendly, delicious meal that doesn’t compromise on quality, homemade pollo loco is the way to go.

Common Variations of Pollo Loco

Although the traditional pollo loco recipe remains iconic, many people enjoy experimenting with different variations. For instance, some recipes swap out lime for orange juice, creating a sweeter, citrus-forward flavor profile. Others might use chipotle or ancho chili in the marinade to add a smoky, spicy kick. If grilling isn’t an option, baking or broiling the chicken can still deliver excellent results, though it may lack the signature char. Additionally, vegetarian adaptations using tofu or jackfruit marinated in the same blend are becoming increasingly popular. For more inspiration on making variations of pollo loco, check out this guide to Mexican marinades.

Ingredients for the Perfect Pollo Loco Recipe

Ingredients for pollo loco marinade on a cutting board.
Fresh ingredients for crafting an authentic pollo loco marinade.

Essential Ingredients for Authentic Flavor

Creating the best pollo loco recipe starts with the right ingredients. The key component is, of course, bone-in chicken thighs or drumsticks, as they hold more flavor and stay juicy during grilling. A zesty marinade is essential, combining lime juice, orange juice, garlic, and a touch of olive oil. Additionally, spices like cumin, paprika, oregano, and a pinch of chili powder provide the bold, smoky notes that make pollo loco unique. Don’t forget a little salt and black pepper to bring it all together! By using fresh and vibrant ingredients, you’ll ensure every bite is bursting with authentic flavor.

Substitutions and Adjustments for Dietary Needs

If you have dietary restrictions, you can still enjoy a flavorful pollo loco recipe. For example, if you’re following a low-sodium diet, reduce or omit added salt and let the citrus marinade shine. Similarly, those avoiding oil can substitute olive oil with an equal amount of water or low-fat yogurt for a creamy alternative. For vegetarians, marinated tofu or jackfruit can serve as an excellent substitute for chicken. Remember, the beauty of pollo loco lies in its flexibility—adjust the recipe to suit your needs while keeping the flavors vibrant and delicious.

Where to Buy Authentic Ingredients

For the most authentic pollo loco recipe, sourcing high-quality ingredients is crucial. Look for organic, free-range chicken at your local butcher or supermarket for the best results. When it comes to spices, try to purchase from reputable brands or specialty stores that offer freshly ground seasonings. Citrus fruits like lime and orange are best bought fresh, but bottled juice can work in a pinch if time is tight. For more tips on sourcing authentic Mexican spices, check out this trusted resource on Mexican ingredients.

Prepping Your Ingredients

Proper preparation can make all the difference in achieving restaurant-quality pollo loco. Begin by trimming any excess fat from the chicken pieces and patting them dry with paper towels. This helps the marinade stick better. Next, mix the marinade ingredients in a large bowl or resealable plastic bag, ensuring the chicken is fully coated. Let it sit for at least two hours in the refrigerator or, for best results, overnight. During this time, the acidic lime and orange juice will tenderize the meat while infusing it with incredible flavor. Before cooking, remove the chicken from the fridge and let it come to room temperature for even grilling.

Step-by-Step Instructions to Make Pollo Loco

Preparing the Marinade

The first step in creating an unforgettable pollo loco recipe is preparing the marinade. In a large mixing bowl, combine freshly squeezed lime and orange juice with minced garlic, olive oil, and your chosen spices, such as cumin, paprika, oregano, and chili powder. Whisk the mixture until it’s well blended. This citrus-based marinade is what gives the chicken its signature tangy and smoky flavor. For an extra layer of aroma, you can also add a handful of chopped cilantro. Once your marinade is ready, you’ll immediately notice how the bold scents of lime and garlic bring life to this dish.

Properly Marinating the Chicken

To ensure every bite of your pollo loco bursts with flavor, marinating is crucial. Place the chicken pieces in a large resealable plastic bag or shallow dish, then pour the marinade over them. Turn the chicken several times to coat it evenly. Seal the bag tightly or cover the dish with plastic wrap, then refrigerate for at least two hours. However, letting it sit overnight will amplify the flavors even more. Remember, the citrus juice in the marinade tenderizes the chicken, while the spices seep deep into the meat. Before cooking, remove the chicken from the fridge and allow it to reach room temperature for even cooking.

Grilling Techniques for Smoky Perfection

Pollo loco chicken grilling on an open flame with smoky char.
Master the art of grilling pollo loco chicken with smoky perfection.

Grilling is the heart of any pollo loco recipe. Preheat your grill to medium-high heat and lightly oil the grates to prevent sticking. Place the marinated chicken on the grill, skin-side down, to get that beautiful char. Cook for about 6–8 minutes on each side, flipping only once to lock in the juices. Keep an eye on the chicken, as the marinade’s sugars can caramelize quickly, creating a smoky crust. If you prefer an alternative, you can use a stovetop grill pan, although it may lack the authentic smoky flavor of an outdoor grill.

For more grilling tips, check out our article on Grilled Chicken Thigh Recipes, which shares techniques for achieving tender, juicy results every time.

Alternative Cooking Methods

Don’t have access to a grill? Don’t worry—this pollo loco recipe can be adapted for other cooking methods. For baking, preheat your oven to 400°F (200°C), arrange the chicken on a baking sheet, and cook for 25–30 minutes or until the internal temperature reaches 165°F (74°C). To add a slight char, broil the chicken for an additional 2–3 minutes. If you’re short on time, pan-frying works as well. Heat a tablespoon of oil in a large skillet, then cook the chicken over medium heat for about 5–7 minutes per side. While these methods may differ slightly in taste, they still deliver a juicy and flavorful chicken dish.

Best Side Dishes to Pair with Pollo Loco

Traditional Accompaniments

A classic pollo loco recipe is often paired with traditional Mexican sides that enhance its bold, zesty flavors. Mexican rice is a top choice, as its mild and slightly tangy tomato base complements the citrusy marinade of the chicken. Refried beans or black beans are also excellent options, adding creaminess and depth to the meal. Don’t forget freshly made tortillas, which can be used to wrap the juicy grilled chicken and create a taco-like experience. These staples ensure your meal is well-rounded and authentically inspired.

Creative Serving Ideas

While the traditional route is always satisfying, why not think outside the box? For a fresh twist, serve your pollo loco recipe over a crisp salad with avocado slices, cherry tomatoes, and a drizzle of cilantro-lime dressing. Alternatively, you could shred the chicken and use it as a filling for burritos or quesadillas. For a lighter option, try pairing it with roasted vegetables such as zucchini and bell peppers, which bring out the smoky flavors of the chicken. These creative pairings allow you to enjoy pollo loco in a variety of delicious ways.

Drinks That Complement Pollo Loco

Choosing the right drink can elevate your dining experience when enjoying a pollo loco recipe. Traditional beverages like horchata, tamarind agua fresca, or even a simple lime soda bring a refreshing balance to the chicken’s rich flavors. If you’re hosting a festive dinner, a classic margarita or a cold Mexican lager pairs wonderfully with the smoky, citrusy chicken. On the other hand, a tall glass of iced tea with a hint of lemon can provide a non-alcoholic yet flavorful option. The right drink doesn’t just quench your thirst—it completes the meal.

How to Store and Reheat Leftovers

If you have leftover pollo loco, you’re in luck—it stores and reheats beautifully. Place the chicken in an airtight container and refrigerate for up to three days. For longer storage, you can freeze it for up to three months. To reheat, use an oven preheated to 350°F (175°C) to warm the chicken slowly, which helps retain its juiciness. If you’re in a hurry, a microwave works, but consider adding a splash of water or broth to keep the meat moist. Leftovers can also be repurposed into tacos, wraps, or salads, making this pollo loco recipe as versatile as it is tasty.

Tips for Perfecting Your Pollo Loco Recipe

Common Mistakes to Avoid

Even the best cooks can stumble when making a pollo loco recipe. One common mistake is over-marinating the chicken. While it might seem like a good idea to leave it soaking for more than 24 hours, the citrus juices can break down the meat too much, resulting in a mushy texture. Another pitfall is cooking the chicken on high heat the entire time. This can lead to burning the marinade’s sugars before the meat is fully cooked. To avoid this, start with medium-high heat to achieve a smoky char, then lower the heat to finish cooking evenly. Finally, skipping the step of letting the chicken rest after grilling can cause the juices to escape, leaving it dry. Taking just five minutes to rest ensures every bite is juicy and tender.

Expert Grilling Tips

Grilling is the heart of any pollo loco recipe, and a few expert techniques can make a big difference. First, always preheat your grill to medium-high and oil the grates to prevent sticking. When placing the chicken on the grill, start with the skin-side down to lock in moisture and develop a flavorful crust. Flipping the chicken only once ensures that it cooks evenly without falling apart. Another tip is to use a meat thermometer to check the internal temperature—it should reach 165°F (74°C) for perfectly cooked chicken. Lastly, basting the chicken with extra marinade during the first few minutes of grilling enhances the smoky flavor without overcooking it.

How to Customize the Recipe for Your Taste

One of the best things about a pollo loco recipe is how easy it is to customize. If you prefer a spicier kick, add chipotle peppers or cayenne to the marinade. For a sweeter touch, include a tablespoon of honey or brown sugar. You can also experiment with different herbs, such as thyme or rosemary, for a unique twist. If you’re cooking for kids, you might want to tone down the chili powder while keeping the bright citrus notes intact. The versatility of this dish makes it perfect for adapting to your family’s preferences.

Tools and Equipment for the Best Results

To master a pollo loco recipe, the right tools can make all the difference. A charcoal grill is ideal for achieving that authentic smoky flavor, but a gas grill or stovetop grill pan works well too. A pair of long-handled tongs will make flipping the chicken easier while keeping your hands safe from the heat. Additionally, a meat thermometer is a must-have to ensure the chicken is cooked through without drying out. If you plan to bake or broil the chicken instead of grilling, a sturdy baking sheet and oven-safe rack will help achieve even cooking. These tools not only simplify the process but also guarantee professional-level results.

Frequently Asked Questions (FAQs)

What are the ingredients of El Pollo Loco?

El Pollo Loco’s signature chicken is marinated using a combination of fresh citrus juices, garlic, salt, black pepper, oregano, and spices like paprika and cumin. This blend gives the chicken its distinct tangy and smoky flavor. While the exact recipe remains a closely guarded secret, many pollo loco recipe variations replicate these flavors by combining lime juice, orange juice, and a touch of chili powder. The simplicity of these fresh ingredients is what makes the dish so delicious and authentic.

What makes El Pollo Loco chicken so good?

The secret behind El Pollo Loco chicken lies in its marinade and cooking process. The citrus-based marinade tenderizes the meat while infusing it with zesty flavors. In addition, the grilling method used gives the chicken a smoky, charred exterior while keeping the inside juicy and flavorful. Recreating a pollo loco recipe at home captures much of this magic, especially if you use a charcoal grill and high-quality ingredients.

What cooking oil does El Pollo Loco use?

El Pollo Loco typically uses canola or vegetable oil for cooking, particularly for greasing grill grates and preparing side dishes. When making your own pollo loco recipe, you can use olive oil as part of the marinade to enhance the flavor and ensure the chicken doesn’t stick during grilling. Olive oil also adds a rich, smooth texture to the marinade, making it a versatile choice for home cooks.

Is Pollo Loco a California thing?

While El Pollo Loco originated in Mexico, it gained significant fame after expanding into California in the 1980s. Its fresh, bold flavors and authentic preparation resonated with the state’s love for Mexican cuisine. Today, pollo loco recipes are enjoyed across the United States, but its popularity in California remains unmatched, with many considering it a local favorite.

Conclusion

Mastering the art of making a delicious pollo loco recipe at home is not only achievable but also incredibly rewarding. By using fresh ingredients, a zesty citrus marinade, and a smoky grilling technique, you can recreate the bold, authentic flavors that make this dish a household favorite. Throughout this guide, you’ve learned the origins of pollo loco, essential ingredients, step-by-step cooking instructions, and creative serving ideas. You’ve also explored tips for avoiding common mistakes and customizing the recipe to suit your taste.